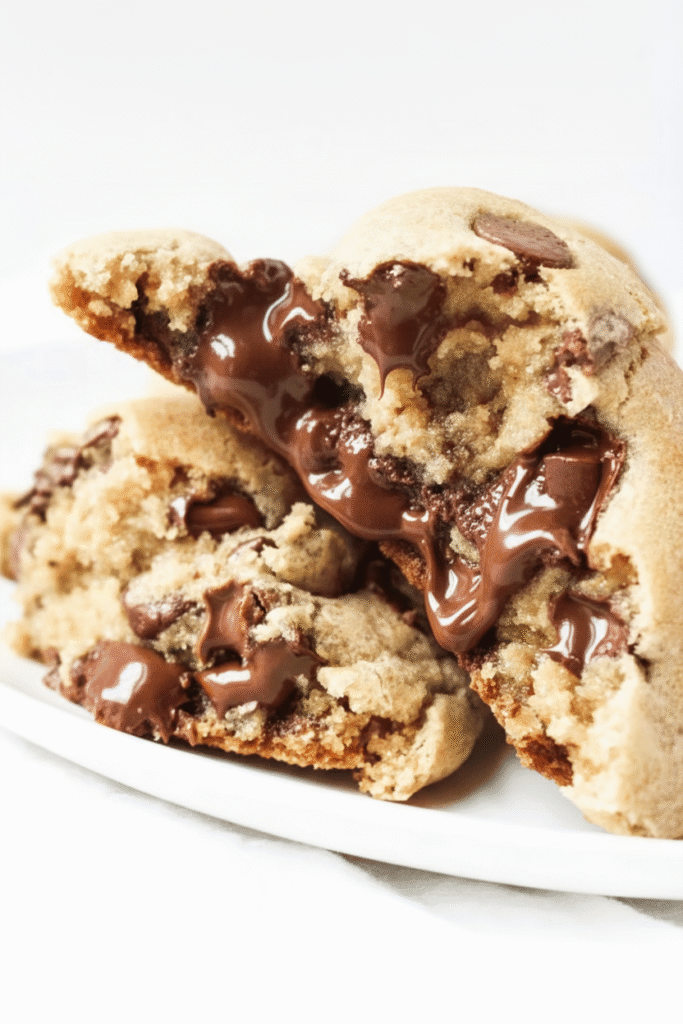
Let’s talk about the perfect chocolate chip cookie. For me, it isn’t flat, crispy, or delicate. My ultimate cookie is a glorious, giant, thick chocolate chip cookie. The kind you see in fancy bakery windows—impossibly tall, with a slightly crinkly top, crisp golden edges, and a gooey, molten center that’s absolutely packed with chocolate.
For years, that bakery-style cookie felt like an impossible dream. My homemade versions would spread into thin, sad pancakes in the oven. But I was determined. I embarked on a mission, testing this recipe over nine times, tweaking one variable at a time. I played with butter temperatures, sugar ratios, and leavening agents until I finally cracked the code.
This recipe isn’t just a list of ingredients; it’s the culmination of that obsessive quest. It’s the no-chill, no-fuss method to create the thickest, chewiest, most satisfying chocolate chip cookies you’ve ever made in your own kitchen.
Why This is the Only Thick Cookie Recipe You’ll Ever Need
- Truly Thick & Chewy: No more flat cookies! These stay beautifully tall and thick with an incredible chewy, soft-baked texture.
- Bakery-Style Results: We’re making six giant, 6-ounce cookies that look and taste like they came from a high-end bakeshop.
- No-Chill Dough: I specifically designed this recipe so you don’t have to wait. You can go from craving to cookie in under 30 minutes.
- Flavor-Packed: The higher ratio of brown sugar gives these cookies a rich, caramel-like depth that perfectly complements the heaps of chocolate.
- Tested to Perfection: As I said, I made these over and over to ensure the process is simple and the results are consistently amazing every single time.
The Science Behind Perfectly Thick Cookies
The secret to preventing spread and achieving that amazing height isn’t one single thing, but a combination of four key scientific principles. Understanding the “why” will make you a better baker!
1. Cold Butter is Non-Negotiable
This is the number one rule. Most cookie recipes call for softened or room temperature butter. For thick cookies, we do the opposite. We use butter cold, straight from the fridge, and cubed.
- Why it Works: Cold butter takes longer to melt in the oven. While it’s slowly melting, the cookie’s structure (the flour, eggs, and sugar) has time to “set” and bake. By the time the butter melts completely, the cookie is already tall and won’t spread out. Softened butter melts instantly, causing immediate spread.
2. The Magic of Cornstarch
You’ll notice cornstarch in the dry ingredients, and it’s our secret weapon for texture.
- Why it Works: Cornstarch is a pure starch that helps control spread and, more importantly, creates an incredibly tender interior. It interferes with gluten formation just enough to give the center of the cookie that signature soft, almost melt-in-your-mouth quality, while the edges get perfectly chewy.
3. Brown Sugar Dominance
This recipe uses double the amount of brown sugar to granulated sugar. This isn’t just for flavor.
- Why it Works: Light brown sugar is acidic and contains more moisture than white sugar. The acidity reacts with the baking soda to give the cookies a lift, helping them rise up instead of spreading out. The extra moisture contributes to that wonderfully chewy texture we’re aiming for.
4. A Hot and Fast Bake
We bake these cookies at a higher temperature than average: 400°F (200°C).
- Why it Works: The high heat helps the outside of the cookie set very quickly. This rapid setting of the edges creates a “wall” that contains the dough, forcing it to bake upwards and keeping it thick. A lower temperature would lead to a slower, more relaxed spread.
Ingredient Breakdown
Getting the best results starts with the right ingredients. Here’s what you’ll need and why:
- Salted Butter: I developed this recipe with salted butter. It adds a crucial layer of flavor that balances the sweetness. If you only have unsalted, add an extra 1/4 teaspoon of fine sea salt. Make sure it’s cold and cubed.
- Sugars: A mix of light brown sugar and granulated sugar provides the perfect balance of chewiness, moisture, and crisp edges.
- Egg + Egg Yolk: Using one whole egg and one extra yolk adds richness and fat from the yolk, which contributes to a tender, chewy texture.
- Vanilla Extract: Use pure vanilla extract for the best, most authentic flavor.
- All-Purpose Flour: Standard all-purpose flour provides the structure. Be sure to measure it correctly—I highly recommend a kitchen scale for accuracy.
- Baking Soda: This is our primary leavening agent, reacting with the brown sugar to lift the cookies.
- Corn Starch: Our secret ingredient for tenderness!
- Salt: Balances all the sweetness and brings out the chocolate and butter flavors.
- Chocolate Chips & Chunks: I love using a mix! Semi-sweet or dark chocolate chips provide a classic flavor, while larger chunks create those irresistible molten pools of chocolate. Use your favorite combination.
Step-by-Step Guide to Giant Chocolate Chip Cookies
Let’s walk through the process together. It’s easier than you think!
Step 1: Prep and Mix Dry Ingredients
First, preheat your oven to 400°F and line a baking sheet with parchment paper. In a medium bowl, whisk together your flour, cornstarch, baking soda, and salt. This ensures everything is evenly distributed.
Step 2: Cream the Cold Butter and Sugars
In the bowl of a stand mixer with the paddle attachment, beat the cold, cubed butter on high for about a minute. It will break down and look a bit shaggy. Scrape the bowl, then add both the brown and granulated sugars. Mix on medium speed until it’s combined and looks fluffy.
Step 3: Add Wet Ingredients
Add the egg, egg yolk, and vanilla extract. Mix on low speed just until combined. Overmixing at this stage can lead to tough cookies, so stop as soon as the yellow streaks disappear.
Step 4: Combine Wet and Dry
With the mixer on its absolute lowest speed, add the flour mixture in a few increments. Mix only until the last bit of flour is incorporated. A few small streaks are okay!
Step 5: Fold in the Chocolate
Add your chocolate chips and chunks. Pulse the mixer just 2-3 times to distribute them. You don’t want to overwork the dough.
Step 6: Portion and Bake
This is the fun part! Use a kitchen scale to portion the dough into 160-gram (6 oz) balls. Roll them into a slightly tall ball shape and place them on your prepared baking sheet, leaving plenty of room between them. For that bakery-perfect look, press a few extra chocolate chunks on top. Bake for 10-12 minutes. The tops will be a pale golden brown and the centers will look soft.
Step 7: The Crucial Rest
This step is MANDATORY! Let the cookies cool on the hot baking sheet for at least 10-15 minutes. This allows the gooey centers to finish baking from the residual heat and set up properly. If you try to move them too soon, they will fall apart. After resting, transfer them to a wire rack to cool completely.
Sofie’s Pro-Tips for Cookie Perfection
- Use a Kitchen Scale: For baking, accuracy is everything. A scale ensures your flour measurement is perfect, which is the #1 factor in cookie success.
- Don’t Overmix: I’ve said it a few times, but it’s the most important tip. Overmixing develops gluten, which makes cookies tough instead of tender.
- Shape Dough Balls Tall: Instead of a perfect sphere, roll your dough into a ball that’s slightly taller than it is wide. This gives the cookie a head start in staying thick as it bakes.
- The Pan-Banging Trick (Optional): For those signature bakery ripples, you can carefully lift the baking sheet a few inches and drop it flat on the counter once or twice right after it comes out of the oven. This slightly deflates the center and creates crinkly edges.
More Cookie Adventures Await
If you’ve fallen in love with creating spectacular cookies, you’re in the right place! My baking passion has led me to perfect all kinds of incredible cookie recipes. Once you’ve mastered these thick and chewy classics, you have to try some of my other favorites:
- Stuffed Red Velvet Cookies: A decadent, cream-cheese-stuffed treat that’s perfect for holidays.
- Pistachio NYC Cookies: Another giant, bakery-style cookie with a sophisticated nutty flavor.
- Creme Egg Stuffed Cookies: The ultimate Easter indulgence with a gooey fondant center.
- Peanut Butter Nutella Cookies: A truly irresistible combination for any peanut butter and chocolate lover.
- White Chocolate Stuffed Cookies: A sweet and gooey surprise inside a classic cookie.
Storing and Freezing Your Masterpieces
To Store: Keep the cooled cookies in an airtight container at room temperature. They’ll stay fresh for up to 5 days. Pro-tip: adding a slice of sandwich bread to the container will keep them incredibly soft.
To Freeze: You can freeze the baked cookies or the raw dough balls.
- Baked Cookies: Place in a freezer-safe bag or container for up to 3 months. Thaw at room temperature.
- Dough Balls: Place the portioned dough balls on a baking sheet and freeze until solid. Then, transfer them to a freezer bag. You can bake them straight from frozen; just add 2-3 minutes to the baking time.
Frequently Asked Questions (FAQ)
Why use cold butter for these thick cookies?
Using cold, cubed butter is the secret to a thick, non-spreading cookie. Unlike softened butter which creates a flatter, crispier cookie, cold butter melts more slowly in the hot oven. This slower melt means the cookie structure has time to set before the butter fully liquifies, resulting in a much thicker, taller cookie.
Can I chill the cookie dough?
While this recipe is designed as a no-chill recipe for convenience, chilling the dough for at least 30 minutes (or up to 72 hours) can enhance the flavor. Chilling allows the flour to hydrate fully, resulting in a deeper, more complex caramel and vanilla flavor profile. If you do chill the dough, you may need to add an extra 1-2 minutes to the baking time.
How do I store these giant chocolate chip cookies?
Store the cooled cookies in an airtight container at room temperature for up to 5 days. To keep them extra soft, you can add a slice of bread to the container; the cookies will absorb moisture from the bread. For longer storage, you can freeze the baked cookies or the raw dough balls.
What’s the purpose of cornstarch in cookies?
Cornstarch is a key ingredient for achieving a supremely tender and soft interior. It’s a pure starch that, when added to flour, inhibits some gluten formation. This results in a cookie that is less tough and has a wonderfully soft, almost melt-in-your-mouth texture in the center.
Go ahead, bake a batch of these incredible cookies. I promise, after one bite of that thick, chewy, chocolate-packed goodness, you’ll never go back to flat cookies again


