There’s something undeniably magical about a cookie that brings a smile to everyone’s face, and in my kitchen, these Strawberry Kiss Cookies have achieved legendary status. After countless batches (I’m talking 9+ times to get it just right!), my family and friends consistently rave about these buttery, melt-in-your-mouth strawberry delights, each hiding a delightful chocolate kiss surprise.
These aren’t just any cookies; they’re a symphony of sweet strawberry flavor, a tender, crumbly texture, and that iconic chocolate kiss that melts ever so slightly, creating a perfect balance. They’re visually stunning with their cheerful pink hue, making them a fantastic addition to any celebration, a thoughtful homemade gift, or simply a cozy comfort-food treat on a quiet afternoon. If you’re looking for an easy, yet impressive, cookie recipe that’s guaranteed to be a hit, you’ve found your new favorite!
Why You’ll Fall in Love with These Strawberry Kiss Cookies
What makes these Strawberry Kiss Cookies so special? Let me count the ways!
- Irresistible Flavor Combination: The sweet, fruity notes of strawberry perfectly complement the classic richness of a chocolate kiss. It’s a match made in dessert heaven.
- Melt-in-Your-Mouth Texture: Thanks to a generous amount of butter and a clever ingredient, these cookies boast a tender, crumbly texture that truly melts as soon as it hits your tongue.
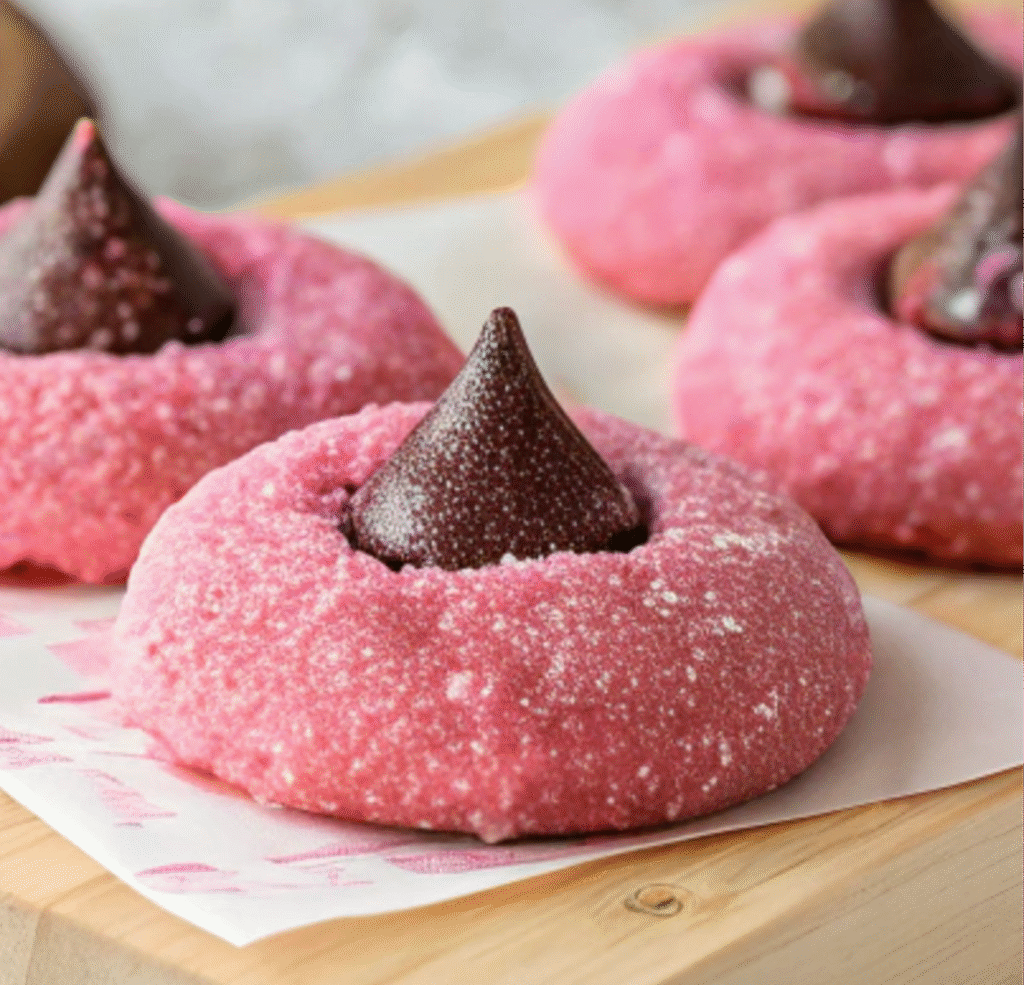
- Visually Stunning: Their vibrant pink color makes them a showstopper on any dessert platter. They’re perfect for Valentine’s Day, Mother’s Day, baby showers, or simply to brighten up your day.
- Surprisingly Simple to Make: Despite their elegant appearance, this recipe uses straightforward techniques and readily available ingredients. Even beginner bakers can achieve beautiful results.
- Sophie’s Tested & Perfected Recipe: As your trusted recipe developer, I’ve refined this recipe over nine batches to ensure every step leads to cookie perfection. You’re getting a thoroughly vetted, foolproof method straight from my kitchen to yours.
- A Touch of Nostalgia: Kiss cookies always bring back fond memories, and this strawberry twist adds a fresh, exciting dimension to a beloved classic.
Sophie’s Secret to Perfectly Pink, Buttery Strawberry Kiss Cookies
When I set out to create the ultimate Strawberry Kiss Cookie, I knew it had to be more than just pretty. It needed depth of flavor, a truly perfect texture, and foolproof instructions. Here are some of the key lessons I learned during my many rounds of testing that will guarantee your success:
- Don’t Skimp on the Chill Time (It’s Non-Negotiable!): This is perhaps the most crucial step. Chilling the dough for at least an hour (or even better, overnight!) solidifies the butter, which prevents the cookies from spreading excessively in the oven. It also allows the flavors to meld, resulting in a richer, more complex cookie. Patience here truly pays off with thicker, chewier, and beautifully shaped cookies.
- Room Temperature Ingredients are Your Best Friends: Softened butter creams beautifully with sugar, incorporating air that creates a light, fluffy dough. A room-temperature egg emulsifies better with the fats, resulting in a smoother, more uniform dough texture. Plan ahead and take them out of the fridge an hour or two before you start.
- The Magic of Strawberry Gelatin: This isn’t just for jiggling! Strawberry-flavored gelatin mix is the secret weapon here. It infuses the dough with an intense, authentic strawberry flavor and delivers that gorgeous, natural-looking pink hue without needing artificial food coloring (though you can always add a drop or two for an extra pop!).
- Timing is Everything for the Chocolate Kiss: Resist the urge to press the chocolate kisses into the dough before baking. This can cause the cookies to spread oddly. Instead, add them a minute or two after the cookies come out of the oven, while they are still warm and pliable. The residual heat helps the chocolate adhere and gently soften, but not completely melt, keeping their iconic shape.
- Mastering the Powdered Sugar Dusting: For that picture-perfect finish without messy chocolate, dust the fully cooled cookies with powdered sugar before you press in the chocolate kisses. This ensures a clean, elegant look. If you press the kisses in first, you’ll end up with a dusting of sugar all over your chocolate, which isn’t ideal.
With these insider tips, you’re not just following a recipe; you’re baking with the expertise of someone who’s refined every detail for your absolute best cookie experience.
Gather Your Ingredients: What You’ll Need
One of the beauties of these Strawberry Kiss Cookies is that they rely on readily available pantry staples, with one fun exception!
- Unsalted Butter (1 cup / 226g), softened: Always opt for unsalted so you can control the salt content. Make sure it’s properly softened (indent when pressed, but not greasy or melted) for the best creaming results.
- Granulated Sugar (1 cup / 200g): Provides sweetness and contributes to the cookie’s tender texture.
- Large Egg (1), at room temperature: Helps bind the ingredients and adds richness.
- Vanilla Extract (1 tsp): A foundational flavor enhancer in almost any cookie.
- Almond Extract (1/2 tsp, optional): This is my secret weapon! A touch of almond extract truly elevates the strawberry flavor, adding a subtle, sophisticated depth. If you’re not an almond fan, feel free to omit it, but I highly recommend trying it.
- All-Purpose Flour (2 cups + 2 tbsp / 280g): The structure of our cookies. Make sure to measure correctly by spooning the flour into your measuring cup and leveling it off with a straight edge. Packing it can lead to dry, dense cookies.
- Baking Powder (1 tsp): Our leavening agent, giving the cookies a slight lift.
- Salt (1/4 tsp): Balances the sweetness and enhances all the other flavors.
- Strawberry-Flavored Gelatin Mix (1 package, 3 oz): This is the star ingredient! It’s responsible for the vibrant color and intense strawberry flavor. I typically use Jell-O brand.
- Powdered Sugar (1/4 cup), for dusting: For that lovely, soft finish.
- Chocolate Kiss Candies (24-30), unwrapped: The iconic center! Hershey’s Kisses are the classic choice, but feel free to experiment with other brands or types if you prefer. Unwrapping them beforehand saves a lot of time and hassle when the cookies are hot.
Step-by-Step Guide to Baking Strawberry Kiss Cookies
Ready to transform these simple ingredients into bakery-worthy cookies? Follow these detailed steps for guaranteed success.
1. Prepare the Dough
In a large mixing bowl, using an electric mixer, beat the softened butter and granulated sugar together until the mixture is light, fluffy, and pale in color, about 2-3 minutes. Scrape down the sides of the bowl as needed.
Add the large egg, vanilla extract, and almond extract (if using) to the butter mixture. Beat until all ingredients are well combined, ensuring no streaks of egg remain.
Now for the star flavor! Mix in the entire package of strawberry-flavored gelatin powder until it is fully incorporated into the wet ingredients. The dough should take on a lovely uniform pink color.
In a separate medium-sized bowl, whisk together the all-purpose flour, baking powder, and salt. This ensures these dry ingredients are evenly distributed throughout the cookies.
Gradually add the dry ingredients to the wet mixture, mixing on low speed until a soft, pink dough just forms. Be careful not to overmix, as this can lead to tough cookies. If your dough feels a little too soft or sticky (this can happen due to humidity or slight variations in butter), add 1-2 extra tablespoons of flour, mixing until just combined.
2. Shape & Chill the Cookies
Scoop out approximately 1 tablespoon of dough for each cookie. Roll each portion between your palms to form a smooth, uniform ball. This helps ensure even baking.
Place the dough balls onto a baking sheet lined with parchment paper. Leave a little space between them, as you’ll be chilling them.
Crucial Step: Transfer the entire baking sheet with the dough balls into the refrigerator. Chill for at least 1 hour. For the very best results – meaning thicker cookies with minimal spreading and enhanced flavor – I highly recommend chilling them overnight. Do not skip this step!
3. Bake
Preheat your oven to 350°F (175°C). While the oven preheats, arrange your chilled dough balls on a parchment-lined baking sheet, spacing them about 2 inches apart to allow for slight spreading.
Important Note: Do NOT press an indentation into the dough before baking. This is a common mistake that can cause the cookies to spread excessively and become flat. The chocolate kiss will be added after baking.
Bake for 11-13 minutes. You’re looking for the edges to look set and slightly firm. The centers of the cookies may still appear soft, but they will continue to firm up as they cool on the baking sheet. Overbaking will result in dry cookies.
4. Add the Chocolate Kisses
Once baked, remove the cookies from the oven. Let them rest on the hot baking sheet for exactly 2 minutes. This brief resting period allows them to set slightly before handling.
While the cookies are still warm, gently press one unwrapped chocolate kiss into the center of each cookie. The residual heat from the cookie will help the chocolate adhere and soften just enough without completely melting and losing its iconic shape.
5. Cool Completely
Carefully transfer the cookies from the baking sheet to a wire rack. Allow them to cool completely. This step is essential for the chocolate to fully set and for the cookies to achieve their final texture.
6. Dust with Powdered Sugar
Once completely cooled, and to avoid getting powdered sugar on the chocolate (which can dull its shine), dust the cookies generously with powdered sugar. You can use a small sieve or a fine-mesh strainer for an even coating. Your beautiful Strawberry Kiss Cookies are now ready to be enjoyed!
Expert Tips & Troubleshooting for Your Best Batch
Even with a thoroughly tested recipe, little tweaks and awareness can elevate your baking game. Here’s how to ensure your Strawberry Kiss Cookies are nothing short of perfect:
- For Thicker, Chewier Cookies: If you love a substantial, chewy cookie, extend the chill time! Chilling the dough overnight instead of just 1 hour makes a noticeable difference in thickness and texture.
- Preventing Spreading (Again!): This is the most common cookie complaint. Beyond adequate chilling, ensure your butter isn’t too soft (it should still hold its shape but be pliable), and measure your flour accurately using the spoon-and-level method. An oven thermometer can also help verify your oven’s temperature, as an oven running too hot or too cool can affect spreading. If spreading is still an issue, try baking at 325°F (160°C) for 1-2 extra minutes.
- Achieving a Brighter Pink Color: The gelatin mix provides a lovely natural pink, but if you desire a more vibrant, eye-popping hue (perfect for themed parties!), add a drop or two of red or pink gel food coloring to the dough along with the gelatin mix.
- If Cookies Come Out Too Flat: Don’t despair! While the cookies are still warm on the baking sheet (before you move them to the wire rack), gently push the edges inward with the back of a spoon to reshape them into a more rounded, compact form. They’ll firm up as they cool.
- Storage Savvy: Store your cooled Strawberry Kiss Cookies in an airtight container at room temperature for up to 3-5 days. For optimal freshness, place a slice of bread in the container to help keep them soft.
- Make-Ahead Dough: The dough freezes beautifully! Roll the dough into balls, place them on a parchment-lined baking sheet, and freeze until solid. Once frozen, transfer them to a freezer-safe bag or container for up to 3 months. When ready to bake, you can bake them directly from frozen, adding 2-4 minutes to the baking time.
- Creative Variations:
- Flavor Swaps: While strawberry is delightful, consider trying other gelatin flavors! Raspberry, cherry, or even lemon gelatin could create entirely new (and equally delicious) kiss cookie experiences.
- Chocolate Choices: Instead of classic milk chocolate kisses, try white chocolate kisses (Hershey’s Hugs are fantastic!), dark chocolate kisses, or even caramel-filled kisses for an extra layer of flavor.
- Festive Flair: Add a sprinkle of colored nonpareils or sanding sugar to the dough balls before baking for an extra festive touch, perfect for holidays or birthdays.
- Double Chocolate Dream: Drizzle cooled cookies with melted white chocolate or dark chocolate for an elegant finish.
- Looking for more decadent cookies? Don’t miss our indulgent Stuffed Red Velvet Cookies Recipe.
- If you love a substantial cookie, our Pistachio NYC Cookies Recipe offers a gourmet experience.
- For another fun stuffed cookie idea, check out our seasonal Creme Egg Stuffed Cookies Recipe.
- Craving a classic combination? You’ll love our Peanut Butter Nutella Cookie Recipe.
- And for another delightful chocolate-filled treat, our White Chocolate Stuffed Cookies are a must-try!
Strawberry Kiss Cookies Recipe Card
(The full, printable recipe card with all ingredients, instructions, and nutrition information would typically appear here on the blog post.)
Serving Suggestions: Enjoying Your Sweet Creations
These Strawberry Kiss Cookies are incredibly versatile and perfect for a variety of occasions:
- With a Glass of Milk: The ultimate classic pairing.
- Coffee or Tea Time: A delightful companion for your morning or afternoon brew.
- Dessert Platter: Their vibrant color and unique shape make them a standout on any spread, especially alongside other cookies or small treats.
- Homemade Gift: Package them in a pretty box or bag with a ribbon for a thoughtful, handmade present that everyone will appreciate.
- Party Favorite: A guaranteed crowd-pleaser at potlucks, birthdays, or family gatherings. They serve about 10-12 people generously (2 cookies per person) or up to 24 for smaller individual treats.
- Just Because: Sometimes, the best reason to enjoy a delicious cookie is simply because you want one!
FAQs About Strawberry Kiss Cookies
Here are some common questions I hear about these delightful cookies:
Why are my Strawberry Kiss Cookies spreading too much?
Spreading is often due to insufficient chilling, butter that’s too soft, or too much flour. Ensure your dough chills for at least 1 hour, or even overnight for best results. Also, spoon and level your flour to avoid accidentally adding too much. An oven that isn’t at the correct temperature can also contribute to spreading.
Can I use fresh strawberries or strawberry extract instead of gelatin mix?
While fresh strawberries would add too much moisture and alter the dough’s consistency, and extract might not give the vibrant color or distinct flavor, using a strawberry-flavored gelatin mix is key for the unique taste and perfect pink hue of these cookies. The gelatin also contributes to the tender, melt-in-your-mouth texture.
How long do Strawberry Kiss Cookies last and how should I store them?
Store these cookies in an airtight container at room temperature for up to 3-5 days. For longer storage, you can freeze the baked cookies (without powdered sugar) for up to 3 months, or freeze the unbaked dough balls and bake them from frozen (adding a few extra minutes to the baking time).
Can I make the dough ahead of time?
Absolutely! The dough can be prepared and chilled in the refrigerator for up to 2-3 days, or frozen for up to 3 months. In fact, chilling the dough overnight often results in thicker, chewier cookies with even more developed flavor, so it’s a recommended practice if you have the time!
What if I don’t have almond extract?
You can certainly make these cookies without almond extract! The vanilla and strawberry gelatin will still provide wonderful flavor. However, the almond extract truly enhances the strawberry, adding a subtle depth that makes these cookies extra special. If you’re hesitant, try it once; you might just love it!
Get Baking and Spread the Sweetness!
There you have it – the ultimate guide to creating melt-in-your-mouth Strawberry Kiss Cookies right in your own kitchen. This recipe, honed through many joyful hours of baking by me, Sophie, is designed to bring you success and, more importantly, delicious moments with your loved ones. The blend of sweet strawberry, tender cookie, and a hidden chocolate treasure is truly irresistible.
Whether you’re baking for a special occasion, sharing a homemade gift, or simply indulging in a comfort food classic, these cookies are guaranteed to impress. So go ahead, preheat that oven, embrace the delightful process, and prepare to be showered with compliments.
I’d love to hear about your experience! Did you try a fun variation? Do you have any favorite cookie-baking tips? Share your thoughts and photos in the comments below! Happy baking!


