I’ll never forget the first time I attempted to make salted caramel from scratch. The sugar seized up into a crystallized mess, smoke filled my kitchen, and I nearly gave up on the whole idea. But after testing this salted caramel mocha cake recipe over nine times, I’ve finally cracked the code to creating the most decadent, foolproof coffee-infused dessert that’s become my go-to for every family gathering.
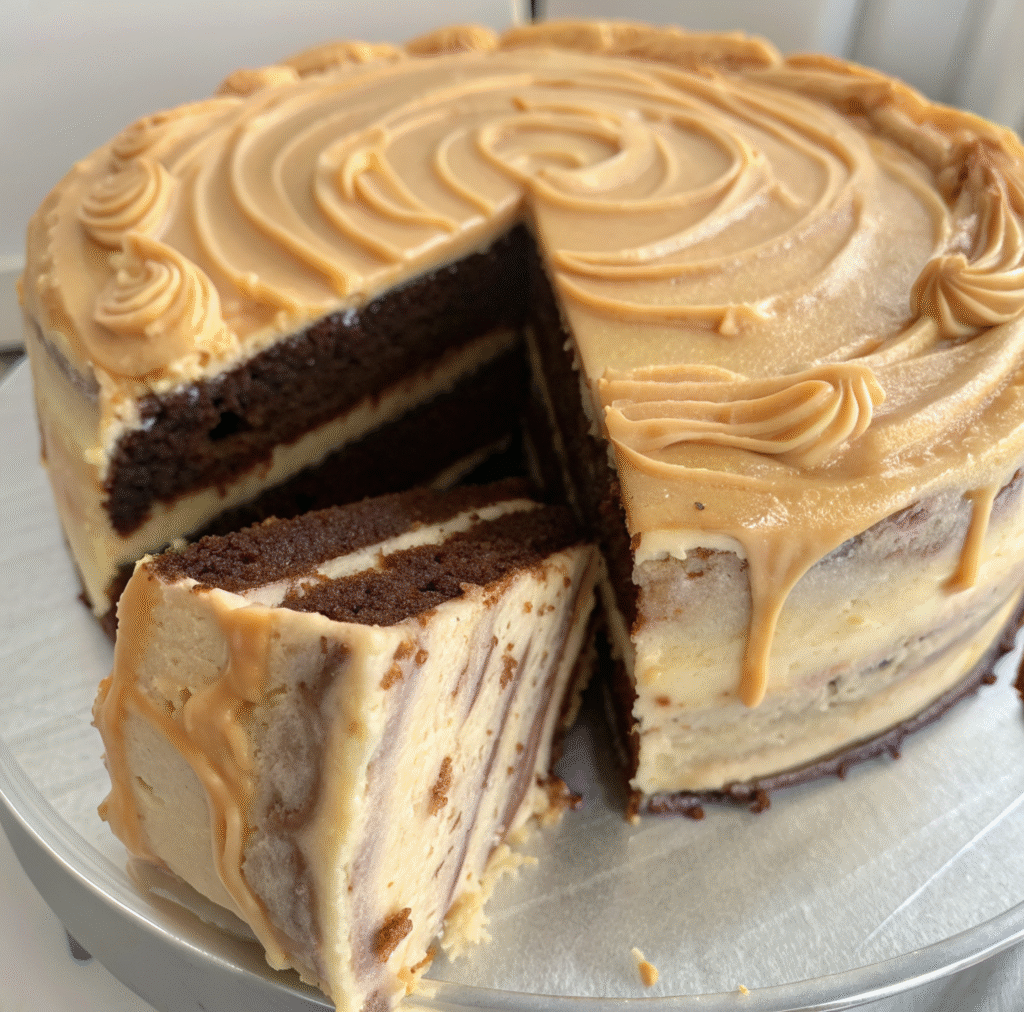
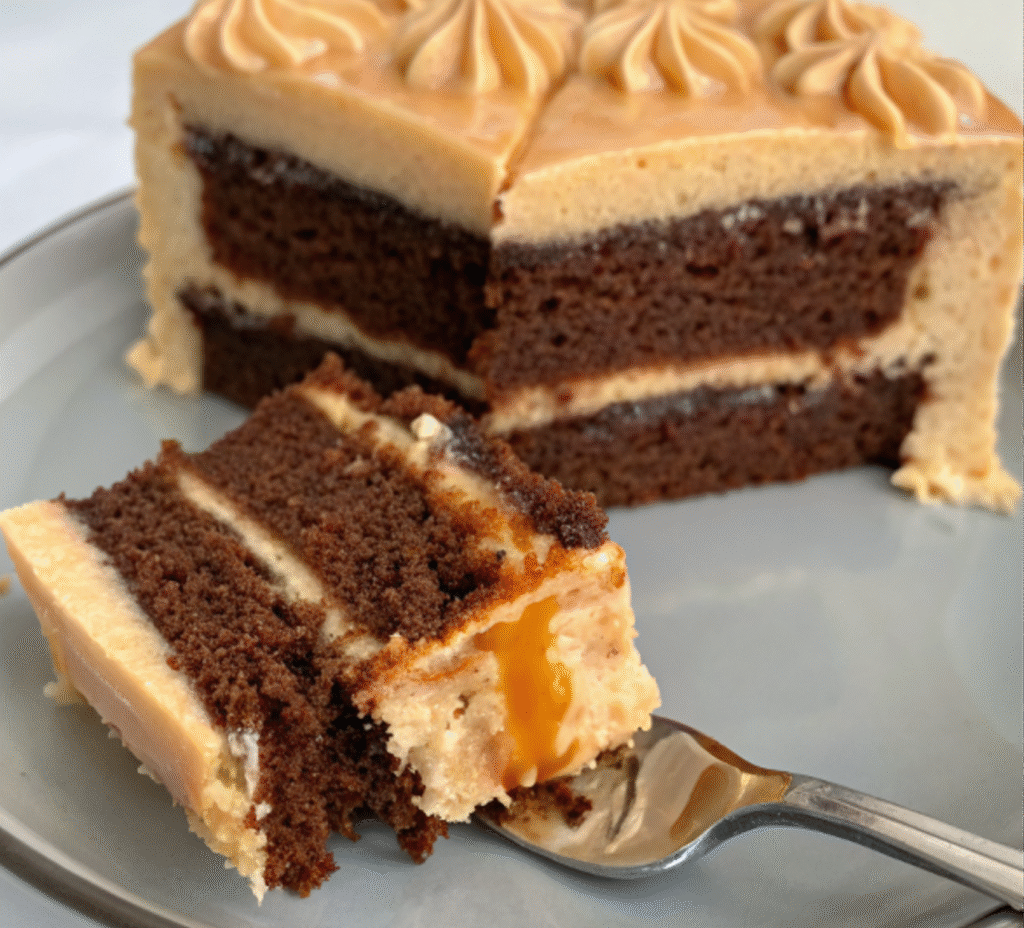
This isn’t just another chocolate cake recipe. It’s a show-stopping three-layer masterpiece that combines rich mocha flavor, silky homemade salted caramel, and an espresso-soaked crumb that stays incredibly moist for days. Whether you’re hosting a dinner party or just craving something special for your weekend baking project, this cake delivers bakery-quality results right from your home kitchen.
Why This Salted Caramel Mocha Cake Recipe Works
After countless batches and plenty of trial and error, I’ve discovered exactly what makes this cake exceptional. The secret lies in the combination of Dutch process cocoa powder and espresso powder, which creates a deep, complex chocolate flavor without any bitterness. The espresso soak is a game-changer that most home bakers skip, but it’s what keeps your cake moist even after several days in the fridge.
The homemade salted caramel component might seem intimidating, but I promise it’s easier than you think. I use a specific method that prevents crystallization, which was my biggest struggle initially. Room temperature ingredients are absolutely crucial here, and I learned this the hard way when my first batch separated into a grainy disaster.
What really sets this recipe apart is the layered approach to flavor. You’re not just making a chocolate cake with caramel on top. The mocha cake layers get brushed with espresso soak, filled with salted caramel buttercream, and then drizzled with extra caramel that swirls beautifully into the frosting. It’s a coffee shop-inspired dessert that actually tastes better than anything you’d pay $8 a slice for.
The Story Behind My Salted Caramel Mocha Obsession
My love affair with mocha desserts started during college when I worked at a small bakery in my hometown. The pastry chef there taught me that coffee doesn’t just add coffee flavor to baked goods; it actually enhances and deepens chocolate flavor in ways cocoa alone never could. That lesson stuck with me for years.
When I started developing recipes for my own family gatherings, I knew I wanted to create something that combined all my favorite flavors: rich chocolate, bold espresso, and that perfect salty-sweet caramel balance. My first few attempts were good, but something was missing. The cake was too dense, the caramel too sweet, the coffee flavor too subtle.
Through nine separate testing rounds, I adjusted ratios, tweaked temperatures, and experimented with different techniques. I tried cake flour versus all-purpose (cake flour wins for texture). I tested various espresso powder amounts (a quarter cup is the sweet spot). I even experimented with different caramel cooking methods before landing on the foolproof technique I’m sharing today.
Now this salted caramel mocha cake is the dessert my family requests for every birthday, holiday, and special occasion. My sister, who doesn’t even like coffee, asks for this cake specifically. That’s how good it is.
Understanding the Key Ingredients
The Mocha Component
Dutch process cocoa powder is essential for this recipe, not regular cocoa powder. Dutch processing neutralizes the acidity in cocoa, creating a smoother, more mellow chocolate flavor that pairs perfectly with coffee. When combined with espresso powder, you get that sophisticated mocha taste without any harsh bitter notes.
I use a full quarter cup of espresso powder, which sounds like a lot but trust me on this. The coffee flavor is present but not overwhelming. It works in harmony with the chocolate rather than competing with it. If you’re worried about caffeine content, you can reduce it slightly, but I wouldn’t go below three tablespoons or you’ll lose that essential mocha character.
The combination of both granulated and brown sugar adds complexity to the cake’s flavor profile. Brown sugar contributes moisture and a subtle molasses note that complements the caramel perfectly. This dual-sugar approach is something I picked up from professional bakers, and it makes a noticeable difference in both taste and texture.
The Salted Caramel Magic
Making salted caramel from scratch transformed this recipe from good to extraordinary. Store-bought caramel sauce simply doesn’t compare in terms of flavor depth and that perfect salty-sweet balance. The key is using room temperature butter and heavy cream, which I learned after my first disaster batch where cold cream caused the sugar to seize.
I add three-quarters of a teaspoon of salt to my caramel, which might seem like a lot, but it’s what creates that addictive flavor contrast. The salt cuts through the sweetness and makes every component of the cake taste more pronounced. You can adjust based on your preference, but don’t skip it entirely or you’ll miss the whole point of “salted” caramel.
One technique tip I discovered: straining your caramel through a mesh strainer after cooking removes any potential sugar crystals or bits that didn’t melt perfectly. This extra step ensures silky-smooth caramel every single time, even if your sugar crystallized slightly during melting.
Cake Flour vs. All-Purpose
This recipe specifically calls for cake flour, and it’s not interchangeable with all-purpose in this case. Cake flour has less protein content, which creates a more tender, delicate crumb that contrasts beautifully with the rich frosting. When I tested this recipe with all-purpose flour, the cake was noticeably denser and less refined.
If you absolutely must substitute, you can make a DIY cake flour by measuring out one and one-third cups of all-purpose flour, removing two tablespoons, and replacing them with two tablespoons of cornstarch. Sift this mixture several times to ensure even distribution. It’s not quite the same as real cake flour, but it works in a pinch.
The sour cream in this recipe is another moisture powerhouse. It adds tanginess that balances the sweetness and contributes to that incredibly tender texture. I’ve tested this with Greek yogurt as a substitute, and while it works, sour cream produces superior results.
Step-by-Step: Making Perfect Salted Caramel
The Sugar Melting Technique
Start with a heavy-bottomed, nonstick pot. This is crucial because it distributes heat evenly and prevents hot spots that can burn your sugar. Add your three-quarters cup of granulated sugar to the cold pot before turning on any heat. This gives you more control than adding sugar to an already-hot pan.

Turn your heat to medium-low. Patience is your best friend here. You’ll stir your sugar every 30 seconds or so with a spatula. Don’t walk away from the stove during this process. First, your white sugar will start forming clumps that look concerning, but this is completely normal. Keep stirring gently.
After a few minutes, those clumps will begin to melt, and you’ll see amber liquid forming around them. Continue stirring until everything is completely liquid with absolutely no white clumps remaining. The color should be a deep amber, similar to honey. If your sugar starts darkening too quickly and smells like it might burn, immediately reduce your heat.
Adding Butter and Cream
Once your sugar is completely melted and amber-colored, it’s time to add butter. Remove the pot from heat briefly if you’re nervous about the temperature. Add your room temperature butter one tablespoon at a time, stirring thoroughly after each addition before adding the next.
Here’s where it gets dramatic: the mixture will bubble and steam vigorously. This scared me the first time, but it’s totally normal. Just keep stirring confidently and the butter will incorporate beautifully. If you add cold butter, it can cause the sugar to seize, which is why room temperature is so important.
After all butter is incorporated, remove your pot from the stovetop completely. Slowly pour in your room temperature heavy cream while stirring constantly. The mixture will bubble up dramatically again. Keep stirring until everything is smooth and combined, making sure to scrape into the corners of your pot where caramel can hide.
Finishing and Storing
Pour your caramel through a mesh strainer into a heatproof bowl. This catches any potential clumps or crystallized bits. Once strained, stir in your vanilla extract and salt. You’ll have about one and one-quarter cups of caramel sauce, which is more than you need for the cake (bonus!).
Let your caramel cool at room temperature for at least one hour before using it in the frosting. If you make it a day ahead, store it in the fridge and bring it back to room temperature before making your frosting. Cold caramel won’t incorporate properly into buttercream and can cause your frosting to split.
The beautiful thing about making caramel ahead is that it actually improves with time. The flavors meld and deepen after sitting for a day. I often make a double batch and keep extra in the fridge for up to two weeks. It’s incredible drizzled over ice cream, stirred into coffee, or eaten straight from the jar with a spoon (not that I’ve done that).
Baking the Perfect Mocha Cake Layers
Mixing Method Matters
Start by creaming your room temperature butter with both sugars until light and fluffy. This takes about three to four minutes at medium-high speed. Don’t rush this step. Proper creaming incorporates air into your batter, which contributes to a lighter cake texture. Your mixture should be noticeably paler and increased in volume.
Add your eggs and extra egg yolk one at a time, mixing well after each addition. The extra yolk adds richness and helps create that tender crumb I love. Some recipes skip this step, but after testing both ways, I’m convinced the extra yolk makes a measurable difference in texture and moisture.
When you add the cocoa powder and espresso powder, mix just until combined. Overmixing at this stage can make your cake tough. Add your liquids in stages, alternating between milk and the sour cream mixture. This gradual approach helps everything emulsify properly and prevents curdling.
The Dry Ingredient Fold
This is where many home bakers make a critical mistake. When you add your cake flour, salt, and baking powder, mix on the absolute lowest speed and stop as soon as you see no more dry flour. Overmixing once flour is added develops gluten, which creates a tough, chewy cake instead of the tender, melt-in-your-mouth texture we’re after.
I use a spatula to scrape the bottom and sides of my bowl after the mixer stops, just to ensure everything is incorporated. Sometimes flour likes to hide at the bottom of the bowl. A few gentle folds with a spatula ensure even distribution without overmixing.
Your batter should be smooth, fairly thick, and deep brown in color. It will have a rich chocolate aroma with coffee notes. If you’re using a stand mixer with a paddle attachment like I do, you’ll have about 950 grams of batter total to split between two nine-inch round pans.
Baking Temperature and Timing
Preheat your oven to exactly 350 degrees Fahrenheit. Oven temperature matters enormously in baking. I recommend using an oven thermometer because many home ovens run hot or cold, which can ruin your cake. If your oven runs hot, your cake will dome too much and potentially dry out. If it runs cold, the texture will be gummy.
Prepare your two nine-inch round pans. I line the bottoms with parchment paper circles and give the sides a light coating of butter or nonstick spray. This ensures easy release without any sticking. Split your batter evenly between the pans, about 475 grams each. I use a kitchen scale for accuracy, but you can also eyeball it.
Bake for 20 to 22 minutes. Your cakes are done when a toothpick inserted into the center comes out with just a few moist crumbs, not wet batter. The tops should spring back when lightly touched. Don’t overbake. These cakes continue cooking slightly as they cool, and the espresso soak adds moisture back in anyway.
The Espresso Soak Secret
This step is what separates amateur cakes from professional-quality results. After your cakes have cooled for about 30 minutes, you’ll brush them with an espresso soak made from milk, espresso powder, and powdered sugar. This technique comes from professional bakeries where keeping cakes moist for several days is essential.
Mix your two tablespoons of milk with espresso powder and powdered sugar until the espresso dissolves completely. Use a pastry brush to generously brush this mixture across the entire top surface of both cake layers. Don’t skip any spots. The soak will absorb into the cake, creating pockets of intense coffee flavor and ensuring your cake stays incredibly moist.
Let your soaked cakes chill in the fridge for at least an hour or two before frosting. If you’re making these a day ahead, cover them with plastic wrap to prevent drying. I often prepare my cake layers the night before and frost the next day, which actually makes the whole process less stressful and allows flavors to develop even more.
Creating the Salted Caramel Buttercream
The Buttercream Base
Start with room temperature butter. This is non-negotiable for smooth buttercream. Cold butter creates lumpy frosting, and melted butter creates soupy frosting. Room temperature means the butter should be cool to touch but your finger easily leaves an imprint when pressed.
Beat your butter with about two cups of powdered sugar at high speed for three to four minutes. This seems like a long time, but it’s what creates that fluffy, cloud-like texture. Your buttercream base should be pale, almost white, and noticeably increased in volume from when you started.
This base buttercream is intentionally not very sweet because we’re adding salted caramel, which contains sugar. I learned this through trial and error. My first version was overwhelmingly sweet because I used the full amount of powdered sugar right from the start.
Incorporating the Caramel
Add your room temperature salted caramel in three stages, about one-quarter cup at a time. Mix at high speed for a couple minutes after each addition. This gradual approach prevents the buttercream from breaking or becoming soupy. If your caramel is too cold, it can cause the butter to seize and create a curdled appearance.
After your first addition, scrape down the bowl and paddle attachment thoroughly. Caramel likes to hide in crevices. After your second addition, scrape again. This ensures even distribution and prevents pockets of unsweetened buttercream or overly caramel-heavy spots.
Add your final quarter cup of caramel along with vanilla extract and salt. The extra salt in the frosting reinforces that salted caramel flavor and balances the sweetness perfectly. Mix at high speed until completely fluffy and combined. Your frosting should be thick enough to hold its shape but spreadable without effort.
Adjusting Sweetness to Taste
Here’s where personal preference comes in. Taste your frosting at this point. If you like a less sweet frosting, you’re done. If you prefer sweeter frosting like I do, add the remaining half cup of powdered sugar, two tablespoons at a time, mixing and tasting after each addition.
The final frosting weight should be about 700 grams if you use the full two and a half cups of powdered sugar. This makes enough to generously frost and fill a two-layer nine-inch cake with a semi-naked finish on the sides. If you want completely covered sides, you might want to make one and a half times the frosting recipe.
Your finished buttercream should be smooth, fluffy, and a beautiful light caramel color. It should taste intensely of salted caramel with buttery richness. If it seems too soft, chill it for 15 minutes and it will firm up. If it seems too stiff, let it sit at room temperature for 10 minutes.
Assembling Your Show-Stopping Cake
The First Layer
Remove your chilled, espresso-soaked cakes from the fridge. Place your first layer on a cake stand, large plate, or tray lined with parchment paper. The parchment makes cleanup easier and allows you to slide the finished cake onto a serving platter without disaster.
Add approximately 300 grams of frosting (a little less than half your total) to the top of your first cake layer. Use an offset spatula or the back of a spoon to spread it evenly across the entire surface, right to the edges. Don’t be shy with the frosting. A generous filling is what makes this cake so decadent.
Drizzle about half of your leftover salted caramel over the frosting layer. You can create a spiral pattern or just drizzle randomly. This extra caramel creates pockets of intense flavor that surprise you with every bite. It’s one of my favorite elements of this cake and something guests always comment on.
Adding the Second Layer
Carefully place your second cake layer on top of the frosted first layer. Press down very gently to ensure it’s level and secure. If your cake layers domed slightly during baking, you can trim the tops flat with a serrated knife before assembly, but I usually don’t bother for a home cake.
Add another 300 grams of frosting to the top of your second layer. Spread it evenly with your offset spatula, creating a smooth surface. Take your time here because this is the top of your cake and most visible part. A few swirls or swooshes can look beautiful and artfully imperfect.
Use the remaining frosting to coat the sides of your cake. You’re creating a “naked” or “semi-naked” look, which means the cake layers peek through in places. This rustic style is trendy, forgiving for home bakers, and absolutely beautiful. Spread the frosting thinly across the sides, leaving some cake visible.
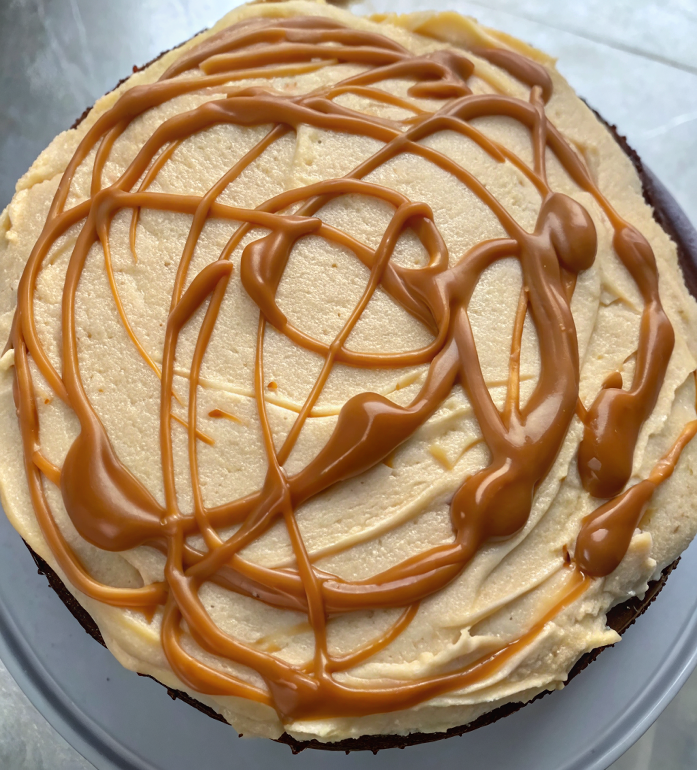
The Final Caramel Drizzle
Drizzle the remainder of your salted caramel across the top of your cake. Don’t pour it all in one spot; create a pattern by moving your spoon or spatula as you drizzle. Use your offset spatula to gently swirl the caramel into the top layer of frosting, creating a marbled effect.
Let some of the caramel drip naturally down the sides of the cake for a dramatic finish. You can encourage drips by gently pushing caramel toward the edges with your spatula. This creates that professional bakery look that makes people think you spent a fortune at a fancy patisserie.
Place your finished cake in the fridge to chill for at least one to two hours before slicing. This allows the frosting to set and the flavors to meld together. Chilling also makes slicing much cleaner and easier. A warm cake will squish and smear when you try to cut it.
Expert Tips for Success
Temperature Control is Everything
Room temperature ingredients are mentioned throughout this recipe for good reason. Cold eggs won’t emulsify properly with butter. Cold milk can cause your batter to curdle. Cold butter won’t cream properly. Take ingredients out of the fridge 30 to 60 minutes before you start baking.
For the caramel specifically, room temperature butter and cream are essential. This isn’t just a suggestion. Cold dairy causes hot sugar to seize and crystallize, ruining your caramel. I keep butter and cream on my counter for at least an hour before making caramel.
When assembling the cake, having your cake layers chilled but your frosting at room temperature creates the perfect scenario. Chilled cakes are easier to handle and less likely to crack, while room temperature frosting spreads smoothly without tearing the cake surface.
Troubleshooting Common Issues
If your caramel crystallizes during cooking, it’s usually because sugar got on the sides of the pot above the liquid level, or you stirred too aggressively. Use a wet pastry brush to wash down the sides of your pot if you see sugar crystals forming. Gentle stirring is key.
If your cake sinks in the middle, you either overmixed the batter, your oven temperature was too low, or you used expired baking powder. Check the expiration date on your leavening agents. They lose potency over time and won’t create the lift your cake needs.
If your buttercream looks curdled or broken after adding caramel, it’s a temperature issue. Your butter or caramel was too cold. Place the bowl over a pot of barely simmering water for just 10 to 15 seconds while stirring, then beat again on high speed. It should come back together.
Make-Ahead Strategy
This cake is perfect for make-ahead preparation, which is why I love it for gatherings. Make your salted caramel up to two weeks ahead and store it in the fridge. Make your cake layers the day before, wrap them well, and keep them refrigerated after applying the espresso soak.
The frosting can be made a day ahead and stored in the fridge in an airtight container. Before using, let it come to room temperature completely, then re-whip it briefly to restore the fluffy texture. Never frost a cake with cold, stiff buttercream directly from the fridge.
You can assemble the entire cake a day before serving. In fact, I think it tastes better the second day after all the flavors have had time to marry together. Keep it covered in the fridge and bring it to room temperature for about 30 minutes before serving for the best taste and texture.
Storage and Freezing
Store your finished cake in the fridge for up to one week. Cover any exposed cake surfaces with parchment paper and ideally keep the whole cake in an airtight container or under a cake dome. The caramel and buttercream both contain dairy, so refrigeration is necessary.
For serving, let slices come to room temperature for about 15 to 20 minutes. The frosting softens and the flavors are much more pronounced at room temperature than straight from the fridge. Cold cake is still delicious, but room temperature is optimal.
Individual slices freeze beautifully for up to three months. Wrap each slice tightly in plastic wrap, then aluminum foil. To enjoy, simply take a slice out and let it come to room temperature on the counter for about an hour. The texture remains remarkably intact after freezing.
Perfect Pairings and Serving Suggestions
This salted caramel mocha cake is rich and satisfying on its own, but certain accompaniments take it to the next level. I love serving it with a dollop of lightly sweetened whipped cream, which adds a light, airy contrast to the dense cake and rich frosting.
A strong espresso or cappuccino is the perfect beverage pairing. The coffee flavors in the drink echo the mocha notes in the cake without being overwhelming. For non-coffee drinkers, a glass of cold milk is classic and wonderful for cutting through the richness.
For a truly indulgent dessert experience, serve this cake with a scoop of vanilla ice cream or, even better, salted caramel ice cream. The cold ice cream melting into the frosting creates an amazing contrast of temperatures and textures that guests absolutely love.
If you’re serving this at a dinner party, I recommend cutting slightly smaller slices than usual. This is a rich, decadent cake, and a little goes a long way. Sixteen slices from this recipe is realistic for dessert portions, though heartier appetites might prefer twelve larger slices.
The Science Behind Perfect Mocha Cake
Understanding the science makes you a better baker. The combination of baking powder and the acid in sour cream creates a chemical reaction that produces carbon dioxide gas, which makes your cake rise and creates that tender, fluffy texture. This is why you can’t substitute every ingredient freely.
Cocoa powder is naturally acidic, but Dutch process cocoa has been treated with an alkalizing agent to neutralize that acidity. This creates a smoother chocolate flavor and a darker color. Regular cocoa powder woul


