The holidays are synonymous with warmth, joy, and, of course, incredible food. Among the festive feast, one dessert often steals the show: a beautifully crafted cake. But what if you could combine two all-time favorites into one utterly irresistible creation? Enter the Red Velvet Christmas Cake with Cheesecake Layer – a truly magnificent dessert that brings together the classic tang and cocoa notes of red velvet with a creamy, dreamy cheesecake center, all crowned with luscious cream cheese frosting.
Why This Red Velvet Christmas Cake is a Holiday Must-Make
What makes this particular Red Velvet Christmas Cake stand out from the crowd? It’s more than just a cake; it’s an experience. Here’s why it’s destined to become a cherished part of your holiday traditions:
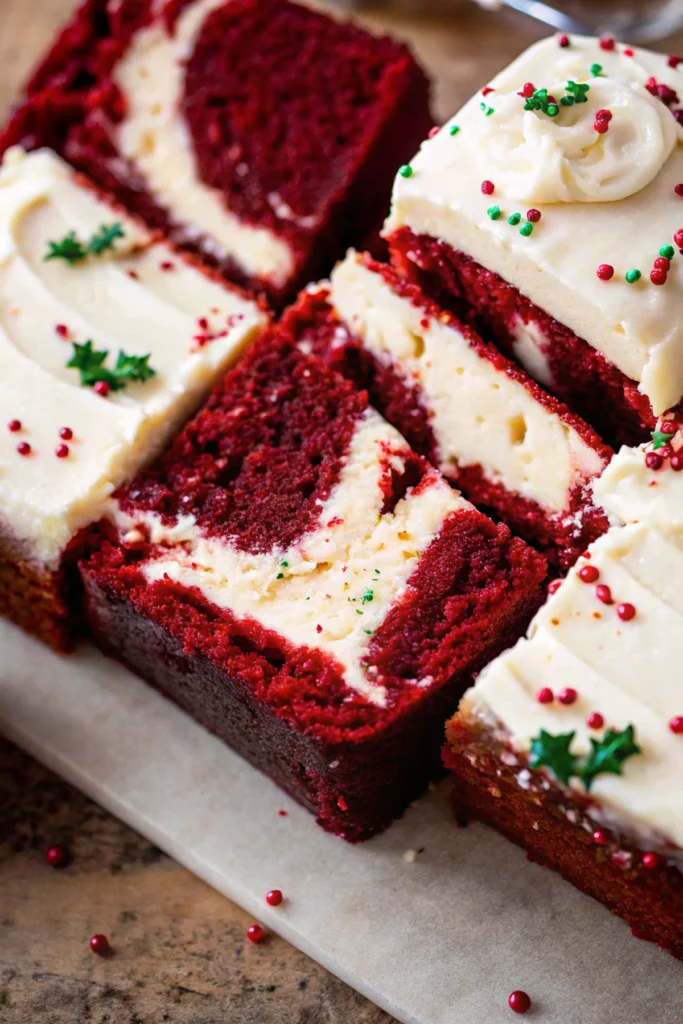
- The Unexpected Cheesecake Layer: This isn’t your average red velvet. The creamy, slightly tangy cheesecake layer baked right into the center adds an incredible richness and a delightful textural contrast that will have everyone asking for your secret. It transforms a classic into a true showstopper.
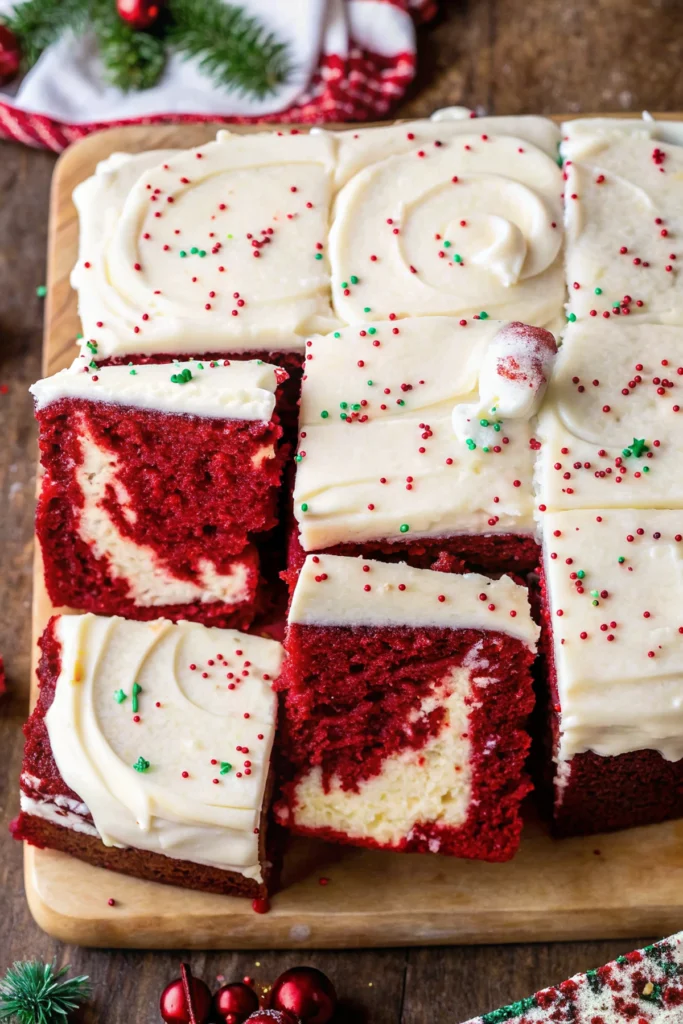
- Vibrant Festive Appeal: That iconic deep red hue screams “Christmas!” It’s visually stunning and perfectly complements the holiday décor, making it an instant centerpiece on any dessert table. Topped with a pristine white cream cheese frosting, it evokes the magic of the season.
- Comfort Food with a Gourmet Touch: Red velvet cake is a beloved comfort food, evoking nostalgia and warmth. By adding the cheesecake element, we elevate it to a gourmet dessert without sacrificing that comforting, homemade feel. It’s indulgent but perfectly balanced.
- Perfectly Balanced Flavors: The subtle cocoa notes of the red velvet, the slight tang from the buttermilk and vinegar, and the rich sweetness of the cream cheese frosting (and cheesecake layer!) all come together in a harmonious symphony of flavors that isn’t overly sweet.
- Tested and Trusted: As Sophie from Sweet Craft Recipes, I’ve personally tested this recipe more than 9 times, tweaking every measurement and technique to ensure consistent success in your home kitchen. This is a reliable recipe you can trust for your most important holiday moments.
This cake isn’t just about baking; it’s about creating joy, sharing deliciousness, and adding a touch of magic to your holiday celebrations.
Sophie’s Secret to the Perfect Holiday Cake: My Baking Journey
Crafting the perfect holiday dessert is a labor of love, and this Red Velvet Christmas Cake with Cheesecake Layer holds a special place in my heart. My journey to perfecting this recipe began with a simple desire: to combine the festive allure of red velvet with the creamy indulgence of cheesecake. I wanted something truly spectacular for my family’s annual Christmas gathering, a dessert that would elicit gasps of delight and fill the air with holiday cheer.
Over the past few months, my kitchen has been a happy (and sometimes messy!) laboratory dedicated to this cake. I’ve gone through nine distinct iterations, each time tweaking the balance of flavors, the texture of the cake, and the perfect consistency of the cheesecake layer.
- First attempts involved getting the red velvet just right – ensuring it was moist, tender, and vibrantly red without tasting artificial.
- Then came the cheesecake challenge. How to bake a cheesecake layer inside a cake without it sinking, drying out, or becoming too dense? This required experimenting with different ratios of cream cheese to sugar, finding the optimal baking temperature, and understanding how the egg in the cheesecake mixture plays a crucial role in its structure.
- Finally, the frosting. A red velvet cake simply isn’t complete without a classic, tangy cream cheese frosting. I focused on making it perfectly smooth, spreadable, and not overly sweet, allowing the other flavors to shine.
What I learned through these trials is the importance of room temperature ingredients (a non-negotiable for smooth batters and frostings!), the subtle power of Dutch process cocoa for that mild chocolate depth, and the art of gentle mixing to keep the cake tender. This dedication means that when you follow this recipe, you’re benefiting from countless hours of testing and refinement, guaranteeing you a delicious and stress-free baking experience. Trust me, this Red Velvet Christmas Cake is a true testament to passion and persistence, and I’m so excited for you to experience its magic!
Key Ingredients for Your Festive Red Velvet Masterpiece
Every great recipe starts with quality ingredients. For this Red Velvet Christmas Cake, understanding the role of each component is key to achieving that perfect holiday flavor and texture.
For the Cheesecake Layer:
- Cream Cheese (Room Temperature): This is non-negotiable! Room temperature cream cheese beats smoothly with no lumps, ensuring a silky cheesecake layer that melts in your mouth.
- All-Purpose Flour: A small amount helps stabilize the cheesecake mixture, preventing it from cracking during baking and giving it just the right consistency.
- Pure Vanilla Extract: Enhances the creamy flavor of the cheesecake, adding a touch of warmth.
- Large Egg (Room Temperature): Binds the cheesecake layer together, giving it structure and a rich custard-like texture.
For the Red Velvet Cake:
- All-Purpose Flour (Spoon & Leveled): Precision here prevents a dry cake. Always spoon flour into your measuring cup and level it off.
- Unsweetened Cocoa Powder (Dutch Process Recommended): I specifically recommend Dutch process cocoa. It’s less acidic than natural cocoa, resulting in a deeper, richer chocolate flavor that complements the red food coloring without turning it muddy.
- Baking Powder & Baking Soda: These leavening agents work together to give the cake its signature light and tender crumb. The baking soda reacts with the acids in the buttermilk and vinegar.
- Oil (Canola or Vegetable): Using oil instead of butter contributes to a wonderfully moist cake that stays tender for days.
- White Vinegar & Buttermilk (Room Temperature): These acidic ingredients are essential for traditional red velvet. They tenderize the cake, activate the baking soda for lift, and contribute to that subtle tangy flavor.
- Red Gel Food Coloring: For that iconic, vibrant Christmas red! Gel coloring provides a much deeper hue with less liquid than liquid food coloring.
- Sour Cream (Room Temperature or Greek Yogurt): Adds incredible moisture, richness, and tenderness to the cake. Room temperature is crucial for smooth incorporation.
For the Cream Cheese Frosting:
- Cream Cheese (Room Temperature): Again, critical for a smooth, lump-free frosting.
- Unsalted Butter (Room Temperature): Provides richness and structure. Make sure it’s soft but not melted.
- Powdered Sugar (Sifted): Sifting removes lumps, ensuring a velvety smooth frosting texture.
- Pure Vanilla Extract: A generous splash enhances the cream cheese flavor beautifully.
Remember, the quality and temperature of your ingredients truly make a difference in the final outcome of this show-stopping Red Velvet Christmas Cake!
Step-by-Step Guide to Your Decadent Red Velvet Christmas Cake
Ready to create some holiday magic? Follow these detailed steps to bake your perfect Red Velvet Christmas Cake with Cheesecake Layer.
Crafting the Dreamy Cheesecake Layer
- Beat Cream Cheese & Sugar: In a small mixing bowl, combine 12 oz (340g) room temperature cream cheese and ¼ cup (50g) white granulated sugar. Using a hand mixer, beat on high speed for exactly 1 minute until the mixture is smooth and light. Scrape down the sides of the bowl.
- Add Flour & Vanilla: Incorporate 1 TBSP all-purpose flour and 1 tsp pure vanilla extract. Mix on medium speed until just combined. The flour helps stabilize our cheesecake layer within the cake.
- Mix in Egg: Finally, add 1 large room temperature egg. Mix on low speed just until it’s combined. Do not overmix after adding the egg, as this can introduce too much air and cause the cheesecake to crack. Set this silky cheesecake batter aside.
Mixing the Vibrant Red Velvet Batter
- Preheat & Prep Pan: Preheat your oven to 350℉ (175℃). Grab a 9×9 inch (23×23 cm) square baking pan. Spray it thoroughly with baking spray, then line the bottom with a sheet of parchment paper. Spray the parchment paper again for extra non-stick insurance.
- Combine Dry Ingredients: In a medium bowl, whisk together 3 cups (360g) all-purpose flour, ¼ cup (25g) unsweetened cocoa powder (I strongly recommend Dutch process for a deeper flavor), 2 tsp baking powder, 1 tsp baking soda, and 1 tsp salt. Whisk well to ensure all leavening agents are evenly distributed. Set aside.
- Whisk Wet Ingredients: In a large mixing bowl, combine 1 cup (240ml) oil (canola or vegetable works great), 1 ½ cups (300g) white granulated sugar, 1 tsp white vinegar, 1 tsp pure vanilla extract, 3 large room temperature eggs, ¾ cup (180g) room temperature sour cream (or Greek yogurt), 1 cup (240ml) room temperature buttermilk, and 1 tsp red gel food coloring. Whisk vigorously until all ingredients are thoroughly combined and the color is a beautiful, uniform red.
- Fold Dry into Wet: Gradually add the dry ingredient mixture to the wet mixture. Using a baking rubber spatula, gently mix until just combined. Be careful not to overmix! Overmixing develops gluten, which can lead to a tough cake. A few small streaks of flour are acceptable; they will disappear during baking.
Assembling the Layers for a Spectacular Effect
- First Red Velvet Layer: Spread roughly half of your vibrant red velvet cake batter evenly into your prepared 9×9 inch baking pan.
- Add Cheesecake Layer: Now, for the showstopper! Use a spoon or a cookie scoop to dollop spoonfuls of the reserved cheesecake batter evenly across the red velvet layer. Gently use an offset icing spatula to spread the cheesecake batter into an even layer, taking care not to disturb the red velvet too much.
- Top with Remaining Red Velvet: Carefully spoon and spread the remaining red velvet cake batter over the cheesecake layer, ensuring it’s evenly covered.
Baking to Perfection
- Bake: Place the assembled cake pan into your preheated oven. Bake for 30-35 minutes. The cake is ready when a toothpick inserted into the red velvet portion comes out clean. The cheesecake layer may still have a slight jiggle, which is perfectly normal.
- Cool: Let the cake cool in the pan for 10 minutes. This allows it to firm up before handling. Then, carefully transfer the cake to a wire cooling rack to cool completely. This step is crucial! Attempting to frost a warm cake will result in melted frosting and a sticky mess.
Whipping Up the Fluffy Cream Cheese Frosting
- Sift Powdered Sugar: In a medium bowl, sift 3 cups (360g) powdered sugar to ensure there are no lumps. Set aside.
- Beat Butter & Cream Cheese: In a separate mixing bowl, using an electric mixer, beat 1 cup (226g) room temperature unsalted butter on high speed for 2 minutes until it’s light and fluffy. Add 4 oz (113g) room temperature cream cheese and beat on high for another 1 minute. Stop and scrape down the sides of the bowl to ensure everything is well combined.
- Finish Frosting: Gradually add the sifted powdered sugar to the butter and cream cheese mixture, mixing on medium speed until just combined. Add 1 tsp pure vanilla extract and increase the speed to high, beating until the frosting is wonderfully creamy, smooth, and fluffy. Be careful not to overbeat once the powdered sugar is incorporated, as this can make the frosting too soft.
- Frost & Decorate: Once your Red Velvet Christmas Cake is completely cool, spread the luscious cream cheese frosting generously over the top. For that extra festive sparkle, I love to sprinkle some holiday sprinkles or edible glitter on top. Slice and serve!
Expert Baking Tips for a Flawless Red Velvet Cake
Baking can sometimes feel like a delicate science, but with these pro tips, your Red Velvet Christmas Cake will be a resounding success every time! These insights come from my many baking adventures and tests here at Sweet Craft Recipes.
- Room Temperature Dairy is Paramount: I cannot stress this enough! Cold cream cheese, eggs, sour cream, and buttermilk will not emulsify properly, leading to lumpy batters and a denser cake. Pull them out of the fridge at least 2 hours before you plan to bake. This ensures smooth mixing and a light, even texture.
- Spoon and Level Flour: Compacted flour is a common culprit for dry cakes. Instead of scooping flour directly with your measuring cup, use a spoon to lightly fill the cup, then level it off with a straight edge. Better yet, use a kitchen scale for ultimate precision – 3 cups of all-purpose flour typically weigh around 360g.
- Don’t Overmix the Batter: Once you add the dry ingredients to the wet, mix only until just combined. Overmixing develops gluten, making your cake tough and chewy instead of tender and moist. A few streaks of flour are completely fine!
- Dutch Process Cocoa for Color & Flavor: While natural cocoa can react with acids to produce a reddish hue, modern recipes relying on food coloring benefit greatly from Dutch process cocoa. Its lower acidity provides a deeper, milder chocolate flavor that enhances the cake without fighting the vibrant red color.
- Quality Red Gel Food Coloring: For that truly striking Christmas red, use a good quality gel food coloring. Liquid food coloring can dilute your batter and won’t achieve the same intensity of color. I prefer brands like Wilton or AmeriColor.
- High Altitude Baking Adjustments: If you live at a high altitude (above 3,500 feet), cakes tend to rise faster and dry out more quickly. To compensate, I recommend adding an extra 3 TBSP of all-purpose flour to your dry ingredients. This helps strengthen the cake structure. You might also slightly reduce the baking powder/soda (by about 1/4 tsp each) and slightly increase liquid if the batter seems too thick, but for this recipe, the flour adjustment is usually sufficient.
- Cool Completely Before Frosting: Patience is a virtue, especially in baking! Frosting a warm cake will cause the frosting to melt and slide right off, creating a messy situation. Ensure your cake is completely cool to the touch before you even think about applying that delicious cream cheese frosting. You can even pop the cooled cake into the fridge for 20-30 minutes to ensure it’s firm.
- Don’t Overbeat Cream Cheese Frosting: While you want your frosting fluffy, overbeating cream cheese frosting can make it too soft and runny. Beat until just combined and fluffy, then stop. If it becomes too soft, chill it in the fridge for 15-30 minutes before trying to frost.
Armed with these tips, you’re ready to bake a spectacular Red Velvet Christmas Cake that tastes as good as it looks!
Make-Ahead Magic: Preparing Your Christmas Cake in Advance
The holidays are busy enough, so any recipe that allows for some make-ahead magic is a true gift! This Red Velvet Christmas Cake is wonderfully accommodating and can be prepared in stages, easing your holiday baking stress.
Preparing Components Ahead:
- Bake the Cake Layers: You can bake the red velvet cake (with its cheesecake layer) up to 2 days in advance. Once completely cooled, wrap the cake tightly in two layers of plastic wrap, then an additional layer of aluminum foil. Store at room temperature. This will lock in moisture and freshness.
- Make the Frosting: The cream cheese frosting can also be made 1-2 days ahead. Transfer it to an airtight container and store it in the refrigerator. When you’re ready to use it, let it come to room temperature for about 30-60 minutes, then give it a quick whip with your mixer to restore its fluffy texture.
Assembling Ahead:
- For optimal freshness and presentation, I recommend assembling and frosting the cake on the day you plan to serve it, or no more than 24 hours in advance. Once frosted, cover the cake loosely (a cake dome is perfect) and store it in the refrigerator.
Storage Instructions:
- Refrigeration: Because of the cream cheese in both the cheesecake layer and the frosting, this cake must be refrigerated. Store any leftovers in an airtight container in the refrigerator for up to 3-4 days.
- Freezing: This cake freezes beautifully! For longer storage, you can freeze individual slices or the whole frosted cake.
- For slices: Place slices on a baking sheet and freeze until firm (about 1-2 hours). Then wrap each slice tightly in plastic wrap, followed by aluminum foil.
- For whole cake: Freeze the frosted cake uncovered until the frosting is firm. Then wrap the entire cake tightly in plastic wrap, followed by aluminum foil.
- Frozen cake will keep well for up to 1 month. Thaw in the refrigerator overnight before serving. For best flavor and texture, let it sit at room temperature for about 30 minutes before enjoying.
Serving Suggestions & Festive Flair
This Red Velvet Christmas Cake is a showstopper all on its own, but a few thoughtful touches can elevate your presentation and make it even more special for your holiday guests.
- Classic Garnishes: A dusting of powdered sugar (especially through a festive stencil!), a scattering of fresh cranberries, or a few sprigs of fresh mint or rosemary can add simple elegance.
- Christmas Sprinkles: As I mentioned in the recipe, festive Christmas sprinkles are my go-to for an instant holiday party vibe! Look for red, green, and white nonpareils or sugar crystals.
- Chocolate Shavings: White chocolate curls or dark chocolate shavings sprinkled over the top can add a touch of gourmet sophistication and visual appeal.
- Berry Medley: A side of fresh raspberries or sliced strawberries provides a lovely color contrast and a fresh, fruity counterpoint to the richness of the cake.
- Warm Drinks Pairing: Serve slices alongside a steaming mug of hot cocoa, a creamy eggnog latte, or a festive spiced tea for the ultimate cozy holiday treat.
- Edible Glitter: For true sparkle, a light dusting of edible silver or gold glitter can make your cake truly magical under holiday lights.
No matter how you choose to present it, this Red Velvet Christmas Cake with Cheesecake Layer is guaranteed to bring smiles and festive cheer to your holiday table.
Beyond the Cake: More Sweet Treats for Your Holiday Table
While this Red Velvet Christmas Cake is undoubtedly the star of the show, Sweet Craft Recipes is dedicated to bringing you an entire repertoire of delightful baked goods perfect for holiday gifting, cookie exchanges, or simply satisfying that sweet tooth throughout the season. Sometimes, the holidays call for an assortment, and that’s where our other beloved recipes come in!
Are you looking for another show-stopping dessert that doubles as a delightful homemade gift? Our Stuffed Red Velvet Cookies offer that same beloved red velvet flavor in a portable, irresistible cookie form, perfect for cookie platters or edible presents.
Perhaps you’re dreaming of something truly decadent, a cookie that rivals the best bakeries? You absolutely must try our Pistachio NYC Cookies. These giant, chewy, and gloriously green cookies are a revelation, offering a unique flavor profile that stands out from the crowd.
For those who love a surprise inside, our Creme Egg Stuffed Cookies are pure indulgence. While often associated with Easter, the concept of a stuffed cookie is universally loved, and you can easily adapt the filling for a festive twist! Similarly, if you’re a fan of the classic combo, our Peanut Butter Nutella Cookie Recipe combines two irresistible spreads into one chewy, satisfying cookie – another great addition to a diverse dessert spread.
And for lovers of all things sweet and luxurious, our White Chocolate Stuffed Cookies offer a rich, melt-in-your-mouth experience that is simply divine.
From cakes to cookies, Sweet Craft Recipes is your go-to source for crafting sweet memories this holiday season and beyond. Explore our collection and find your next favorite bake!
Red Velvet Christmas Cake: Your Top Questions Answered
Got a few more questions about making this exquisite Red Velvet Christmas Cake? I’ve got you covered with answers to some common baking queries.
What gives red velvet cake its signature color and flavor?
The signature red color traditionally comes from a chemical reaction between acidic ingredients (like buttermilk and vinegar) and natural cocoa powder, which brings out the reddish anthocyanins in the cocoa. Today, red gel food coloring is primarily used to achieve that vibrant, deep red hue. The flavor is a delicate balance of mild cocoa, a slight tang from buttermilk and vinegar, and a rich, moist crumb, often complemented by vanilla notes.
Can I make this Red Velvet Christmas Cake ahead of time?
Absolutely! This cake is excellent for making ahead. You can bake the cake layers a day or two in advance, wrap them tightly in plastic, and store them at room temperature. The cream cheese frosting can also be made a day or two ahead and stored in an airtight container in the refrigerator. Assemble and frost the cake on the day of serving, or up to 24 hours before for optimal freshness, keeping it refrigerated.
Why is it important for dairy ingredients to be at room temperature?
Bringing dairy ingredients like cream cheese, eggs, sour cream, and buttermilk to room temperature is crucial for achieving a smooth, well-emulsified batter and frosting. Cold ingredients don’t blend evenly, leading to lumpy batters and a denser, less tender cake texture. Room temperature ingredients incorporate more air when beaten, resulting in a lighter, fluffier cake and frosting, and a more consistent final product.
What type of cocoa powder should I use for Red Velvet Cake?
For a traditional red velvet cake, natural unsweetened cocoa powder was historically used to react with the acids and produce a reddish tint. However, with modern red food coloring, Dutch-processed cocoa powder, which is less acidic, actually provides a deeper, richer chocolate flavor without interfering with the red dye. I recommend Dutch process cocoa for its superior flavor and consistent color.
How should I store leftover Red Velvet Christmas Cake?
Due to the cream cheese in both the cheesecake layer and the frosting, this cake must be stored in an airtight container in the refrigerator. It will stay fresh and delicious for 3-4 days. For longer storage, slices can be individually wrapped and frozen for up to 1 month. Thaw in the refrigerator before serving, and bring to room temperature for the best flavor and texture.
Final Thoughts: A Slice of Holiday Joy
There’s something truly magical about baking during the holidays, and this Red Velvet Christmas Cake with Cheesecake Layer embodies that spirit perfectly. It’s a recipe born from passion, perfected through countless tests, and designed to bring a touch of extraordinary sweetness to your festive season.
From its vibrant color and moist crumb to the surprise cheesecake center and tangy cream cheese frosting, every element of this cake is crafted to delight. I hope you and your loved ones enjoy every single slice as much as my family and I do.
If you bake this beautiful cake, I would absolutely love to hear about it! Share your creations and tag Sweet Craft Recipes on social media. Your holiday baking adventures inspire us all! Happy baking, and Merry Christmas from my kitchen to yours!


