Red velvet cake mix cookies are the ultimate shortcut to bakery-style treats that look stunning and taste incredible with just five simple ingredients. These soft, chewy cookies deliver all the classic red velvet flavor you love—rich cocoa undertones, vibrant color, and a tender crumb—without the fuss of making cookies from scratch. Sophie has tested this recipe over nine times to perfect the timing, texture, and M&M placement, making it foolproof for bakers of all skill levels.
Whether you’re hosting a family gathering, preparing for a holiday celebration, or simply craving something sweet on a weeknight, these red velvet cookies come together in about 15 minutes of hands-on time. The secret lies in chilling the dough just long enough to handle it easily, then pulling the cookies from the oven when they still look slightly underdone. Trust the process—they’ll finish baking on the sheet and emerge with that perfect soft-baked texture that keeps everyone coming back for more.
Why You’ll Love This Red Velvet Cake Mix Cookies Recipe
This recipe transforms a simple box of cake mix into show-stopping cookies that taste like you spent hours in the kitchen. The beauty is in its simplicity—no chilling overnight, no complicated techniques, just mix, scoop, and bake. The one-hour chill time is perfectly manageable and makes all the difference in achieving cookies that hold their shape while staying incredibly soft inside.
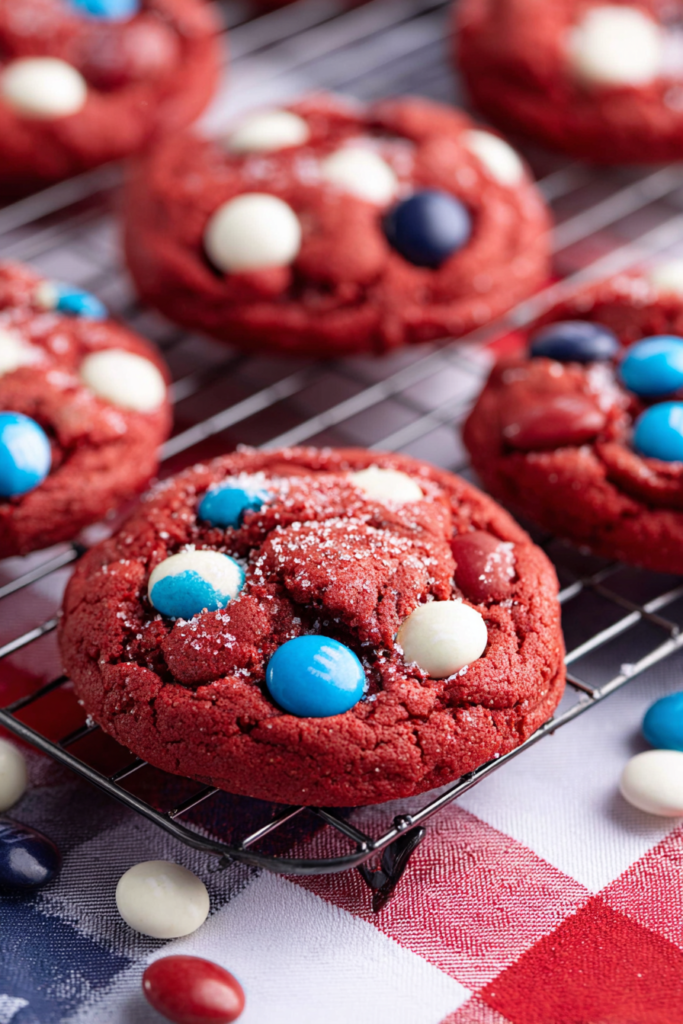
The festive M&M’s add bursts of chocolate sweetness and make these cookies picture-perfect for any occasion. You can customize the candy colors to match holidays, birthdays, or team colors, making this recipe endlessly versatile. The granulated sugar coating creates a subtle crunch on the outside that contrasts beautifully with the chewy interior.
These cookies also travel remarkably well, staying fresh in an airtight container for up to a week. They’re ideal for cookie exchanges, bake sales, potlucks, or shipping to loved ones. Plus, the recipe yields 24 generous cookies, making it perfect for feeding a crowd without requiring multiple batches.
Ingredients for Red Velvet Cake Mix Cookies
Main Cookie Dough
- 1 box red velvet cake mix (15.25 oz) – Forms the base and provides the signature flavor and color
- ⅓ cup vegetable oil – Creates moisture and tender texture
- 2 large eggs – Binds ingredients and adds richness
- 1 cup red, white, and blue M&M’s (divided) – Half mixed into dough, half pressed on top
- ½ cup granulated sugar – For rolling and coating cookie dough balls
Ingredient Notes
Cake Mix Selection: Use a standard 15.25-ounce box of red velvet cake mix. Different brands work equally well—Duncan Hines, Betty Crocker, and Pillsbury all produce excellent results. Avoid using cake mixes labeled “pudding in the mix” as they can make cookies cakey rather than chewy.
Oil Alternatives: While vegetable oil works perfectly, you can swap it for melted coconut oil for a subtle tropical note or use light olive oil for added heart-healthy fats. Avoid using butter here—oil keeps these cookies remarkably soft for days.
Egg Substitutes: For egg-free cookies, use flax eggs (mix 2 tablespoons ground flaxseed with 5 tablespoons water and let sit 5 minutes until gel-like). The texture will be slightly denser but still delicious.
Candy Customization: Feel free to swap M&M’s for mini chocolate chips, white chocolate chips, chopped pecans, or even mini marshmallows. For holidays, use seasonal M&M colors—red and green for Christmas, pastels for Easter, or orange and black for Halloween.
Sugar Coating: The granulated sugar coating isn’t just for looks—it creates a pleasant textural contrast and helps prevent cookies from spreading too thin. Don’t skip this step.

Step-by-Step Instructions
Step 1 – Mix the Cookie Dough
In a large mixing bowl, combine the red velvet cake mix, vegetable oil, and eggs. Use a hand mixer on medium speed or a sturdy wooden spoon to beat the ingredients together until completely combined, about 1-2 minutes. The dough will be thick and slightly sticky. Fold in half of the M&M’s (about ½ cup) using a spatula, distributing them evenly throughout the dough. Reserve the remaining M&M’s for decorating the tops after baking.
Step 2 – Chill the Dough
Cover the mixing bowl tightly with plastic wrap, ensuring it touches the surface of the dough to prevent drying. Place the bowl in the refrigerator and chill for exactly one hour. This step is crucial—the dough will be too soft and oily to shape before chilling. Don’t chill longer than one hour, as the dough can become too firm and difficult to scoop.
Step 3 – Prepare for Baking
About 10 minutes before the chill time ends, preheat your oven to 350 degrees Fahrenheit. Line one or two baking sheets with parchment paper or silicone baking mats. Pour the granulated sugar into a small shallow bowl for coating the dough balls. Position your oven rack in the center position for even baking.
Step 4 – Shape the Cookies
Remove the chilled dough from the refrigerator. Use a medium cookie scoop (approximately 2 tablespoons capacity) to portion out uniform balls of dough. Gently roll each portion between your palms to form a smooth ball, then immediately roll it in the granulated sugar to coat completely. Place the sugar-coated balls on your prepared baking sheet, spacing them at least 2 inches apart to allow for spreading. You should get about 24 cookies from this recipe.
Step 5 – Bake to Perfection
Bake the cookies for 8 to 9 minutes—set a timer and check them at 8 minutes. This is critical: the cookies will look puffy, slightly underdone, and the centers may appear wet. Resist the urge to bake them longer. The cookies will continue cooking from residual heat after you remove them from the oven.
Step 6 – Add Final Touches
The moment you remove the baking sheet from the oven, immediately press the reserved M&M’s gently into the tops of the hot cookies. Work quickly while they’re still very soft. Let the cookies cool on the baking sheet for exactly 5 minutes—this cooling time allows them to set properly without overbaking. After 5 minutes, carefully transfer the cookies to a wire cooling rack to cool completely.
Pro Tips for Success
Don’t Overbake: The single most common mistake is baking these cookies too long. They should look slightly underdone when you pull them out. If they look fully baked in the oven, they’ll be dry and crumbly once cooled. Trust Sophie’s nine-plus tests—8 to 9 minutes is the sweet spot.
Chill Time Matters: The one-hour chill transforms the dough from sticky and unworkable to perfectly scoopable. Set a timer and stick to it. If you forget and leave it longer, let the dough sit at room temperature for 10 minutes before scooping.
Use Parchment Paper: Parchment paper or silicone mats prevent sticking and promote even browning on the bottoms. If you only have unlined sheets, these cookies may spread more and stick slightly.
Uniform Sizing: Using a cookie scoop ensures every cookie is the same size, which means they all bake evenly. Eyeballing portion sizes often results in some cookies burning while others underbake.
Press M&M’s Quickly: Those first 30 seconds after the cookies come out of the oven are ideal for pressing in the M&M’s. If you wait too long, the cookies firm up and the candies won’t stick properly.
Cool on the Sheet: Skipping the 5-minute rest on the baking sheet will cause cookies to break apart. They need this time to firm up their structure before moving.
Flavor Variations
Double Chocolate Red Velvet Cookies: Replace half the M&M’s with semi-sweet chocolate chips and add ¼ cup cocoa powder to the dough for an extra-rich chocolate experience.
Cream Cheese Frosted Red Velvet Cookies: Once cookies cool completely, spread or pipe a simple cream cheese frosting (4 oz cream cheese, 2 cups powdered sugar, 1 teaspoon vanilla) on top. This transforms them into mini red velvet cakes.
White Chocolate Red Velvet Cookies: Swap all the M&M’s for white chocolate chips or chunks. The contrast between red cookie and white chocolate is visually stunning and tastes amazing.
Stuffed Red Velvet Cookies: Flatten each dough ball slightly, place a square of cream cheese or white chocolate in the center, then wrap the dough around it and roll into a ball. These take an extra minute or two to bake but are absolutely decadent. Check out our stuffed red velvet cookies recipe for detailed instructions.
Nutty Red Velvet Cookies: Fold in ½ cup chopped pecans or walnuts along with the M&M’s for added crunch and nutty flavor. Toast the nuts first for even better taste.
Serving Suggestions
Serve these red velvet cake mix cookies at room temperature for the best texture and flavor. They pair beautifully with cold milk, hot coffee, or a creamy latte. For special occasions, stack them on a tiered serving platter alongside other cookie varieties like our peanut butter Nutella cookies and white chocolate stuffed cookies for an impressive dessert spread.
For holiday gatherings, arrange the cookies on a festive platter with coordinating napkins. They make excellent additions to cookie exchange parties—the vibrant color and crowd-pleasing flavor always stand out. Package them in clear cellophane bags tied with ribbon for charming homemade gifts.
Consider serving them alongside vanilla ice cream for a simple but elegant dessert. The warm cookie and cold ice cream combination creates a delightful temperature and texture contrast. You can also crumble them over ice cream sundaes or use them as a crust for cheesecake bars.
Storage and Freezing Instructions
Room Temperature Storage: Store completely cooled cookies in an airtight container at room temperature for up to one week. Layer parchment paper between stacks to prevent sticking. The cookies will maintain their soft texture throughout the week if properly sealed.
Refrigerator Storage: While not necessary, you can refrigerate these cookies for up to two weeks in an airtight container. Let them come to room temperature before serving for the best texture and flavor.
Freezing Baked Cookies: Place completely cooled cookies in a single layer on a baking sheet and freeze for one hour until solid. Transfer the frozen cookies to a freezer-safe airtight container or heavy-duty freezer bags, separating layers with parchment paper. Freeze for up to three months. Thaw at room temperature for 30 minutes before serving.
Freezing Cookie Dough: After chilling the dough, scoop and roll the balls in sugar, then freeze them on a baking sheet until solid. Transfer to a freezer bag and freeze for up to three months. Bake directly from frozen, adding 1-2 extra minutes to the baking time. This method is perfect for having fresh-baked cookies anytime with zero active prep.
Nutrition Facts (Per Serving)
| Nutrient | Amount |
|---|---|
| Calories | 135 |
| Protein | 1.5g |
| Carbohydrates | 20g |
| Fat | 5g |
| Fiber | 0.5g |
| Sodium | 115mg |
Based on 24 servings. Nutritional values are approximate and may vary based on specific brands used.
FAQ About Red Velvet Cake Mix Cookies
Can I make red velvet cookies without cake mix?
Yes, you can make red velvet cookies from scratch using flour, cocoa powder, buttermilk, and red food coloring, but the cake mix version saves significant time and delivers consistent results every time. The cake mix already contains the perfect blend of leavening agents, cocoa, and flavorings that would require measuring multiple ingredients from scratch. For busy home cooks, the cake mix method offers the same delicious flavor in a fraction of the time with fewer dishes to wash.
Why are my red velvet cookies spreading too much?
Cookies spread excessively when the dough isn’t chilled properly or when the oven temperature is too low. Make sure you chill the dough for the full hour—warm or under-chilled dough will spread immediately upon hitting the hot baking sheet. Also verify your oven temperature with an oven thermometer, as many home ovens run 25 degrees cooler than the dial indicates. If your cookies still spread, try chilling the already-scooped and sugar-coated dough balls for an additional 15 minutes before baking.
Can I use a different flavor of cake mix?
Absolutely! This same method works beautifully with chocolate cake mix, vanilla cake mix, lemon cake mix, or even funfetti cake mix. Each flavor creates a unique cookie with the same soft, chewy texture. Yellow cake mix with chocolate chips tastes like chocolate chip cookie dough, while lemon cake mix with white chocolate creates bright, citrusy cookies perfect for spring gatherings.
Do I have to use M&M’s in this recipe?
No, M&M’s are completely optional and can be replaced with any mix-in you prefer. Chocolate chips, butterscotch chips, white chocolate chunks, dried cranberries, or chopped nuts all work wonderfully. You can even make plain red velvet cookies with no mix-ins at all—they’ll still taste amazing. The M&M’s primarily add visual appeal and extra chocolate flavor, so feel free to customize based on what you have available or what your family enjoys.
How do I know when red velvet cookies are done baking?
Red velvet cookies are done when the edges look set but the centers still appear slightly puffy and soft—almost underdone. They should not look dry or cracked on top. The cookies will continue baking from residual heat during the 5-minute cooling period on the baking sheet. If you wait until they look completely done in the oven, they’ll end up overbaked and dry once cooled. Trust the 8-9 minute timing and remove them even if they look questionable—this is the secret to achieving that bakery-style soft texture.
Can I make these cookies smaller or larger?
Yes, you can adjust the size, but you’ll need to modify the baking time accordingly. For mini cookies using a 1-tablespoon scoop, reduce baking time to 6-7 minutes. For extra-large cookies using a ¼-cup scoop, increase baking time to 10-12 minutes. Watch them carefully during the last minute of baking regardless of size, as even 30 seconds can make the difference between perfectly soft and overbaked. Smaller cookies yield about 48 cookies, while larger ones produce about 12-16 cookies.
Final Thoughts
Red velvet cake mix cookies prove that impressive homemade treats don’t require complicated recipes or professional baking skills. With just five ingredients and Sophie’s tested technique, you can create cookies that look bakery-quality and taste absolutely incredible. The vibrant color, soft texture, and candy-studded tops make these cookies a guaranteed hit at any gathering, while the simple preparation makes them accessible for even the most novice baker.
The key to success lies in following the timing precisely—chill for one hour, bake for 8-9 minutes, and cool on the sheet for 5 minutes. These three steps separate good cookies from extraordinary ones. Once you master this basic technique, you’ll find yourself returning to this recipe again and again, experimenting with different mix-ins and flavor combinations.
Whether you’re baking for a holiday celebration, a family gathering, or simply treating yourself on a Tuesday evening, these red velvet cookies deliver comfort, nostalgia, and pure deliciousness in every bite. Sophie’s nine-plus rounds of testing ensure you get perfect results on your very first try. So grab a box of cake mix and transform it into something truly special—your kitchen will smell amazing and your family will thank you.


