I’ll never forget the first time I tried making pumpkin spice cake from scratch. It was a chilly October evening, and I had grand visions of a perfectly moist, spiced cake that would wow my family gathering. What I got instead was a dense, flat disaster that barely rose in the pan. After nine attempts and countless tweaks, I finally cracked the code to creating the most incredible pumpkin spice cake with cinnamon cream cheese frosting—and I’m sharing every secret with you today.
This pumpkin spice cake isn’t your average fall dessert. It combines the perfect balance of warming spices, real pumpkin puree, and a cream cheese frosting so good you’ll want to eat it with a spoon. Whether you’re planning a family gathering or simply craving comfort food with a healthier twist, this recipe serves up to 16 people and stays fresh for days.
Why This Pumpkin Spice Cake Recipe Works
After testing this recipe more than nine times, I’ve discovered exactly what makes a pumpkin cake truly exceptional. The secret lies in the perfect moisture balance and the combination of both butter and oil in the batter.
The Science Behind Moist Pumpkin Cake
Most pumpkin cakes fail because they’re either too dense or too dry. This recipe solves both problems simultaneously. The melted butter provides rich flavor and structure, while the neutral oil keeps the crumb incredibly tender. Adding sour cream creates a subtle tang that balances the sweetness and adds extra moisture that lasts for days.
The canned pumpkin puree contributes natural moisture without making the cake gummy or heavy. I use Farmer’s Market Foods Organic Canned Pumpkin because it has the perfect consistency—not too watery, not too thick. This matters more than you might think, as different pumpkin brands can dramatically affect your final texture.
What Makes This Frosting Special
The cinnamon cream cheese frosting is where this cake truly shines. Unlike traditional cream cheese frostings that can be one-dimensional, adding cinnamon creates a warm, spiced layer that complements the pumpkin perfectly. The ratio of butter to cream cheese is crucial—too much cream cheese and it becomes tangy and dense, too much butter and you lose that signature cream cheese flavor.
I’ve found that using equal parts butter and cream cheese creates the fluffiest, most spreadable frosting that holds its shape without being stiff. The key is ensuring both are at true room temperature before mixing. Cold cream cheese will never fully incorporate and you’ll end up with lumps no matter how long you beat it.
Essential Ingredients for Perfect Pumpkin Spice Cake
The Cake Components
Fats and Sugars: The combination of melted unsalted butter (4 tablespoons) and neutral oil (1/4 cup) creates the ideal texture. Canola or vegetable oil works perfectly. For sweetness, you’ll need both granulated sugar (2/3 cup) and dark brown sugar (1/2 cup). The brown sugar adds moisture and a subtle molasses flavor that enhances the pumpkin spice.
Wet Ingredients: Fresh eggs at room temperature are non-negotiable. Cold eggs won’t emulsify properly with the fats, leading to a denser cake. I always take my eggs and sour cream (1/3 cup) out of the fridge 30 minutes before starting. The canned pumpkin (2/3 cup) should be pure pumpkin puree, not pumpkin pie filling which contains added sugars and spices.
Dry Ingredients: All-purpose flour (1 1/3 cups) provides structure without making the cake heavy. The pumpkin spice (2 teaspoons) should be a quality blend or you can make your own with cinnamon, ginger, nutmeg, and cloves. Baking powder (1 teaspoon) and baking soda (1/4 teaspoon) work together to create the perfect rise, while salt (1/2 teaspoon) enhances all the flavors.
The Frosting Essentials
Room temperature butter (6 tablespoons) and cream cheese (6 tablespoons) are the foundation. Powdered sugar (2 1/4 cups) sweetens and stabilizes the frosting, while ground cinnamon (1 1/2 teaspoons) adds that signature warmth. Vanilla extract and a pinch of salt round out the flavors perfectly.
Step-by-Step Instructions for Pumpkin Spice Cake Success
Preparing Your Kitchen
Before you begin, gather all your equipment. You’ll need a 9×9 inch square pan (an 8×8 works but requires longer baking time), a stand mixer with paddle attachment or hand mixer, spatula, and parchment paper. Preheat your oven to 350 degrees Fahrenheit. This temperature is perfect for even baking without over-browning the edges.
Line your square pan with parchment paper on all sides. I learned this trick after struggling to remove cakes cleanly—having paper on all sides means you can lift the entire cake out for easier frosting and cutting. You can also lightly grease the pan, but parchment paper is foolproof.
Making the Cake Batter
Start by combining your melted butter, oil, granulated sugar, and dark brown sugar in your stand mixer with the paddle attachment. Run the mixer at medium speed for one to two minutes. This initial mixing dissolves the sugars slightly and creates an emulsion that helps trap air for a lighter cake.
Next, add your sour cream, canned pumpkin, eggs, and vanilla extract. Mix at medium speed for a minute or two, then pause to scrape down the sides and bottom of your bowl thoroughly. This step is crucial—unmixed ingredients hiding on the bowl sides can create dense pockets in your cake. Continue mixing for another minute or two until the mixture has lightened slightly in color, indicating proper aeration.
Incorporating Dry Ingredients
Add all your dry ingredients at once—flour, pumpkin spice, salt, baking powder, and baking soda. Here’s where many home bakers go wrong. Turn your mixer to the lowest speed and mix only until about half incorporated. Stop and scrape thoroughly, reaching all the way to the bottom of the bowl where flour tends to hide.
Mix again at low speed for just one minute until barely combined. Overmixing develops gluten and creates a tough, chewy cake instead of the tender crumb you want. A few small flour streaks are fine—they’ll disappear during baking.
Baking to Perfection
Pour your batter into the prepared pan and spread it evenly into all corners. Use your spatula to smooth the top gently. Place the pan in your preheated 350-degree oven and bake for 23 to 26 minutes.
The perfect doneness test is the jiggle check. When you gently shake the pan, the cake should barely jiggle in the very center with completely set edges. A toothpick inserted in the center should come out with just a few moist crumbs. Don’t wait for a completely clean toothpick or you’ll overbake the cake.
Cooling Strategy
This is where patience pays off. Let your cake cool at room temperature for one full hour. This allows the structure to set without the shock of cold temperature. After the hour, transfer the entire pan to the refrigerator for another hour before frosting.
Why the fridge time? A completely cool cake accepts frosting beautifully without melting it or creating crumbs that mix into your frosting. I learned this after ruining several batches by trying to frost warm cake—it’s simply not worth rushing.
Creating the Perfect Cinnamon Cream Cheese Frosting
The Butter Base
Clean your stand mixer bowl and paddle attachment thoroughly, or grab a large bowl for your hand mixer. Add your room temperature butter and beat for one to two minutes. You’ll see it transform from solid to smooth and creamy. This initial beating incorporates air that makes your frosting fluffy.
Scrape down the bowl and paddle, then add your room temperature cream cheese. Continue mixing for a minute until completely smooth with no lumps visible. The mixture should look homogeneous and slightly glossy.
Adding the Sweetness and Spice
Add your powdered sugar, ground cinnamon, vanilla extract, and pinch of salt all at once. Start your mixer on the lowest speed and pulse a few times. This prevents a powdered sugar explosion that will coat your entire kitchen.
Once the sugar begins incorporating, increase to medium speed and mix for several minutes. Stop to scrape down the bowl and paddle attachment, then continue mixing for another minute. Your frosting should be light, fluffy, and completely streak-free. The cinnamon should be evenly distributed with no dark swirls remaining.
Frosting Application Tips
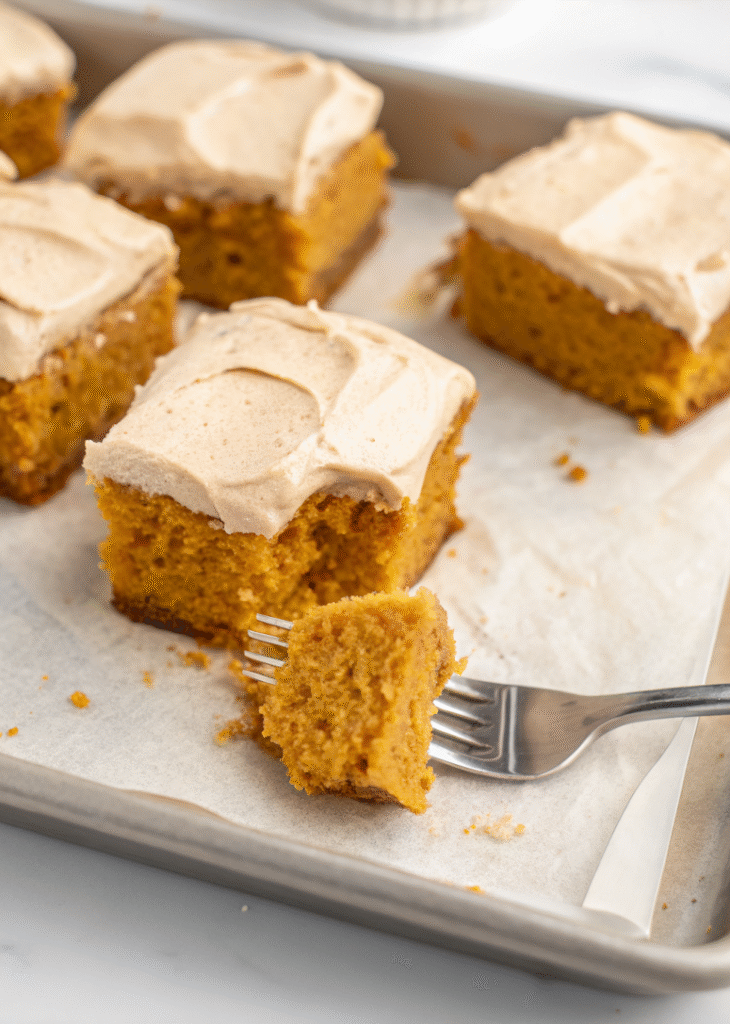
Remove your completely cooled cake from the refrigerator. Dollop large spoonfuls of frosting across the entire surface, then use your spatula to spread it evenly. I prefer a rustic, swooped look, but you can make it as smooth or textured as you like.
For the best slicing results, return the frosted cake to the refrigerator for one hour. This sets the frosting so it doesn’t smush when you cut. However, if you’re serving immediately, you can cut right away—the slices just won’t be quite as clean.
Serving and Storage Guide
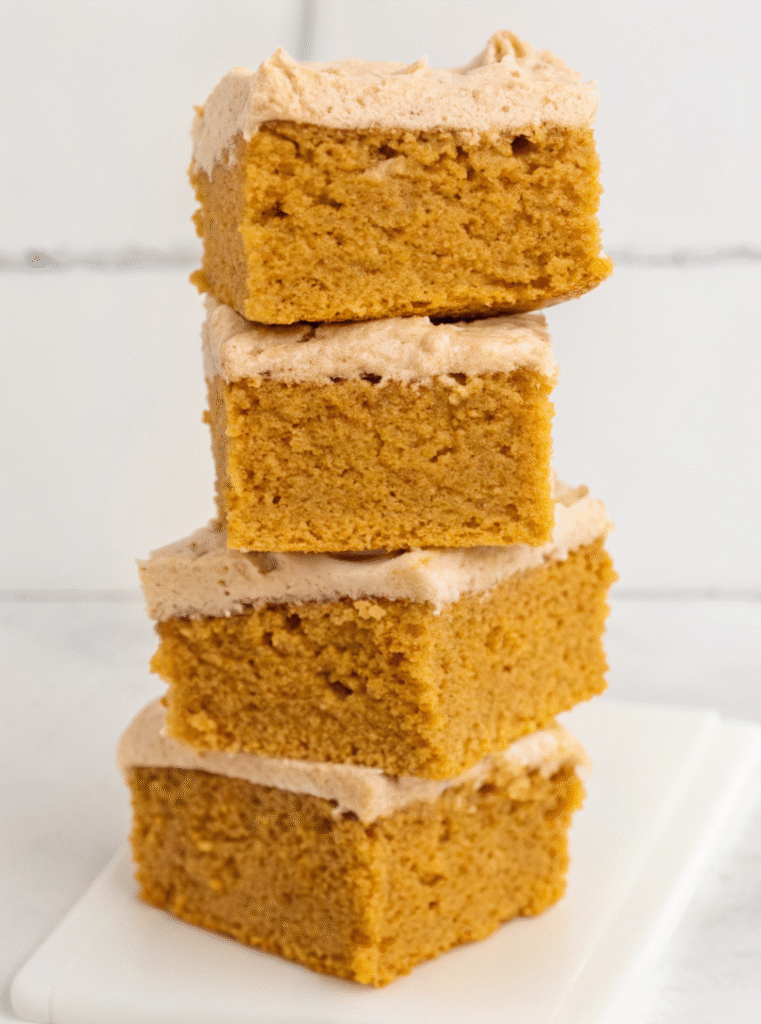
Cutting Perfect Squares
For 16 servings, cut your cake into a 4×4 grid. Use a sharp knife wiped clean between cuts for the neatest squares. Each piece contains approximately 41 grams of carbohydrates, with 274 carbs from the frosting total.
If you prefer larger servings for a smaller crowd, cut into 12 pieces instead. The cake feeds up to 10 people generously when accompanied by other desserts or refreshments.
Short-Term Storage
Store sliced cake in an airtight container in the refrigerator for 5 to 7 days. The sour cream and pumpkin keep the cake incredibly moist throughout the week. If you haven’t sliced the cake yet, cover it tightly with plastic wrap to prevent the surface from drying out.
I’ve found that individually wrapping slices in plastic wrap before placing them in a container keeps them even fresher. This prevents the cut edges from drying and makes it easy to grab a single serving.
Freezing for Later
For longer storage, this cake freezes beautifully. Wrap individual frosted squares tightly in plastic wrap, then place them all in an airtight container or freezer bag. They’ll stay fresh for up to three months.
You can eat the cake straight from the freezer for a dense, fudgy texture, or let it defrost in the refrigerator overnight for the original texture. Room temperature defrosting takes about an hour.
Make-Ahead Strategy
You can bake the cake up to two days ahead and store it covered in the refrigerator before frosting. For even longer advance prep, freeze the unfrosted cake in an airtight container. I don’t recommend making the frosting ahead of time without frosting the cake immediately, as it doesn’t store as well on its own.
Expert Tips and Troubleshooting
Common Mistakes to Avoid
Using Cold Ingredients: This was my biggest error in early attempts. Cold eggs and sour cream don’t emulsify properly, creating a dense, uneven texture. Always bring dairy and eggs to room temperature—it takes just 30 minutes and makes a dramatic difference.
Overmixing the Batter: Once you add flour, mix only until combined. Overmixing develops gluten strands that make cake tough and chewy instead of tender. I use the lowest mixer speed and stop as soon as I no longer see flour streaks.
Overbaking: Pumpkin cakes can go from perfectly moist to dry very quickly. Start checking at 23 minutes. Remember, the cake continues cooking slightly as it cools in the hot pan.
Customization Ideas
Spice Adjustments: Love warm spices? Increase the pumpkin spice to 2 1/2 teaspoons or add an extra 1/2 teaspoon of cinnamon to the batter. For a less spiced version, reduce to 1 1/2 teaspoons.
Frosting Variations: Add 1/4 teaspoon of nutmeg to the frosting for extra warmth, or replace half the cinnamon with pumpkin spice for more complex flavor. For chocolate lovers, fold in 2 tablespoons of cocoa powder.
Add-Ins: Fold 1/2 cup of chopped pecans or walnuts into the finished batter for crunch. White chocolate chips (1/2 cup) add pockets of sweetness that complement the pumpkin beautifully.
Dietary Modifications
Gluten-Free Option: Replace the all-purpose flour with a 1:1 gluten-free baking blend. The texture will be slightly more delicate but still delicious.
Reduced Sugar: You can reduce the granulated sugar to 1/2 cup without drastically affecting texture. The cake will be less sweet but the frosting compensates.
Dairy-Free Adaptations: While I haven’t tested this version extensively, you can try using dairy-free butter and cream cheese alternatives. The texture may differ slightly from the original.
Why This Recipe Stands Out
Perfect for Fall Gatherings
This pumpkin spice cake feeds a crowd beautifully and travels well. The square format makes it easy to cut uniform pieces for potlucks, office parties, or family dinners. Unlike layer cakes, there’s no risk of sliding layers or crushed frosting during transport.
The flavor profile appeals to everyone—it’s not too sweet, not too spiced, and the cinnamon cream cheese frosting is universally loved. I’ve served this to pumpkin skeptics who went back for seconds.
Versatile Serving Options
Serve squares plain for afternoon coffee or tea. Top with a dollop of whipped cream for a fancier presentation. For special occasions, garnish with candied pecans or a light dusting of cinnamon.
The cake is equally delicious cold from the fridge or at room temperature. Some of my family members prefer it chilled when the frosting is firm, while others like it softer at room temperature.
A Recipe Worth Making Again
After perfecting this recipe through nine test batches, I can confidently say it’s become my most-requested fall dessert. The combination of proper technique, quality ingredients, and tested ratios creates a pumpkin spice cake that rivals any bakery version.
The best part? It’s actually quite simple once you understand the key steps. Taking your time with ingredient temperatures and not overmixing makes all the difference between an okay cake and an exceptional one.
Frequently Asked Questions
Can I use fresh pumpkin instead of canned? You can, but canned pumpkin puree has a more consistent moisture content that produces reliable results. If using fresh, roast and puree the pumpkin, then strain it through cheesecloth to remove excess water. The texture won’t be identical but can still work well.
Why is my frosting too soft? The most common cause is ingredients that weren’t at proper room temperature. Cold cream cheese makes soft frosting, while too-soft butter does the same. Place soft frosting in the refrigerator for 15 minutes, then rewhip. You can also add 1/4 cup more powdered sugar to stiffen it.
Can I make this as a layer cake instead? Absolutely! Divide the batter between two 8-inch round pans and reduce baking time to 18-22 minutes. You’ll need to double the frosting recipe to have enough for filling and coating both layers.
What if I don’t have pumpkin spice? Make your own by combining 1 teaspoon cinnamon, 1/2 teaspoon ginger, 1/4 teaspoon nutmeg, and 1/4 teaspoon allspice or cloves. This homemade blend tastes even better than store-bought.
How do I know when the cake is truly done? Use the jiggle test—gently shake the pan and look for just a slight jiggle in the very center with completely set edges. A toothpick should have a few moist crumbs but no wet batter. Overbaking is more common than underbaking with this recipe.
Can I reduce the sugar without affecting texture? You can reduce the granulated sugar by up to 2 tablespoons without major texture changes. The brown sugar is more important for moisture, so I recommend keeping that amount the same.
Why do I need both baking powder and baking soda? They work together to create the perfect rise and texture. Baking soda reacts with the acidic ingredients (sour cream, brown sugar) while baking powder provides additional lift. Using both creates a lighter, more tender crumb than using just one leavener.
Your New Fall Favorite
This pumpkin spice cake with cinnamon cream cheese frosting has earned its place as a staple in my recipe collection, and I know it will in yours too. The combination of warming spices, moist pumpkin cake, and tangy-sweet frosting creates the ultimate fall comfort dessert that works for any occasion.
Whether you’re an experienced baker or just starting your journey, this recipe is forgiving and yields professional results. The key is following the temperature guidelines, not overmixing, and giving the cake proper cooling time before frosting.
I’d love to hear how your pumpkin spice cake turns out! Have you tried any of the customization ideas, or do you have your own twist on this classic? Share your experience in the comments below, and don’t forget to tag me on social media when you bake this delicious fall treat.
For more cozy fall desserts, check out my recipes that your family will love all season long. Happy baking!


