As the leaves begin to turn and a crisp coolness fills the air, my kitchen, Sophie’s kitchen, transforms into a haven for cozy, comforting, and utterly delicious treats. Fall always sparks a craving for wholesome, homemade goodies that capture the season’s magic without requiring hours over a hot oven. That’s precisely why these No-Bake Peanut Butter Ball Pumpkins have become an absolute staple in my home, particularly when I’m looking for a “healthy-ish” comfort-food twist.
I remember the first time I whipped up a batch, aiming for something festive yet simple. Little did I know, they’d become an instant family favorite! After countless tests – nine, to be exact! – I’ve perfected this recipe to ensure every pumpkin is bursting with creamy peanut butter flavor, perfectly shaped, and adorned with the cutest chocolate chip “stem.” They’re incredibly easy, requiring no baking whatsoever, making them the ultimate kid-friendly activity and a stress-free dessert for any fall gathering.
Whether you’re planning a Halloween party, looking for a delightful Thanksgiving appetizer, or just want a wholesome snack to brighten a regular autumn afternoon, these adorable peanut butter pumpkins are guaranteed to bring smiles. Let’s dive into making these seasonal delights!
Table of Contents
- Why You’ll Love These No-Bake Peanut Butter Ball Pumpkins
- What Makes Them a “Healthy-ish” Twist?
- Essential Ingredients You’ll Need
- Equipment for Success
- Step-by-Step Instructions: Sophie’s Foolproof Method
- Sophie’s Expert Tips for Perfect Pumpkins
- Troubleshooting Common Issues
- Creative Variations & Customizations
- Making Ahead & Storage Tips
- Serving Suggestions
- Nutrition Information
- Frequently Asked Questions (FAQs)
- More Sweet Craft Recipes You’ll Love
- Final Thoughts
Why You’ll Love These No-Bake Peanut Butter Ball Pumpkins
There’s a special kind of joy in making a recipe that consistently delivers on taste, ease, and visual appeal. These peanut butter pumpkins hit all those notes and then some. Here’s why they’ll become your new fall go-to:
- Effortlessly Easy: No oven required! Just a few simple steps and you’re done. Perfect for beginner bakers or busy parents.
- Kid-Friendly Fun: Rolling, shaping, and decorating these pumpkins is a fantastic activity for little hands. My kids absolutely love helping with this part!
- A Healthy-ish Treat: Made with real peanut butter and butter, you control the ingredients. They’re satisfyingly sweet without being overly decadent, offering a good dose of protein.
- Crowd-Pleasing Flavor: The classic combination of peanut butter and a hint of vanilla is universally loved.
- Festively Adorable: Their pumpkin shape and chocolate chip stem make them perfect for any fall or Halloween-themed event.
- Make-Ahead Magic: These treats store beautifully, making them ideal for prepping in advance for parties or weekly snacks.
What Makes Them a “Healthy-ish” Twist?
When I say “healthy-ish,” I mean these aren’t deep-fried or loaded with artificial ingredients. As a recipe developer, I always aim for balance. Here’s how these peanut butter pumpkins offer a more mindful indulgence:
- Homemade Control: You know exactly what goes into them. No mysterious additives or preservatives found in many store-bought candies.
- Protein Power: Peanut butter is a fantastic source of plant-based protein and healthy fats, which helps keep you feeling fuller and more satisfied than a purely sugary treat.
- Portion Control: Each pumpkin is a perfectly bite-sized treat, making it easy to enjoy a little something sweet without overdoing it.
- Real Ingredients: Butter, real peanut butter, and a touch of vanilla – simple, recognizable ingredients.
Of course, they still contain sugar, but by making them yourself, you can appreciate the quality and freshness of each bite. It’s about enjoying a delicious comfort food in a more conscious way!
Essential Ingredients You’ll Need
Gathering your ingredients is the first step to success. Here’s what you’ll need, along with a few of my insights on selection:
- 1/4 cup Butter, softened: I always recommend unsalted butter so you can control the salt content. Softened butter is crucial here; it blends smoothly with the peanut butter and powdered sugar, preventing a crumbly dough. If your butter isn’t soft, microwave it for 10-15 seconds, being careful not to melt it completely.
- 1 cup Creamy Peanut Butter: I prefer creamy peanut butter for a smoother texture in the finished balls. You can use natural peanut butter (the kind that separates) but be sure to stir it extremely well before measuring to ensure consistency. Standard creamy peanut butter (like Jif or Skippy) also works wonderfully and often yields a firmer dough.
- 2 cups Powdered Sugar: Also known as confectioners’ sugar. This fine sugar is what gives the dough its smooth, melt-in-your-mouth texture and helps it bind together without being gritty.
- 1 tsp Vanilla Extract: A good quality vanilla extract enhances the overall flavor, adding warmth and depth to the peanut butter. Don’t skip it!
- 1 Pinch Salt: Just a tiny pinch makes a huge difference! Salt balances the sweetness and brings out the nutty flavor of the peanut butter.
- Orange Gel Food Coloring: Gel coloring is superior to liquid drops here as it provides vibrant color without adding excess moisture to your dough, which can make it sticky. You only need a few drops to get that perfect pumpkin hue.
- 50 Mini Chocolate Chips: These are for the adorable pumpkin stems! Mini chips are the perfect size, but if you only have regular, you can carefully cut them in half with a sharp knife.
Equipment for Success
While this is a no-bake recipe, having the right tools can make the process even smoother:
- Stand Mixer with Paddle Attachment: This is my preferred method as it makes quick work of mixing and ensures a perfectly smooth dough. A hand mixer can also work.
- Large Mixing Bowl: If you don’t have a stand mixer, a large sturdy bowl is essential for mixing by hand.
- Rubber Spatula: For scraping down the sides of the bowl.
- Measuring Cups and Spoons: For accurate ingredient measurements.
- Parchment Paper or Silicone Mat: For lining your baking sheet to prevent sticking.
- Baking Sheet: To hold your finished pumpkins.
- Toothpicks or Skewers: The secret tool for creating those signature pumpkin lines!
Step-by-Step Instructions: Sophie’s Foolproof Method
Follow these easy steps to create your own batch of delightful Peanut Butter Ball Pumpkins.
- Combine Wet Ingredients: In the bowl of a stand mixer fitted with the paddle attachment, add the softened butter and creamy peanut butter. Beat on medium speed until the mixture is smooth and thoroughly combined, usually for 1-2 minutes. Make sure to stop and scrape down the sides of the bowl with your rubber spatula a few times to ensure everything is incorporated evenly. Sophie’s Tip: Ensuring your butter is properly softened at room temperature is key for a smooth, lump-free start!
- Form the Dough Base: Reduce the mixer speed to low. Add the powdered sugar, vanilla extract, and a pinch of salt. Mix until the powdered sugar is just incorporated, then increase the speed to medium and continue mixing until a thick, firm dough forms. It should pull away from the sides of the bowl and be easy to handle.
- Color the Dough: Now for the fun part! Add a few drops of orange gel food coloring to the mixer. Continue mixing on medium speed until you achieve a vibrant, consistent orange color throughout the dough. Start with 2-3 drops and add more gradually until you reach your desired shade – remember, you can always add more, but you can’t take it away!
- Portion and Roll: Prepare a baking sheet by lining it with parchment paper or a silicone mat. Portion out the orange dough, using about 2 teaspoons of dough for each pumpkin. Roll each portion between your palms to form a smooth, round ball. Place the rolled balls onto the prepared baking sheet. Sophie’s Tip: If your hands get too sticky, lightly dust them with a little powdered sugar or wash them periodically.
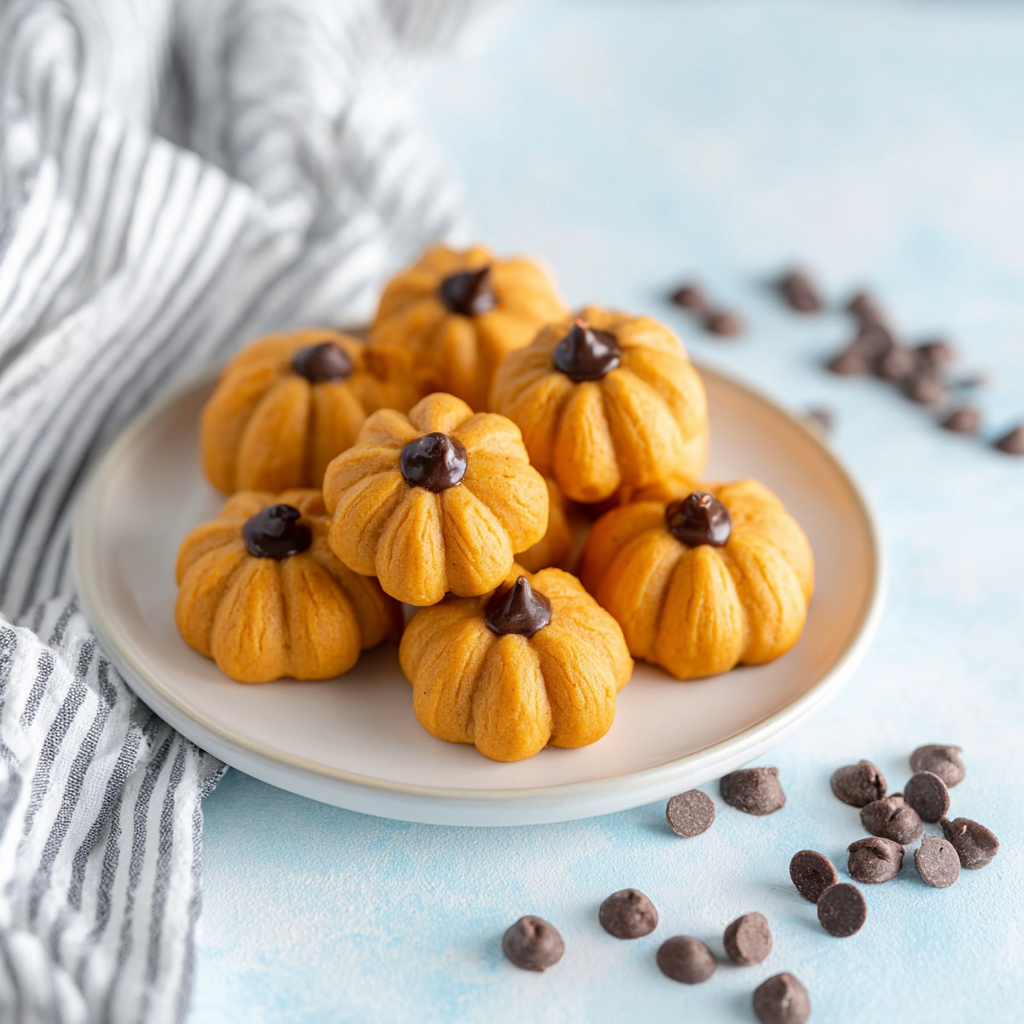
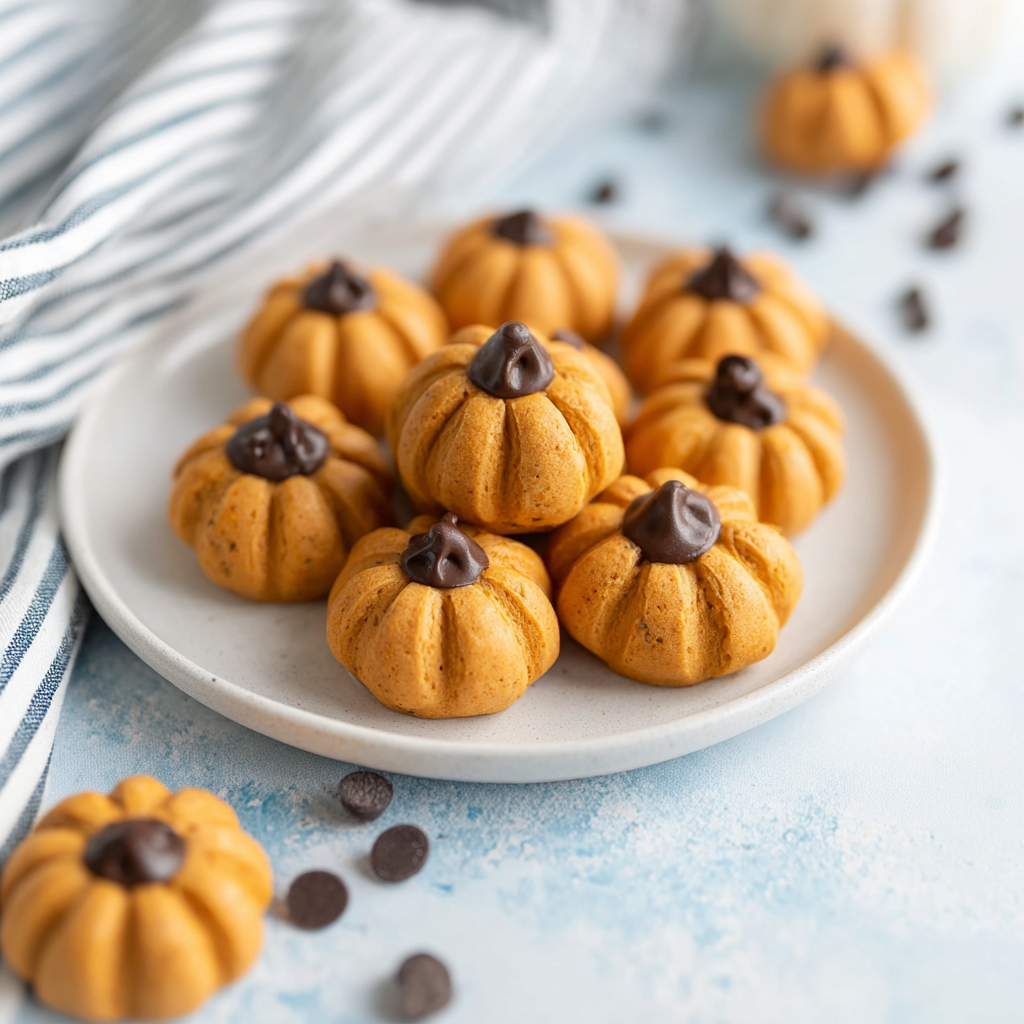
- Shape and Decorate: This is where they truly become pumpkins! Take a toothpick or the dull edge of a thin knife and gently press lines into the dough balls to make them look like miniature pumpkins. Aim for 6-8 evenly spaced vertical lines around each ball. Next, take a mini chocolate chip and carefully press it into the top center of each pumpkin to create the “stem” effect.
- Chill and Enjoy: Repeat the rolling, shaping, and decorating process with the remaining dough. Once all your pumpkins are formed, place the baking sheet in the refrigerator for at least 30 minutes. Chilling helps the pumpkins firm up, making them even more delightful to eat. Then, serve and enjoy your adorable and delicious No-Bake Peanut Butter Ball Pumpkins!
Troubleshooting Common Issues
Even with an easy recipe, sometimes things don’t go exactly as planned. Here are solutions to common problems:
- Dough is Too Sticky: This usually means there’s too much moisture or not enough powdered sugar. Try adding 1-2 tablespoons more powdered sugar, mixing until it reaches a manageable consistency. Chilling the dough for 15-20 minutes can also help significantly.
- Dough is Too Crumbly: This can happen if your peanut butter was too firm, your butter wasn’t soft enough, or there wasn’t enough fat/moisture. Add a tiny bit more softened butter (1/2 teaspoon at a time) or a half-teaspoon of milk or cream, mixing until the dough comes together.
- Color Isn’t Vibrant Enough: Add more gel food coloring, a drop at a time, mixing well after each addition until you achieve your desired orange shade.
- Chocolate Chips Won’t Stay: If your dough is too soft, the chocolate chips might not hold. Chill the formed pumpkins for 10-15 minutes, then re-insert the chips. If the dough is too firm, you might need to make a small indentation with a toothpick first.
Creative Variations & Customizations
One of the best parts of simple recipes is their adaptability! These Peanut Butter Ball Pumpkins are a fantastic canvas for your creativity.
- Different Nut Butters: While peanut butter is classic, you can experiment with almond butter, cashew butter, or even sunflower seed butter for a nut-free option (ensure it’s well-stirred and creamy).
- Roll in Toppings: Instead of just a chocolate chip stem, roll the finished balls in a variety of toppings:
- Crushed Graham Crackers: For a “pie crust” flavor.
- Chocolate Sprinkles: For an extra festive touch.
- Toasted Coconut Flakes: Adds a lovely texture and flavor.
- Cocoa Powder: For a darker, richer finish.
- Drizzle with Chocolate: Melt some white, milk, or dark chocolate and drizzle it over the chilled pumpkins for an extra layer of indulgence. You could even use green candy melts for “vines.”
- Spice It Up: Add 1/4 teaspoon of pumpkin pie spice or a pinch of cinnamon to the dough along with the vanilla for an extra autumnal flavor boost.
- Stuffed Surprises: For an extra treat, try pressing a mini pretzel bit or a small piece of a Rolo candy into the center of the dough before rolling it into a ball.
- Different Shapes: Get creative beyond pumpkins! Roll them into balls and dip them entirely in melted chocolate for classic buckeyes, or shape them into acorns (using a small pretzel stick for the stem and a little crushed cookie for the cap).
If you’re a fan of experimenting with delicious cookie and candy variations, you absolutely have to check out some of my other popular recipes. For more sweet craft recipes that inspire creativity and satisfy your cravings, you might love my Stuffed Red Velvet Cookies, or if you’re feeling adventurous, my Pistachio NYC Cookies are a real treat. And for those who enjoy a chocolatey, nutty combo, don’t miss my Peanut Butter Nutella Cookies!
Making Ahead & Storage Tips
These No-Bake Peanut Butter Ball Pumpkins are fantastic for making in advance, which is a huge plus for holiday planning or weekly meal prep.
- Making Ahead: You can prepare the dough up to 2-3 days in advance. Store it, tightly covered, in the refrigerator. When ready to use, let it sit at room temperature for 15-20 minutes to soften slightly before rolling and shaping. The finished pumpkins can also be made 2-3 days ahead and stored in the fridge.
- Storage: Store the finished Peanut Butter Ball Pumpkins in an airtight container in the refrigerator for up to 1-2 weeks. This keeps them firm and fresh.
- Freezing: For longer storage, arrange the finished pumpkins in a single layer on a baking sheet and freeze until solid (about 1-2 hours). Once frozen, transfer them to a freezer-safe airtight container or zip-top bag. They will keep in the freezer for up to 2-3 months. Thaw them in the refrigerator for a few hours or at room temperature for about 30 minutes before serving.
Serving Suggestions
These adorable pumpkins are versatile and can be enjoyed in many ways:
- Halloween Parties: The obvious choice! Arrange them on a platter with other spooky treats.
- Fall Gatherings: A delightful addition to any Thanksgiving dessert table or autumn potluck.
- Lunchbox Surprise: Pop one into a lunchbox for a fun and nourishing snack.
- After-School Treat: A quick, easy, and satisfying snack for kids (and adults!).
- Coffee or Tea Time: A perfect little bite alongside your favorite hot beverage.
- Gift-Giving: Package them in pretty cellophane bags with a ribbon for a thoughtful homemade gift.
Nutrition Information
(Per serving, approximate, based on 36 servings)
- Calories: 55 kcal
- Fat: 3g
- Protein: 1g
- Carbohydrates: 6g
- Fiber: 0.5g
- Sugar: 5g
- Saturated Fat: 1g
- Cholesterol: 5mg
- Sodium: 25mg
Please note that these are approximate values and can vary based on specific brands of ingredients used and exact portion sizes.
Frequently Asked Questions (FAQs)
How long do Peanut Butter Ball Pumpkins last and how should I store them?
These No-Bake Peanut Butter Ball Pumpkins can be stored in an airtight container in the refrigerator for up to 1-2 weeks. For longer storage, you can freeze them for up to 2-3 months. Thaw in the refrigerator before serving.
Can I make these Peanut Butter Ball Pumpkins ahead of time for a party?
Absolutely! They are perfect for making ahead. You can prepare them 2-3 days in advance and store them in the refrigerator, or even freeze them weeks ahead. Just ensure they are in an airtight container to maintain freshness and prevent them from drying out or absorbing odors.
Are there any substitutions I can make for the ingredients?
Yes! For peanut butter, you can try other creamy nut butters like almond butter or cashew butter, though the texture might vary slightly. For powdered sugar, while it’s key for the texture, a blend of a sugar-free powdered sweetener could work for a lower-sugar option, but I haven’t personally tested it. Always use softened butter for the best consistency. You can also swap vanilla extract for almond extract for a different flavor profile.
Can I add different flavors or coatings to these pumpkin balls?
Definitely! You could roll them in crushed graham crackers, sprinkles, or even a light dusting of cocoa powder for a rich finish. A drizzle of melted white or dark chocolate would also be delicious, especially with a contrasting color. For added flavor, consider adding a pinch of pumpkin pie spice or ground cinnamon to the dough.
Why is my peanut butter dough too sticky or crumbly?
If your dough is too sticky, it likely needs more powdered sugar. Add a tablespoon or two more, mixing until it reaches a manageable consistency. Chilling the dough for 15-20 minutes can also help make it easier to handle. If it’s too crumbly, it might be that your peanut butter was too firm or your butter wasn’t soft enough. Try adding a tiny bit more softened butter (1/2 teaspoon at a time) or a teaspoon of milk/cream, mixing until it comes together. Humidity can also play a role, so adjust as needed!


