There are few things in life as comforting as a warm, freshly baked cookie. But what if you could take two of the most beloved cookies – the classic chocolate chip and the iconic Oreo – and combine them into one unbelievably soft, chewy, and utterly irresistible treat? Well, dear reader, you absolutely can!
I’m Sophie, and after perfecting this recipe over nine delightful rounds of testing, these Easy Oreo Chocolate Chip Cookies have become my absolute go-to for family gatherings, potlucks, or simply when a serious cookie craving strikes. Forget complicated steps or endless ingredient lists. This recipe is all about maximizing flavor and texture with minimal fuss, delivering that nostalgic comfort-food feeling with every single bite.
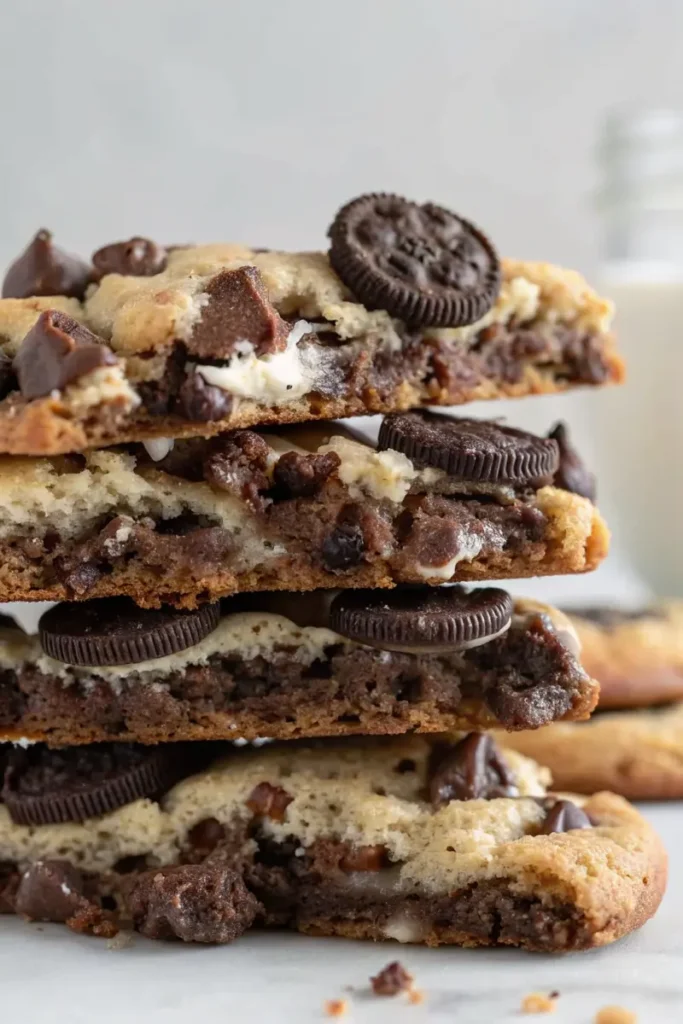
Imagine sinking your teeth into a golden-edged cookie with a gloriously soft, chewy center, studded with gooey pockets of melted chocolate chips and delightful crumbles of Oreo cookies. It’s a symphony of textures and flavors that will have everyone asking for your secret. The best part? It’s truly easy, making it perfect for both seasoned bakers and complete novices looking for a foolproof recipe. So, let’s dive in and bake up some pure cookie happiness!
Why You’ll Absolutely Love These Oreo Chocolate Chip Cookies
Before we get to the mixing and baking, let me tell you why this particular recipe stands out from the crowd. These aren’t just good cookies; they’re a game-changer for anyone who loves a comforting, easy-to-make dessert.
- Quick & Easy to Make: With simple ingredients and straightforward steps, you can whip up a batch of these cookies in under 35 minutes from start to finish. Perfect for last-minute cravings or unexpected guests.
- The Ultimate Crowd-Pleaser: Seriously, who can resist the combination of chocolate chips and Oreos? These cookies disappear fast at any event, making them ideal for family gatherings, school parties, or a cozy night in. They truly serve up to 10 happy cookie lovers!
- Perfectly Soft & Chewy Texture: Thanks to a clever combination of ingredients and my tested baking method, these cookies boast an incredible chewiness with slightly crisp edges and soft, almost gooey centers. They hold their shape beautifully without becoming brittle.
- Unbeatable Flavor Fusion: You get the best of both worlds – the classic sweetness of a chocolate chip cookie amplified by the unique chocolatey crunch and creamy filling of crushed Oreos. It’s a flavor explosion that’s surprisingly harmonious.
- Sophie’s Tested & Approved! I’ve personally made these cookies more than nine times, tweaking and refining until they were absolutely perfect. You can trust that this recipe is tried, true, and guaranteed to deliver delicious results every single time. This is my cookie legacy, and I’m thrilled to share it with you.
Gathering Your Ingredients: Quality Matters!
One of the beauties of these cookies is that they rely on readily available ingredients. However, as an expert baker, I always stress that the quality of your ingredients can truly elevate your end result.
Here’s what you’ll need, along with a few tips:
- 1/2 cup (1 stick) unsalted butter, slightly softened: Room temperature butter is crucial for creaming properly with sugar, creating air pockets that contribute to the cookie’s texture. “Slightly softened” means it should give slightly when pressed, but not be greasy or melted.
- 1/2 cup brown sugar (packed): Brown sugar is the secret weapon for that signature chewiness and rich, molasses-like flavor. Always pack it into your measuring cup for an accurate amount.
- 1/4 cup granulated sugar: This adds sweetness and contributes to the cookie’s spread and crispness on the edges.
- 1 large egg: A binder that adds moisture and richness. Ensure it’s also at room temperature for better emulsification with the butter mixture.
- 2 tsp vanilla extract: Use a good quality pure vanilla extract for the best flavor. It enhances all the other sweet notes.
- 1 & 1/4 cup all-purpose flour: The structure of your cookie. Measure using the “spoon and level” method (spoon flour into the measuring cup, then level off with a straight edge) to avoid overpacking.
- 1 tbsp corn starch: My expert tip for extra soft, tender cookies that resist spreading too much. Don’t skip this!
- 1/2 tsp baking soda: This leavening agent helps the cookies rise and spread, reacting with the acidic brown sugar. Ensure it’s fresh for optimal results.
- 1/2 tsp salt: A crucial flavor enhancer that balances the sweetness and brings out the chocolate notes. Don’t underestimate its importance!
- 3/4 cup semi-sweet chocolate chips: I prefer semi-sweet as it balances well with the sweetness of the Oreos. You can use milk chocolate or a mix if you prefer.
- 7 Oreo cookies, roughly chopped (regular stuffed, NOT DOUBLE STUFFED): This is important! Regular Oreos provide the perfect cookie-to-cream ratio. Double Stuffed Oreos can make the cookies greasy and overly sweet due to the excess filling.
Step-by-Step Instructions for Your Best Cookies Ever!
Ready to bake? Follow these straightforward steps for perfect Easy Oreo Chocolate Chip Cookies every time.
- Prepare Oven and Baking Sheet: Preheat your oven to 350°F (175°C). Line a large baking sheet with parchment paper or a silicone baking mat (like a Silpat). This prevents sticking and ensures even baking.
- Cream Butter and Sugars: In a large mixing bowl (or the bowl of a stand mixer fitted with the paddle attachment), add the slightly softened butter, brown sugar, and granulated sugar. Cream them together on medium speed for 2-3 minutes, until the mixture is light, fluffy, and pale in color. This process incorporates air, making your cookies tender.
- Add Wet Ingredients: Crack the egg into the butter-sugar mixture, then add the vanilla extract. Mix on medium speed until everything is smoothly incorporated and no streaks of egg remain. Scrape down the sides of the bowl with a spatula to ensure everything is well combined.
- Combine Dry Ingredients: In a separate small bowl, whisk together the flour, corn starch, baking soda, and salt. Gradually add this dry mixture to the wet ingredients, mixing on low speed just until barely combined. The key here is not to overmix, as overdeveloping the gluten can lead to tough cookies. Stop mixing as soon as you see no more dry streaks of flour.
- Fold in Mix-ins: Gently fold in the semi-sweet chocolate chips and the roughly chopped Oreo pieces using a rubber spatula. Mix just until they are evenly distributed throughout the dough. Again, avoid overmixing.
- Scoop and Place Dough: Using a large cookie scoop (a 1/4 cup or 4 tablespoon capacity scoop works perfectly for generous cookies), scoop out uniform portions of dough. You should get about 10 cookies. Place the scooped dough balls onto your prepared baking sheet, ensuring there’s ample space between them (about 2-3 inches) to allow for spreading.
- Bake the Cookies: Transfer the baking sheet to the preheated oven and bake for 13 minutes. The cookies are done when their edges are lightly golden brown, but the centers still look slightly soft or even a little underdone. This is crucial for achieving that incredible soft, chewy texture. Trust me on this!
- Cool and Enjoy: Remove the baking sheet from the oven. Let the cookies cool on the baking sheet for 5 minutes. This allows them to set up and continue baking slightly from the residual heat. After 5 minutes, carefully transfer the cookies to a wire cooling rack to cool completely.
Voilà! Your kitchen will be filled with an intoxicating aroma, and you’ll have a batch of the most delicious Easy Oreo Chocolate Chip Cookies ready to devour.
Sophie’s Expert Tips for Cookie Perfection
After countless batches and a relentless pursuit of the perfect cookie, I’ve gathered some invaluable insights. These tips will help you avoid common baking pitfalls and ensure your Easy Oreo Chocolate Chip Cookies are absolutely stellar every single time.
- Mind Your Butter Temperature: This is probably my number one tip for any cookie. Your butter should be slightly softened, not melted or rock-hard. If it’s too cold, it won’t cream properly with the sugar, leading to dense cookies. If it’s too warm or melted, your cookies will spread excessively and become greasy. Take it out of the fridge about 30-60 minutes before you start.
- The Power of Cornstarch: Don’t skip the cornstarch! It’s my secret weapon for cookies that are wonderfully tender and soft without being cakey. It helps create a delicate crumb and prevents over-spreading, contributing to that perfect thick, chewy texture.
- Don’t Overmix the Dough: Once you add the flour, mix just until combined. Overmixing develops gluten, which can make your cookies tough and dense. A few streaks of flour are better than an overmixed dough. The chocolate chips and Oreos will be folded in gently, ensuring minimal agitation.
- Accurate Flour Measurement is Key: Too much flour is a common culprit for dry, crumbly cookies. Always use the “spoon and level” method: spoon flour into your measuring cup, then level off the top with the back of a knife or straight edge. Never scoop directly from the bag, as this compacts the flour.
- Chop Your Oreos Properly: Aim for “roughly chopped” pieces, not crushed crumbs. You want distinct chunks of Oreo for texture and flavor. Regular stuffed Oreos are crucial here – double stuffed can introduce too much moisture and sweetness, altering the cookie’s structure.
- The Art of Underbaking: For truly soft and chewy cookies, resist the urge to overbake. When you pull the cookies from the oven, the centers should still look a little soft and slightly underdone. They will continue to bake and set as they cool on the hot baking sheet. This ensures a gooey interior that’s pure bliss.
- Cooling Time is Critical: Those 5 minutes on the baking sheet are non-negotiable! This allows the cookies to finish baking, firm up, and prevent them from falling apart when you transfer them. Patience is a virtue, especially when it comes to cookies!
Delicious Variations & Customizations
While this recipe for Easy Oreo Chocolate Chip Cookies is perfect as is, it’s also a fantastic base for experimentation! Here are a few ideas to get your creative juices flowing:
- Different Chocolate Chips: Swap out semi-sweet for milk chocolate chips, dark chocolate chunks, or even white chocolate chips for a different flavor profile. A mix of two types can also be wonderful!
- Nutty Additions: Fold in 1/2 cup of chopped walnuts or pecans along with the chocolate chips and Oreos for an extra layer of crunch and flavor.
- Minty Twist: If you’re a fan of mint and chocolate, try using mint-flavored Oreos! Just be aware that this will significantly change the flavor, so it’s best for true mint lovers.
- Make Them Mini: For smaller, bite-sized treats, use a smaller cookie scoop (about 1 tablespoon) and reduce the baking time to 8-10 minutes. Keep a close eye on them to prevent overbaking.
- A Touch of Spice: A pinch of cinnamon (1/4 tsp) can add a subtle warmth that complements the chocolate beautifully, especially if you’re leaning into a comforting, cozy vibe.
Serving Suggestions: How to Enjoy Your Cookies
These Easy Oreo Chocolate Chip Cookies are delicious on their own, but here are some ways to elevate the experience:
- Classic Milk Companion: A tall, cold glass of milk is the quintessential partner for a warm, freshly baked cookie. Pure nostalgia!
- Coffee or Tea Time: Pair them with your morning coffee or an afternoon tea for a delightful pick-me-up.
- Ice Cream Sandwich: Once completely cooled, press two cookies around a scoop of your favorite vanilla or chocolate ice cream for an epic homemade ice cream sandwich.
- Dessert Platter Star: Arrange them on a platter with other small desserts for a party or gathering. Their unique appeal makes them stand out.
- Thoughtful Gift: Package a few cookies in a cute box or bag as a homemade gift for friends, neighbors, or teachers.
Storage and Freezing Tips
Knowing how to properly store your cookies ensures they stay fresh and delicious for as long as possible!
Storing Baked Cookies:
Once your Easy Oreo Chocolate Chip Cookies have cooled completely, store them in an airtight container at room temperature. They will remain wonderfully soft and chewy for 3-4 days. For an extra boost of freshness, I often place a half-slice of plain bread (like sandwich bread) into the container with the cookies; the cookies absorb moisture from the bread, keeping them softer longer.
Freezing Baked Cookies:
If you want to enjoy these cookies over a longer period, they freeze beautifully! Once completely cooled, place the cookies in a single layer on a baking sheet and freeze for about an hour until firm. Then, transfer them to a freezer-safe zip-top bag or airtight container, separated by parchment paper, for up to 2-3 months. Thaw at room temperature or warm briefly in the microwave for a “fresh out of the oven” experience.
Freezing Cookie Dough:
This is a fantastic option for having fresh cookies on demand!
- Scoop: Scoop the cookie dough into individual balls and place them on a parchment-lined baking sheet.
- Flash Freeze: Freeze the dough balls for about 1-2 hours, or until they are solid.
- Store: Transfer the frozen dough balls to a freezer-safe zip-top bag or airtight container. Label with the date. They can be stored for up to 3 months.
- Bake from Frozen: When you’re ready to bake, place the frozen dough balls on a prepared baking sheet and bake as directed, adding 1-3 minutes to the baking time. No need to thaw!
Frequently Asked Questions (FAQs) About Oreo Chocolate Chip Cookies
Here are some common questions I get about making these delicious cookies:
Can I use Double Stuffed Oreos for these cookies?
While tempting, I highly recommend sticking to regular stuffed Oreos for this recipe. Double Stuffed Oreos have too much cream filling, which can melt excessively during baking, leading to a greasy cookie and an unbalanced flavor profile. The regular amount ensures the perfect ratio of cookie crunch to cream, complementing the chocolate chips beautifully.
Why are my Oreo chocolate chip cookies flat?
Flat cookies can be caused by a few factors. Ensure your butter isn’t too soft or melted (it should be slightly softened, not liquid). Also, make sure your baking soda is fresh and active. Overmixing the dough can also lead to less airy cookies. Finally, properly measuring your flour (spoon and level method) is crucial, as too little flour can result in a thinner dough.
Can I make the cookie dough ahead of time?
Absolutely! This dough is fantastic for making ahead. You can scoop the dough balls and refrigerate them in an airtight container for up to 3-4 days. For longer storage, freeze the scooped dough balls on a baking sheet until firm, then transfer them to a freezer-safe bag for up to 3 months. Bake from frozen, adding a minute or two to the baking time.
How should I store these cookies to keep them fresh?
Once cooled completely, store your Easy Oreo Chocolate Chip Cookies in an airtight container at room temperature. They will stay wonderfully soft and chewy for up to 3-4 days. For an extra boost of freshness, you can place half a slice of bread in the container with them; the cookies will absorb moisture from the bread, keeping them moist longer.
What’s the role of cornstarch in this cookie recipe?
Cornstarch is my secret ingredient for achieving that incredibly soft and chewy texture! It helps to tenderize the cookies, preventing them from becoming tough or cakey. It also absorbs moisture, contributing to a wonderfully melt-in-your-mouth feel and helping the cookies maintain their shape during baking without becoming overly spread out.
More Irresistible Sweet Craft Recipes to Explore!
If you’ve fallen in love with these delightful Easy Oreo Chocolate Chip Cookies and are keen to explore more incredible cookie creations, you’re in the right place! At Sweet Craft Recipes, we specialize in tried-and-tested treats that bring joy to every bite. My passion for cookies, especially those with a wonderful “stuffed” element, knows no bounds.
If you enjoyed the unique texture and flavor of the Oreo pieces folded into these cookies, you absolutely have to check out some of our other stuffed cookie masterpieces. These recipes take the humble cookie to a whole new level of indulgence, perfect for elevating any dessert table or simply treating yourself.
- For a truly decadent experience, dive into our Stuffed Red Velvet Cookies Recipe. Imagine a rich red velvet cookie with a surprise creamy filling – pure bliss!
- Craving something unique and wonderfully thick? Our Pistachio NYC Cookies Recipe delivers that iconic bakery-style crunch and a delightful nutty flavor.
- For the ultimate seasonal indulgence, especially around Easter, you simply can’t miss our Creme Egg Stuffed Cookies Recipe. They’re an absolute showstopper!
- If you’re a fan of classic flavor combinations, our Peanut Butter Nutella Cookie Recipe offers the perfect harmony of salty peanut butter and sweet, creamy Nutella.
- And for those who adore a classic with a twist, these White Chocolate Stuffed Cookies are unbelievably soft, chewy, and bursting with a molten white chocolate center.
Each of these recipes has been personally tested and perfected by me, Sophie, to ensure you achieve bakery-quality results right in your own kitchen. Join the Sweet Craft Recipes family and discover your next favorite treat!
Time to Bake Your Own Batch of Happiness!
There you have it – my tried, tested, and beloved recipe for Easy Oreo Chocolate Chip Cookies. These aren’t just cookies; they’re a little bite of comfort, a guaranteed smile-maker, and a testament to how simple ingredients can create something truly extraordinary.
From the perfectly softened butter to the exact baking time, every step in this guide has been refined to ensure your success. Whether you’re baking for family gatherings, a quiet evening at home, or looking to impress your friends, these soft, chewy, and irresistible cookies are sure to be a hit.
So, preheat your oven, gather your ingredients, and get ready to experience the magic of combining two iconic treats into one spectacular cookie. I can’t wait for you to try them and fall in love, just as I have! Happy baking!


