I’ll never forget the first time I tried to combine my two favorite treats—Oreos and chocolate chip cookies—into one magical dessert. The result? A melted mess that stuck to the pan and broke my heart. But after nine attempts, countless ingredient tweaks, and one very patient family who taste-tested every batch, I finally cracked the code for these show-stopping cookies and cream bar cookies.
What makes these different from regular cookies? It’s all about the homemade cookies and cream bark that gets folded right into buttery cookie dough. Trust me, once you try this technique, you’ll never go back to plain cookies again.
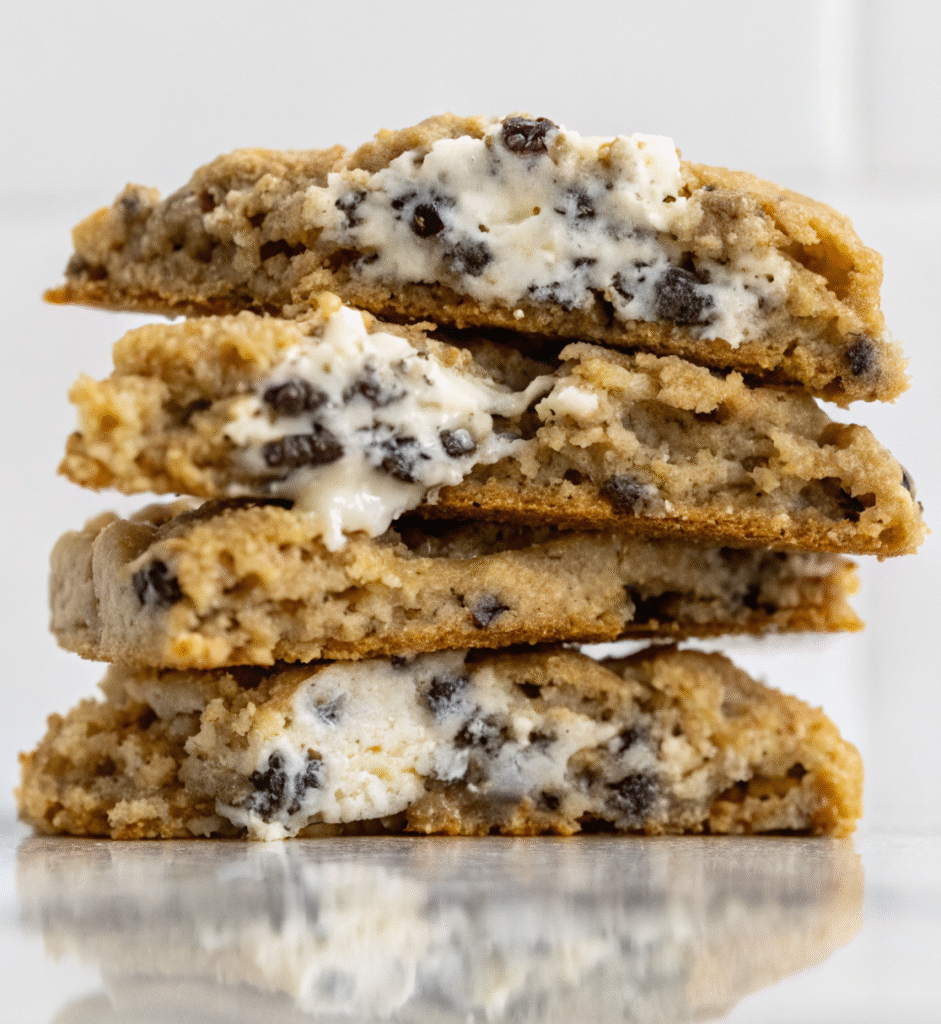
What Are Cookies and Cream Bar Cookies?
Cookies and cream bar cookies are thick, bakery-style cookies loaded with chunks of homemade white chocolate bark studded with crushed Oreo cookies. Unlike traditional chocolate chip cookies, these feature a double dose of cookies and cream flavor—both mixed into the dough and as chunky bark pieces throughout.
The magic happens when you make your own cookies and cream bark, then chop it into rustic pieces that create pockets of creamy, crunchy sweetness in every bite. Each cookie weighs about 75 grams and serves as a perfect dessert for family gatherings, cookie exchanges, or whenever you need serious comfort food.
Why This Recipe Works:
These cookies hit the sweet spot between nostalgic comfort food and elevated home baking. The homemade bark technique ensures even distribution of cookies and cream flavor, while the overnight chill creates that coveted thick, chewy texture with crispy edges.
The Secret to Perfect Cookies and Cream Bark
After testing this recipe over nine times, I learned that the bark makes or breaks these cookies. Store-bought cookies and cream chocolate often contains stabilizers that don’t melt properly during baking. Making your own takes just 10 minutes and tastes infinitely better.
Key Bark Technique Tips:
The chocolate matters immensely. I use high-quality white chocolate chips or chopped white chocolate bars—never candy melts or almond bark, which seize up when mixed with cookie crumbs. Ghirardelli and Guittard white chocolate chips work beautifully.
Chop your six Oreos into fine pieces, not powder. You want small chunks that distribute evenly through the melted chocolate. I pulse them in a food processor about 4-5 times or chop with a sharp knife until the pieces are roughly the size of peppercorns.
When melting white chocolate, patience prevents burning. Microwave in 15-second bursts, stirring between each interval. The chocolate should be smooth and glossy, not grainy. If using stovetop method, keep the heat on the absolute lowest setting and stir constantly.
Spread your bark to standard chocolate bar thickness—about 1/4 inch. Too thin and it crumbles into dust when mixing; too thick and the pieces won’t distribute evenly through your dough.
The Freezer Trick:
Freeze the bark completely solid before chopping—at least 30 minutes. This prevents it from turning into a melted mess when you fold it into room temperature cookie dough. I learned this the hard way on attempt number three!
Building the Perfect Cookie Dough Base
The foundation of great cookies and cream bar cookies starts with properly creamed butter and sugar. This isn’t just mixing—it’s incorporating air that creates lift and that signature crackly top.
Butter Temperature Matters:
Room temperature butter should leave a slight fingerprint when pressed but not be greasy or shiny. Too cold and it won’t incorporate air properly; too soft and your cookies will spread flat. I leave mine out for 45-60 minutes before baking.
The Brown Sugar Secret:
Light brown sugar adds moisture and creates chewier cookies with deeper caramel notes that complement the sweet white chocolate bark. The combination of 1/2 cup brown sugar and 1/3 cup granulated sugar hits the perfect balance—enough structure from granulated sugar, enough chew from brown sugar.
Why Two Eggs (Plus One Yolk)?
Using one whole egg plus an extra yolk is my secret weapon for ultra-rich, thick cookies. The extra yolk adds fat and emulsifiers without the extra water from egg whites, which can make cookies cakey. This technique comes straight from professional bakery recipes.
The Vanilla Extract Rule:
Always use pure vanilla extract, never imitation. The flavor difference is dramatic, especially in recipes where vanilla plays a supporting role to other flavors. I use Nielsen-Massey Madagascar Bourbon vanilla for special batches.
The Mixing Method That Changes Everything
Most home bakers over-mix cookie dough, developing too much gluten and creating tough, flat cookies. My method ensures tender, thick cookies every single time.
Stage One: Creaming (2-3 minutes total)
Beat butter and both sugars at medium-high speed for about one minute. Stop, scrape down the bowl thoroughly, then beat again. This double-scraping technique ensures no butter pockets remain unmixed. The mixture should look fluffy and lighter in color.
Stage Two: Adding Wet Ingredients
Add vanilla, egg, and extra yolk together. Start on low speed to prevent splattering, then increase to high for 1-2 minutes. The mixture will lighten further and look almost like buttercream frosting. This is perfect—you’re creating an emulsion that holds your cookies together.
Stage Three: Cookie Pieces
Finely chop two additional Oreos and add them directly to your wet mixture. These crushed cookies add texture throughout the dough and reinforce that cookies and cream flavor profile. Don’t skip this step!
Stage Four: Dry Ingredients (The Gentle Approach)
Add flour, baking soda, baking powder, and salt all at once. Mix on the lowest speed until only half incorporated—you should still see streaks of flour. This prevents over-mixing.
Stage Five: The Bark Addition
Chop your frozen bark into roughly 1-inch pieces. Yes, they’ll break down a bit more during mixing, which is exactly what you want. Mix on the absolute lowest speed for just 15-30 seconds at a time. I usually stop the mixer and finish by hand with a spatula to preserve those gorgeous bark chunks.
Why the Overnight Chill Is Non-Negotiable
I know waiting 6+ hours feels like torture when you want cookies now, but this step transforms good cookies into bakery-quality masterpieces.
The Science Behind Chilling:
During the overnight rest, flour hydrates completely, developing flavor complexity and preventing spread. The butter solidifies, which means cookies hold their shape better and develop those crispy edges with chewy centers.
Additionally, the sugar starts dissolving into the butter and eggs, creating a deeper, more caramelized flavor during baking. Professional bakeries chill cookie dough for 24-72 hours for this exact reason.
Practical Chilling Tips:
Portion your dough into 75-gram balls (about 1/4 cup each) before chilling. This means you’re ready to bake immediately after the chill—no struggling with rock-hard dough.
Cover your portioned dough balls with plastic wrap directly touching the surface. This prevents the dough from drying out and forming a skin that can prevent proper spreading.
For maximum flexibility, chill for 6 hours minimum, but up to 24 hours for even better flavor. Beyond 24 hours, freeze the dough balls following the storage instructions below.
Baking to Perfection: Temperature and Timing
After nine test batches, I’ve nailed the exact baking parameters for these thick, gooey cookies with slightly crispy edges.
Oven Temperature: 350°F
This moderate temperature allows the cookies to spread slightly while the centers stay gloriously underbaked. Too hot (375°F) and the edges burn before centers set; too cool (325°F) and they spread thin.
The Spacing Rule:
Place only 4-6 cookies per standard sheet pan, spaced at least 3 inches apart. These cookies spread to about 4 inches in diameter, and crowding causes uneven baking and prevents that signature crispy edge.
Timing for Different Preferences:
- 11-12 minutes: Barely set edges, very gooey centers (my personal favorite)
- 12-13 minutes: Set edges, soft centers with slight jiggle
- 13-14 minutes: Crispy edges, just-set centers
The centers will look underdone when you remove them—this is correct! They continue baking on the hot sheet pan for another 3-4 minutes after leaving the oven.
The Extra Bark Topping Trick:
If you reserved some bark pieces, press them gently onto the cookie tops immediately when they come out of the oven. The residual heat softens the chocolate just enough to make them stick, creating a gorgeous presentation.
Cooling Is Part of Baking:
Let cookies cool on the sheet pan for 10-15 minutes minimum. Moving them too soon causes them to break apart since the structure hasn’t fully set. The cookies will sink slightly as they cool—this is normal and creates that perfect dense, fudgy texture.
Storage and Make-Ahead Strategies
These cookies taste incredible fresh from the oven, but proper storage keeps them delicious for days.
Short-Term Storage (1-3 Days):
Store completely cooled cookies in an airtight container at room temperature. I add a piece of bread to the container—it keeps cookies soft by releasing moisture. Replace the bread slice every 24 hours.
Layer cookies with parchment paper if stacking to prevent the bark pieces from sticking together.
Freezing Cookie Dough (My Preferred Method):
After the initial 6-hour chill, freeze portioned dough balls on a sheet pan for 24 hours until solid. Transfer to a freezer bag with all air removed. Properly frozen dough lasts 3 months.
Bake from frozen at 325°F for 15-18 minutes. The slightly lower temperature prevents burning while the frozen center bakes through.
Freezing Baked Cookies:
Freeze fully cooled cookies in a single layer for 2 hours, then transfer to freezer bags. They’ll keep for up to 2 months.
Thaw at room temperature for 30 minutes, then refresh in a 350°F oven for 3-4 minutes to restore that just-baked texture.
Reheating for Fresh-Baked Taste:
Microwave one cookie for 10 seconds for a quick warm-up, though I prefer the oven method: 350°F for 3-5 minutes until edges crisp and centers soften.
Common Mistakes and How to Avoid Them
Through my nine test batches, I made every mistake possible so you don’t have to.
Mistake #1: Using Candy Melts Instead of Real White Chocolate
Candy melts contain vegetable oil instead of cocoa butter and won’t melt properly into the cookies. They create waxy, flavorless chunks. Always use real white chocolate with cocoa butter as the first ingredient.
Mistake #2: Over-Mixing After Adding Flour
The moment you add flour, gluten development begins. Over-mixing creates tough, flat cookies. Mix just until you see a few flour streaks, then stop.
Mistake #3: Skipping the Chill Time
I tested a side-by-side comparison once—cookies baked immediately spread thin and flat with no height. The chilled batch stayed thick and perfect. Don’t skip this step, even if you’re tempted.
Mistake #4: Chopping the Bark Too Small
Tiny bark pieces melt completely during baking, disappearing into the dough. Aim for 1-inch chunks that create pockets of cookies and cream flavor throughout each cookie.
Mistake #5: Baking Multiple Sheets at Once
Oven temperature varies between racks, causing uneven baking. Bake one sheet at a time on the center rack for consistent results.
Customization Ideas and Variations
Once you master the base recipe, try these tested variations:
Dark Chocolate Version:
Replace white chocolate with dark chocolate (60-70% cacao) for a less sweet, more sophisticated flavor. The dark chocolate pairs beautifully with the sweet Oreo pieces.
Peanut Butter Twist:
Add 1/4 cup creamy peanut butter to the wet ingredients and reduce butter to 8 tablespoons. Creates a peanut butter cookie hybrid that’s absolutely addictive.
Mint Cookies and Cream:
Use mint Oreos instead of regular and add 1/2 teaspoon peppermint extract to the dough. Perfect for holiday baking!
Stuffed Cookie Version:
Press dough balls flat, add a square of white chocolate in the center, then seal and reshape. The molten white chocolate center is incredible.
Birthday Cake Cookies and Cream:
Use Golden Oreos and add 1/4 cup rainbow sprinkles to the dough. Use birthday cake flavored white chocolate for extra celebration vibes.
Expert Tips From My Testing Sessions
After baking 90+ cookies across nine test batches, here are my hard-won insights:
Tip #1: Weigh Your Ingredients
Measuring flour by volume varies wildly depending on how you scoop. A kitchen scale ensures consistent results every single time. I measure 200 grams of flour, which equals about 1 2/3 cups.
Tip #2: Use a Cookie Scoop
A #16 scoop (4 tablespoon/1/4 cup capacity) creates uniformly sized cookies that bake evenly. Eyeballing sizes leads to some cookies burning while others underbake.
Tip #3: Rotate Halfway Through Baking
Even in the best ovens, hot spots exist. Rotate your cookie sheet 180 degrees at the 6-minute mark for even browning.
Tip #4: The Slam Test
When you remove cookies from the oven, give the sheet pan a firm slam on the counter. This deflates any air pockets and creates those gorgeous wrinkled, crackly tops that make professional bakery cookies so distinctive.
Tip #5: Underbake Slightly
Cookies continue baking on the hot pan after leaving the oven. Remove them when centers still look slightly underdone—they’ll finish setting during the cooling period.
Nutritional Information and Dietary Modifications
Each cookie contains approximately 54 grams of carbohydrates, making them a substantial treat perfect for sharing or saving for later.
Full Recipe Carb Breakdown:
- Total recipe: 544g carbs
- White chocolate contribution: 144g carbs
- Eight Oreos (all cookies used): 80g carbs
- Per serving (10 cookies): ~54g carbs each
Note About Carb Calculations:
As someone who manages insulin-to-carb ratios for diabetes, I calculate these numbers based on the specific ingredient brands I use. Your totals may vary slightly depending on your chocolate and cookie brands. Always check nutrition labels for your specific ingredients.
Gluten-Free Adaptation:
Replace all-purpose flour with a 1:1 gluten-free baking flour like Bob’s Red Mill. Add 1/4 teaspoon xanthan gum if your blend doesn’t include it. Use gluten-free sandwich cookies like Glutino.
Dairy-Free Version:
Substitute plant-based butter (I like Miyoko’s) and dairy-free white chocolate chips (Enjoy Life brand works well). The texture will be slightly different but still delicious.
Reducing Sugar:
You can reduce granulated sugar by 2 tablespoons without major texture changes, but I don’t recommend reducing further as sugar affects structure and spread, not just sweetness.
Equipment Recommendations
Having the right tools makes this recipe foolproof:
Stand Mixer: A KitchenAid or similar stand mixer with paddle attachment makes creaming butter effortless. Hand mixers work but require more time and arm strength.
Kitchen Scale: For consistent results, weigh ingredients. I use an OXO digital scale that measures in grams.
Cookie Scoop: A #16 scoop (about 1/4 cup) ensures uniform size. I use a spring-loaded scoop from OXO that releases dough cleanly.
Heavy-Duty Sheet Pans: Light, thin pans cause uneven baking and burnt bottoms. Nordic Ware aluminum sheet pans distribute heat perfectly.
Parchment Paper: Prevents sticking and makes cleanup effortless. I buy Reynolds parchment paper sheets pre-cut to fit standard pans.
Silicone Spatula: For scraping bowls and folding in bark pieces gently. Get a heat-resistant one that won’t melt if you use it near hot pans.
Why These Cookies Work for Family Gatherings
With each cookie serving as a substantial 75-gram portion, this recipe yields 10 generous cookies—perfect for intimate family gatherings of 8-10 people where everyone can enjoy a freshly baked treat.
The cookies and cream flavor profile has universal appeal. Kids love the familiar Oreo taste, while adults appreciate the elevated homemade bark and bakery-quality texture. I’ve served these at family birthday parties, holiday gatherings, and casual Sunday dinners, and they’re always the first dessert to disappear.
Make-Ahead Benefits for Hosts:
Prepare the dough 1-2 days before your event and keep it chilled. Bake fresh 30 minutes before serving for that irresistible warm cookie aroma that fills your home. Your guests will think you spent all day baking when you actually did the work in advance.
The recipe easily doubles or triples for larger gatherings. I’ve made triple batches for extended family reunions (30 cookies) and the recipe scales beautifully.
Pairing Suggestions
These rich, sweet cookies pair beautifully with beverages that balance their intensity:
Coffee: A medium-roast coffee cuts through the sweetness perfectly. I love these with a cappuccino or cold brew.
Milk: Classic for a reason. The cold milk contrast with warm cookies is unbeatable. Try whole milk for extra richness.
Tea: Earl Grey or English Breakfast tea provides a sophisticated, slightly bitter counterpoint to the sweet cookies and cream flavor.
Ice Cream: Serve slightly warm cookies with vanilla bean ice cream for an over-the-top dessert. The temperature contrast is incredible.
Wine (for adults): A sweet dessert wine like Moscato or a tawny port complements the white chocolate and cookie flavors beautifully.
Frequently Asked Questions
Can I use regular chocolate chips instead of white chocolate?
Absolutely! Semi-sweet or dark chocolate chips work wonderfully and create a less sweet, more balanced flavor. The cookies and cream pieces still provide plenty of sweetness. You can even try stuffed red velvet cookie techniques with chocolate chips.
What if I don’t have a stand mixer?
A hand mixer works fine—just expect to mix a bit longer (add 1-2 minutes to each mixing stage). Make sure your butter is at proper room temperature or you’ll tire out your arms. In a pinch, you can cream butter and sugar by hand with a wooden spoon, though it takes serious elbow grease.
Why are my cookies spreading too much?
Several factors cause excessive spreading: butter too warm, insufficient chilling time, oven too hot, or measuring flour by scooping (which packs it down and gives you less flour). Make sure to chill the full 6 hours and measure flour by spooning it into your measuring cup, then leveling.
Can I freeze the bark ahead of time?
Yes! Make the bark up to 2 weeks ahead and keep it frozen in an airtight container. Chop it while still frozen directly into your finished cookie dough.
My white chocolate seized up—what happened?
White chocolate is temperamental and can seize if it gets too hot or if any water comes in contact with it. Make sure your bowl is completely dry, use low heat, and stir constantly. If it seizes, try adding 1 teaspoon of vegetable oil and stirring vigorously to smooth it out.
How do I know when cookies are done?
Look for edges that are set and slightly golden, with centers that still look a bit puffy and underdone. They should jiggle slightly when you shake the pan. Remember, they continue cooking on the hot sheet after you remove them.
Can I make these into smaller cookies?
Yes! Use a #40 or #60 scoop for smaller portions, reduce baking time to 8-10 minutes, and increase yield to 18-24 cookies. The texture and flavor remain the same, just in bite-sized portions.
What’s the best way to transport these cookies?
Let them cool completely, then pack in a single layer in a sturdy container with parchment between layers if stacking. The bark pieces can make them fragile when warm, so completely cooled cookies travel better.
Can I add other mix-ins?
Absolutely! Try adding 1/2 cup of mini chocolate chips, chopped nuts, or toffee bits along with the bark. Don’t exceed 1 cup of total mix-ins or the cookies won’t hold together properly.
Final Thoughts: Why This Recipe Deserves a Spot in Your Collection
After nine rounds of testing and one very happy family who got to taste-test every version, these cookies and cream bar cookies have become our most-requested dessert. They combine nostalgic comfort food flavors with elevated baking techniques that make you look like a professional baker.
The homemade cookies and cream bark elevates these beyond standard cookies, creating pockets of creamy, crunchy sweetness in every bite. The overnight chill ensures bakery-quality texture—thick, chewy centers with crispy edges that rival any expensive cookie shop.
These cookies work beautifully for family gatherings because the recipe yields 10 substantial portions perfect for intimate dinner parties, and they’re impressive enough for special occasions while being approachable enough for casual weeknight baking.
Whether you’re a seasoned baker or just starting out, this recipe delivers consistent, show-stopping results. The detailed instructions walk you through every step, from making the bark to achieving that perfect underbaked center.
Ready to Bake?
Gather your ingredients, set aside time for the overnight chill, and prepare to create the most delicious cookies and cream bar cookies you’ve ever tasted. Don’t forget to share your results—I love seeing how these turn out in kitchens around the world!
If you loved these cookies, you’ll also want to try my pistachio NYC-style cookies or the decadent Creme Egg stuffed cookies for another showstopping treat.
Happy baking! 🍪


