Chocolate sugar cookies are the ultimate comfort food, offering a rich cocoa flavor with the tender, melt-in-your-mouth texture of a classic sugar cookie. If you have been searching for a recipe that holds its shape perfectly for cut-outs but stays soft in the center, you have found it.
Having tested this recipe over nine times in my kitchen, I can confidently say this is a “triumph” of baking. Sophie here, and I know how frustrating it is when cookies spread into unrecognizable puddles in the oven. That is why I have refined this method to ensure every batch comes out looking beautiful and tasting amazing. Whether you are baking for a holiday exchange, a family gathering, or just a cozy weekend treat, these cookies are a crowd-pleaser.
While these are an indulgent treat, making them from scratch allows for a cleaner, “healthier twist” compared to processed store-bought versions filled with preservatives. You control exactly what goes into the bowl. Let’s get baking!
Why You’ll Love This Chocolate Sugar Cookies Recipe
There are dozens of cookie recipes out there, but this one stands out for several specific reasons. It strikes the perfect balance between a brownie and a butter cookie.
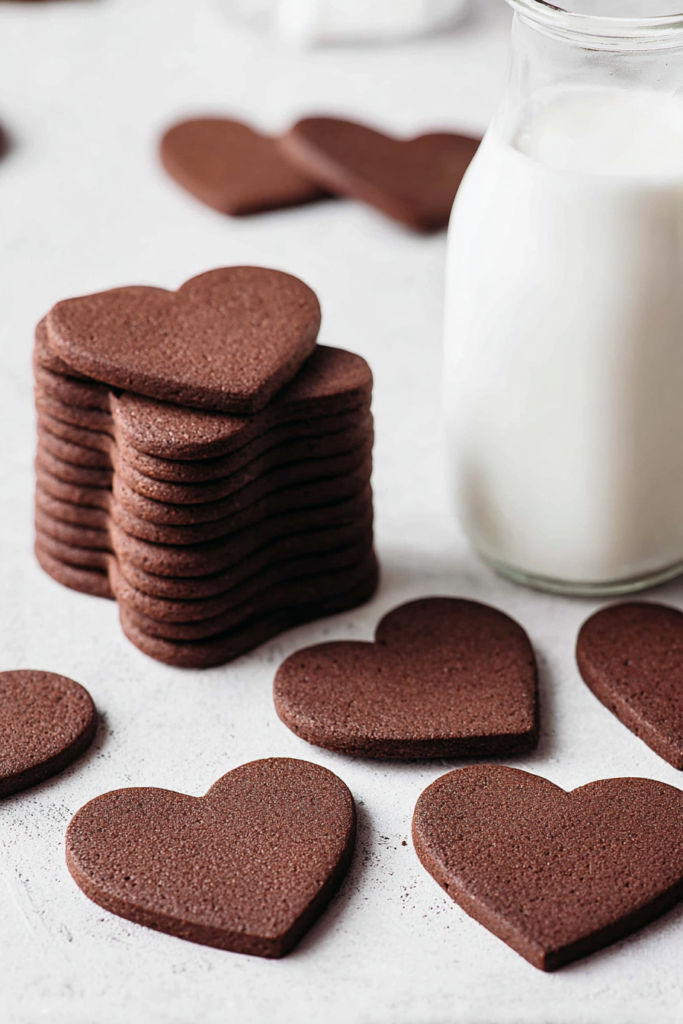
- Holds Shape Perfectly: Unlike many drop cookies, this dough is engineered to keep sharp edges. It is ideal for using your favorite cookie cutters.
- Simple Ingredients: You likely have everything you need in your pantry right now. No obscure specialty items are required.
- Freezer Friendly: This dough freezes beautifully, meaning you can prep ahead of time and bake fresh cookies whenever a craving strikes.
- Rich Flavor: The use of unsweetened cocoa powder gives a deep chocolate taste that isn’t overly sweet, making it a hit with both kids and adults.
- Tested Reliability: After nine rounds of testing, the ratios of flour to butter have been perfected to prevent spreading.
Ingredients for Chocolate Sugar Cookies
The magic of this recipe lies in the ratio of fat to dry ingredients. Here is what you will need to gather before you start.
- Unsalted Butter (softened): 100g (1/2 cup). Using unsalted butter allows you to control the salt level. It must be room temperature to cream properly.
- Powdered Sugar: 80g (2/3 cup). This is the secret weapon. Unlike granulated sugar, powdered sugar (confectioners’ sugar) contains cornstarch, which keeps the cookies tender and prevents them from becoming gritty.
- Egg: 1 large egg, room temperature. This binds the dough together and adds richness.
- Vanilla Extract: 1 tsp. Essential for balancing the bitterness of the cocoa.
- All-Purpose Flour: 180g (1 1/2 cups). The structural backbone of the cookie.
- Unsweetened Cocoa Powder: 25g (1/4 cup). Use standard cocoa or Dutch-processed for a darker color.
- Salt: A pinch to enhance the chocolate flavor.
- Baking Powder (Optional): 1/2 tsp. Leave this out if you want extremely sharp edges; add it if you prefer a slightly softer, puffier bite.
Ingredient Notes and Healthy Swaps
If you are looking to adjust this recipe for dietary needs or a “healthy twist,” consider these adjustments:
- Gluten-Free: You can swap the all-purpose flour for a high-quality 1:1 gluten-free baking flour blend. The texture remains surprisingly similar.
- Cocoa Choice: For a boost of antioxidants, choose a high-quality dark cocoa powder. It intensifies the flavor without adding extra sugar.
- Dairy-Free: You can replace the butter with a high-quality vegan butter stick (not tub margarine) to make this dairy-free.
Step-by-Step Instructions
Follow these steps closely for the best results. The chilling time is mandatory, so plan accordingly!
Step 1 – Mix Dry Ingredients
Preheat your oven to 350°F (175°C) and line two perforated baking sheets with parchment paper. In a medium bowl, sift together the flour, cocoa powder, salt, and baking powder (if you are using it). Sifting is crucial here because cocoa powder tends to clump, and you want a smooth dough.
Step 2 – Cream Butter and Sugar
In a large bowl, place your softened butter and powdered sugar. Using an electric mixer or a stand mixer fitted with a paddle attachment, beat the mixture until it is smooth and creamy. Do not rush this; you want the butter and sugar to be fully combined, but you don’t need to whip excessive air into it like a cake batter.
Step 3 – Add Wet Ingredients
Add the room-temperature egg and the vanilla extract to the butter mixture. Mix again until fully incorporated. Scrape down the sides of the bowl to ensure everything is mixing evenly.
Step 4 – Combine and Chill
Add the dry ingredient mixture to the wet ingredients. Mix on low speed just until combined. The dough will look sticky—this is normal! Use a pastry scraper to gather the dough into a ball. Wrap it tightly in plastic wrap and flatten it into a disk. Refrigerate for at least 20 minutes. This allows the butter to firm up and the flour to hydrate.
Step 5 – Roll and Cut
Take the chilled dough and roll it between two sheets of parchment paper until it is about 1/8 inch (3 mm) thick. Pro tip: Slide the rolled dough (still in the paper) into the freezer for 10–15 minutes. This firms it up, making it incredibly easy to cut clean shapes with your cookie cutters. Place the shapes on your prepared baking sheets.
Step 6 – Bake and Cool
Bake in the preheated oven for 8–10 minutes. Watch them closely; you want the edges to be firm, but the centers should still look slightly soft. They will firm up as they cool. Let them rest on the baking sheet for a few minutes, then transfer to a wire rack to cool completely.
Pro Tips for Success
I have learned a few tricks over my many test batches that will help you achieve bakery-quality results at home.
- Use a Digital Scale: Baking is a science. Measuring cups can vary wildly, but 180g of flour is always 180g. For the most accurate texture, weigh your ingredients.
- The Freezer Trick: Placing your cut-out cookies in the freezer for 20 minutes before putting them in the oven helps them hold their precise shape. This is especially helpful if your kitchen is warm.
- Don’t Over-mix: Once you add the flour, mix only until the white streaks disappear. Over-mixing develops gluten, which leads to tough, hard cookies rather than tender ones.
- Watch the Oven: Chocolate cookies are tricky because you can’t see them turn “golden brown.” Rely on the texture of the edges to know when they are done.
- Room Temperature Ingredients: Ensure your egg and butter are at room temperature so they emulsify properly. If they are cold, the batter may curdle.


Flavor Variations
Once you master the base recipe, you can get creative with flavors.
- Peppermint Chocolate: Add 1/2 teaspoon of peppermint extract along with the vanilla for a festive holiday version.
- Mocha Cookies: Whisk 1 teaspoon of instant espresso powder into the vanilla extract before adding it to the dough. Coffee intensifies chocolate flavor.
- Sandwich Cookies: If you love texture contrasts, try filling two cookies with a cream filling. You might enjoy the filling ideas found in our Stuffed Red Velvet Cookies Recipe.
- Orange Chocolate: Zest one orange into the sugar and butter mixture for a bright, citrusy aroma.
Serving Suggestions
These chocolate sugar cookies are versatile. They are elegant enough for a dessert platter yet sturdy enough for a lunchbox.
- Classic Pairing: Serve these with a tall glass of cold milk or a hot cup of coffee. The bitterness of coffee complements the sweetness of the cookie perfectly.
- Dessert Board: Arrange these alongside other favorites like our Peanut Butter Nutella Cookie Recipe for a stunning mix of colors and flavors at your next party.
- Ice Cream Sandwiches: Because these cookies stay relatively flat, they are excellent for homemade ice cream sandwiches.
Storage and Freezing Instructions
These cookies store wonderfully, making them great for gifting.
- Room Temperature: Keep baked cookies in an airtight container at room temperature for up to 1 week.
- Freezing Dough: You can freeze the unbaked dough disks for up to 3 months. Thaw in the fridge overnight before rolling.
- Freezing Baked Cookies: Baked cookies can be frozen for up to 3 months. Layer them with parchment paper in a freezer-safe container to prevent sticking.
Nutrition Facts (Per Serving)
Here is the nutritional breakdown for one cookie based on the recipe yielding roughly 10 servings.
| Nutrient | Amount |
| Calories | 73 |
| Total Fat | 3.6 g |
| Carbohydrates | 9.4 g |
| Sugar | 3.2 g |
| Protein | 1.2 g |
| Sodium | 96.9 mg |
FAQ About Chocolate Sugar Cookies
Why did my cookies spread in the oven?
Spreading usually happens if the butter was too warm when the cookies went into the oven. Make sure to chill the dough thoroughly. Also, ensure you didn’t accidentally use too little flour. Using a scale fixes the flour issue!
Can I decorate these cookies?
Absolutely. These cookies have a smooth surface perfect for royal icing or a simple glaze. However, they are rich enough to be eaten plain. If you love decorating, you might also like the techniques used in our White Chocolate Stuffed Cookies.
Can I use salted butter?
Yes, you can. If you use salted butter, simply omit the “pinch of salt” listed in the ingredients.
My dough is crumbling and dry. What do I do?
If the dough feels too dry, your egg might have been small, or you may have measured too much cocoa. Let the dough sit for 5 minutes to hydrate. If it is still crumbly, add 1/2 teaspoon of milk and mix gently.
Is baking powder necessary?
No, it is optional. Without it, the cookies will be denser and hold their shape exactly. With it, they will be slightly lighter but might spread a tiny fraction more.
Final Thoughts
Making homemade Chocolate Sugar Cookies is a rewarding experience that fills your kitchen with the incredible scent of warm cocoa. Whether you are baking with kids or prepping for a holiday party, this recipe is reliable, delicious, and fun to make. The combination of easy preparation and sophisticated flavor makes it a keeper in any recipe box.
If you try this recipe, I would love to hear how it turned out! Enjoy your baking adventure.


