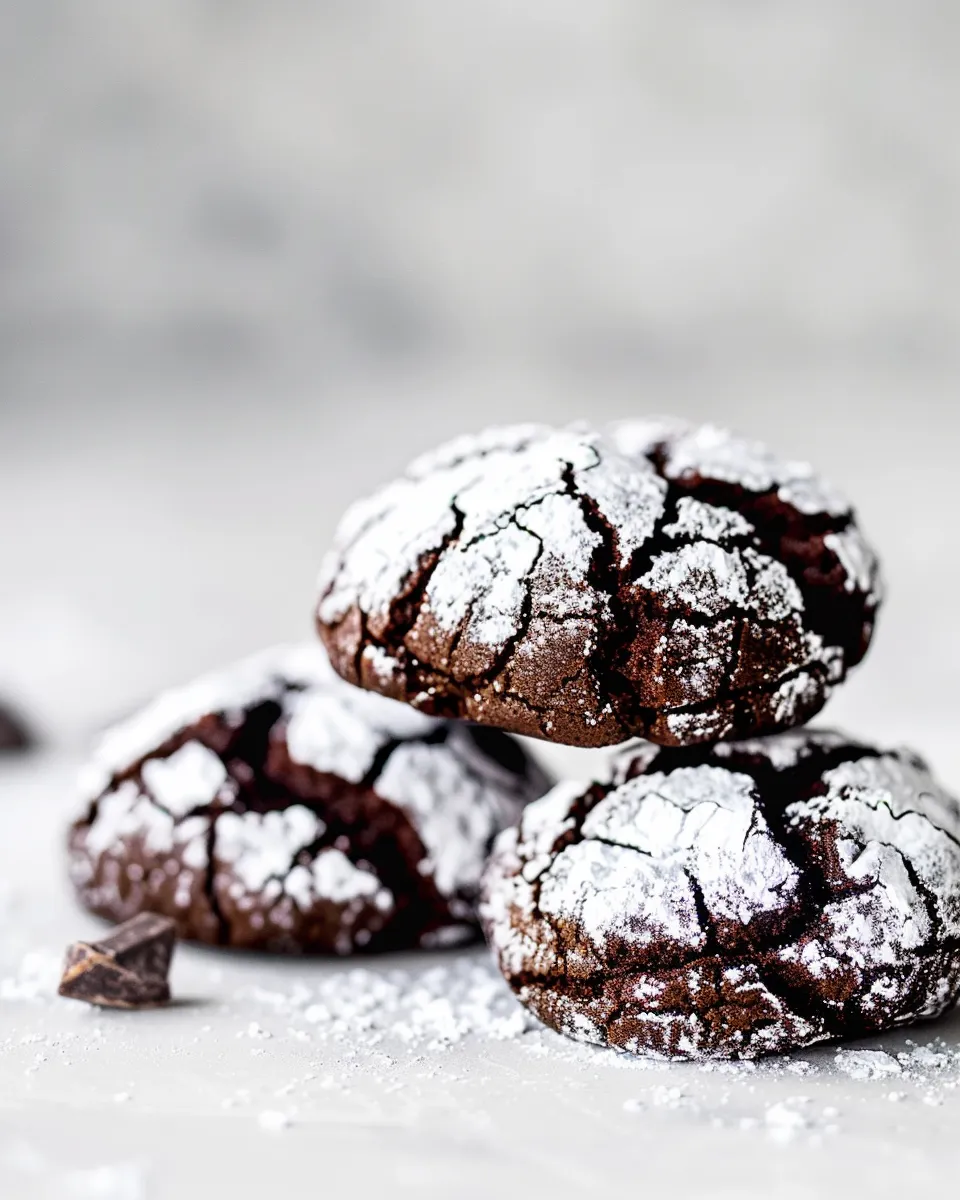
Okay, let’s be honest – who doesn’t love a warm, fudgy chocolate cookie? And when that cookie has a crackly, powdered sugar coating? Forget about it! My journey with Chocolate Crinkles started years ago, a slightly disastrous attempt from a tattered church cookbook. The cookies spread way too thin and were crispy, not chewy. I’ve spent countless hours since then perfecting this recipe, testing it over a dozen times, tweaking ingredients, and experimenting with chilling times. This version? Pure perfection. It’s ridiculously easy, delivers consistently perfect results, and is always a crowd-pleaser. The secret? High-quality cocoa powder and a long chill in the fridge. Trust me, the wait is worth it! Plus, with the holiday season approaching, these crinkles are the perfect addition to any cookie platter or a delightful homemade gift. Everyone goes crazy for them!
This isn’t just another recipe; it’s the culmination of years of baking experience, a little bit of science, and a whole lot of love. Let’s dive into how to make these irresistible treats!
Gathering Your Ingredients – The Key to Crinkle Perfection
Before we even think about turning on the oven, let’s talk ingredients. This isn’t just about throwing things together; it’s about understanding the role each ingredient plays in creating that perfect crinkle cookie.
The Foundation: Flour, Sugar, and Cocoa
You’ll need all-purpose flour (bleached or unbleached works fine), granulated sugar, and unsweetened cocoa powder. But here’s the thing: quality matters, especially with the cocoa. I highly recommend using Dutch-processed cocoa powder for a deeper, richer chocolate flavor and a darker color. It also helps with the cookie’s texture. For the sugar, regular granulated sugar is perfect. Don’t substitute with powdered sugar in the dough, as it will change the cookie’s structure.
The Binders: Eggs, Oil, and Vanilla
Eggs are essential for binding the dough and providing structure. Use large eggs at room temperature for the best results. Vegetable oil adds moisture and contributes to the chewy texture. Avoid using butter in this recipe, as it can cause the cookies to spread too much. A good quality vanilla extract enhances the chocolate flavor. Don’t skimp on the vanilla!
The Essentials: Baking Powder, Salt, and Powdered Sugar
Baking powder is our leavening agent, giving the cookies that characteristic rise and crackle. Make sure your baking powder is fresh! Salt balances the sweetness and enhances the other flavors. And finally, the star of the show: powdered sugar! This is what creates that beautiful, crackly coating. Don’t substitute with granulated sugar; it won’t work the same way.
Mixing the Dough – Achieving the Right Consistency
Now for the fun part! Mixing the dough is where the magic begins, but it’s important to follow the steps carefully to avoid overmixing.
Combining the Dry Ingredients
In a medium bowl, whisk together the flour, cocoa powder, baking powder, and salt. This ensures that the baking powder is evenly distributed throughout the mixture. Don’t skip the whisking; it’s important for a consistent rise.
Incorporating the Wet Ingredients
In a separate, larger bowl, combine the sugar, oil, eggs, and vanilla extract. Beat until well combined. You don’t need to use a stand mixer for this; a hand mixer or even a whisk will work just fine. The goal is to create a smooth, emulsified mixture.
Bringing it All Together
Gradually add the dry ingredients to the wet ingredients, mixing on low speed until just combined. Be careful not to overmix! Overmixing develops the gluten in the flour, resulting in tough cookies. The dough will be thick and slightly sticky, and that’s exactly what we want.
The Chill Factor – Why This Step Is Crucial
This is where the real secret lies! Chilling the dough is absolutely essential for preventing the cookies from spreading too thin and for developing that signature crackly appearance.
The Science Behind the Chill
Chilling the dough allows the fat (in this case, the oil) to solidify, which prevents the cookies from spreading excessively during baking. It also allows the flavors to meld together and deepen. Think of it as a mini flavor vacation for your dough!
The Ideal Chill Time
I recommend chilling the dough for at least 3 hours, but preferably overnight. The longer the chill, the better the results. I’ve tested this recipe with various chilling times, and overnight chilling consistently produces the best texture and crackle.
Chilling Strategies
Wrap the dough tightly in plastic wrap or place it in an airtight container. This prevents the dough from drying out in the refrigerator. You can also divide the dough into smaller portions for easier handling later on.
Shaping and Coating – The Art of the Crinkle
Now comes the fun part – shaping and coating the cookies! This is where we transform that chilled dough into beautiful, ready-to-bake crinkles.
Scooping and Shaping
Use a cookie scoop or spoon to portion out the dough. I recommend using a 1.5-tablespoon scoop for perfectly sized cookies. Roll the dough into smooth balls. Don’t worry about making them perfectly round; a little irregularity adds to the rustic charm.
The Powdered Sugar Shower
This is where the magic happens. Generously roll each dough ball in powdered sugar, ensuring that it’s completely coated. Don’t be shy! The thicker the coating, the more dramatic the crinkles will be. I like to do a double dip for extra coverage.
Arranging on the Baking Sheet
Place the coated dough balls on a baking sheet lined with parchment paper. Leave about 2 inches of space between each cookie to allow for spreading. Parchment paper is essential for preventing the cookies from sticking and for easy cleanup.
Baking to Perfection – Achieving the Ideal Texture
Baking is the final step in our crinkle cookie journey, and it’s crucial to get the timing and temperature just right.
Oven Temperature and Time
Preheat your oven to 350°F (175°C). Bake the cookies for 10-12 minutes, or until the edges are set and the centers are still slightly soft. Don’t overbake! Overbaked cookies will be dry and crumbly.
The Visual Cues
Keep a close eye on the cookies while they’re baking. You’ll know they’re ready when the edges are set and the centers are starting to crackle. The powdered sugar coating will also start to develop those characteristic fissures.
Cooling and Enjoying
Let the cookies cool on the baking sheet for a few minutes before transferring them to a wire rack to cool completely. This prevents them from breaking apart. And now, the best part: enjoy your delicious, homemade Chocolate Crinkles!
Storage and Serving – Keeping Your Crinkles Fresh
You’ve baked a batch of amazing Chocolate Crinkles, but how do you keep them fresh and delicious? Here’s what you need to know.
Storage Solutions
Store the cookies in an airtight container at room temperature for up to 3 days. They’re best enjoyed within the first 24 hours, but they’ll still be delicious for a few days after that.
Freezing for Later
You can also freeze the baked cookies for up to 2 months. Place them in a freezer-safe container or bag, and thaw them at room temperature before serving. You can also freeze the dough balls before coating them in powdered sugar. When ready to bake, thaw the dough balls in the refrigerator overnight, then roll them in powdered sugar and bake as directed.
Serving Suggestions
These cookies are perfect on their own, but they’re also delicious with a glass of milk, a scoop of vanilla ice cream, or a warm cup of coffee. They make a great addition to holiday cookie platters, potlucks, or as a homemade gift.

Expert Tips for Crinkle Cookie Success
Over the years, I’ve learned a few tricks that can help you achieve crinkle cookie perfection. Here are my top tips:
- Don’t skip the chilling! This is the most important step.
- Use high-quality cocoa powder. It makes a huge difference in flavor and color.
- Don’t overbake the cookies. They should be slightly soft in the center.
- Coat the dough balls generously in powdered sugar. The more, the better!
- Use fresh baking powder. Expired baking powder won’t give you the desired rise and crackle.
- Experiment with flavors. Add a pinch of cinnamon or a dash of espresso powder to the dough for a unique twist.
- If your dough is too sticky to handle, add a tablespoon or two of flour at a time until it comes together.
FAQ: Your Crinkle Cookie Questions Answered
Why are my crinkle cookies flat?
Flat crinkle cookies are usually caused by not chilling the dough long enough, using too much oil, or using expired baking powder. Make sure to chill the dough for at least 3 hours, use the correct amount of oil, and check the expiration date on your baking powder.
Why aren’t my crinkle cookies cracking?
If your crinkle cookies aren’t cracking, it could be due to not coating them generously enough in powdered sugar or not using enough baking powder. Make sure to roll the dough balls thoroughly in powdered sugar, and double-check that your baking powder is fresh.
Can I use butter instead of oil?
I don’t recommend using butter in this recipe, as it can cause the cookies to spread too much. The oil helps to create a chewy texture and prevents the cookies from becoming too dry.
Can I make these cookies gluten-free?
Yes, you can make these cookies gluten-free by substituting the all-purpose flour with a gluten-free all-purpose flour blend. Make sure to choose a blend that contains xanthan gum for best results.
How long do these cookies last?
These cookies will last for up to 3 days in an airtight container at room temperature. They’re best enjoyed within the first 24 hours, but they’ll still be delicious for a few days after that.
Can I freeze the dough?
Yes, you can freeze the dough. Form the dough into balls, wrap them individually, and then place them in a freezer bag. When you’re ready to bake, let them thaw in the refrigerator overnight before rolling them in powdered sugar and baking.
Personal Conclusion: Baking Memories, One Crinkle at a Time
These Chocolate Crinkles aren’t just cookies; they’re a little piece of my baking journey, a testament to persistence, and a whole lot of deliciousness. I’ve poured my heart into perfecting this recipe, and I’m thrilled to share it with you. I encourage you to try them out, experiment with flavors, and make them your own. And most importantly, share them with the people you love. After all, the best things in life are meant to be shared. What are your favorite holiday cookies to bake? Let me know in the comments below! I can’t wait to hear about your experiences and see your beautiful crinkles. Happy baking!


