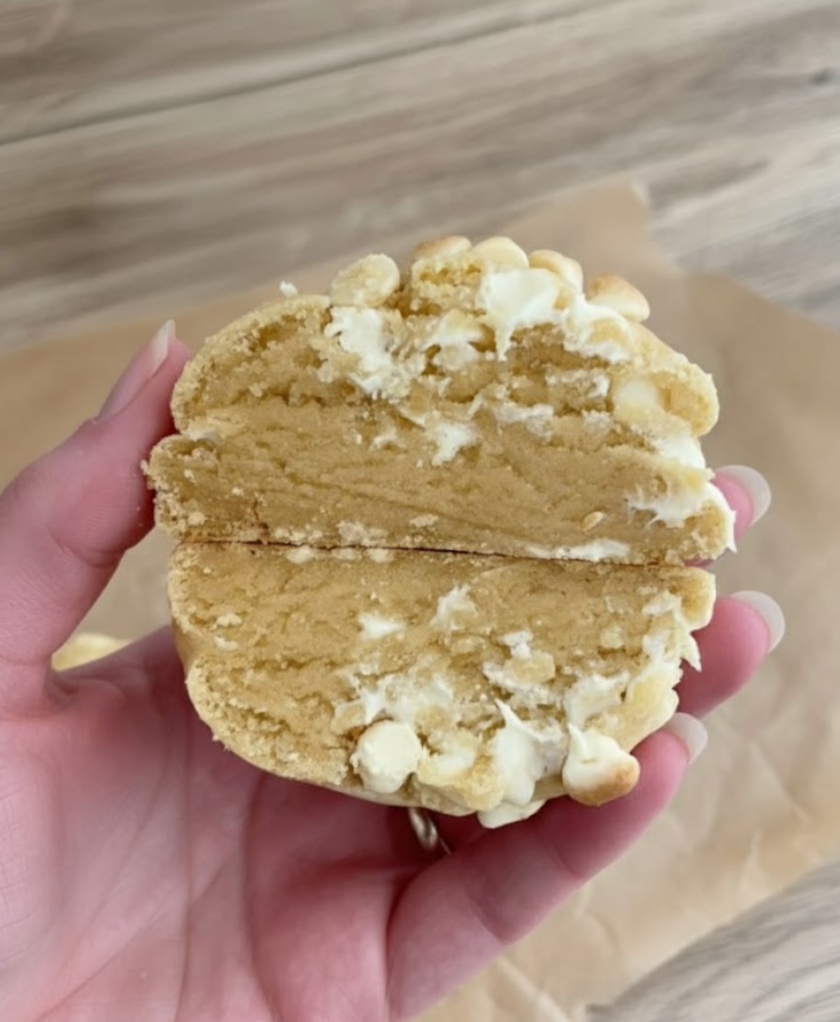
There’s something magical about a true NYC-style cookie. It’s not just a cookie; it’s an experience. The sheer size of it, the perfectly crisp edges that give way to a ridiculously thick, soft, and gooey center. For years, I was on a quest to replicate that bakery magic at home. And let me tell you, it was a journey. This very recipe is the result of more than nine dedicated attempts, countless bags of flour, and a relentless pursuit of perfection.

I tested everything: butter versus margarine, different sugar ratios, chilling times, and baking temperatures. Batch after batch, I took notes, tweaked ingredients, and finally, on the ninth try, I nailed it. The secret, I discovered, lies in a few key details that transform a good cookie into an unforgettable one.
This is that recipe. It’s my definitive, tried-and-true method for creating the most incredible White Chocolate Chip NYC Cookies you’ll ever bake. They are a true comfort-food indulgence, perfect for family gatherings or just a Tuesday afternoon when you need a little sweetness.
Why You’ll Love This Recipe
- Iconic NYC Texture: These aren’t your average flat, crispy cookies. They’re thick, substantial, and boast that signature soft, slightly underbaked center that makes NYC cookies so famous.
- Bakery Quality at Home: Why spend a fortune at a specialty bakery when you can make a whole batch of even better cookies right in your own kitchen? You control the ingredients, so there are no artificial preservatives—just pure, homemade goodness.
- Incredibly Simple: Despite the professional results, the process is straightforward. No complicated techniques, just simple steps and a little bit of patience (the freezer is your best friend here!).
- Packed with Flavor: The combination of brown and white sugar creates a wonderful caramel note, while a generous amount of high-quality white chocolate chips ensures every bite is rich, sweet, and satisfying.
Understanding the Ingredients
The magic of these cookies is in the specific combination of simple ingredients. Each one plays a crucial role in achieving that perfect texture and flavor.
- Margarine: I landed on block margarine after testing it against butter. It has a higher melting point, which contributes to less spread and a thicker cookie. If you prefer butter, you can absolutely use it, but make sure it’s unsalted and don’t skip the freezer time!
- Light Brown & Caster Sugar: This duo is essential. Light brown sugar provides moisture and a slight caramel flavor, which creates that desirable chewiness. Caster (or granulated) sugar helps the cookies spread just the right amount and contributes to those crispy edges.
- Cornflour (Cornstarch): This is my secret weapon for softness! Just a tiny amount of cornflour tenderizes the dough, giving the center a uniquely soft, melt-in-your-mouth quality.
- Bicarbonate of Soda & Baking Powder: Using both leavening agents gives the cookies the perfect lift and spread. Baking powder provides the primary lift for thickness, while the bicarbonate of soda helps with the browning and spread.
- White Chocolate Chips: Don’t skimp here! Use a good quality brand of white chocolate chips. The flavor will be noticeably better. We use some inside the dough and press more on top for that bakery-window look.
Step-by-Step: How to Make White Chocolate Chip NYC Cookies
Let’s break down the process. Follow these steps carefully, and you’ll be rewarded with cookie perfection.
1. Creating the Cookie Dough
First things first, get your mixing bowl ready. Add the softened margarine and both the light brown and caster sugars. Using an electric mixer or a strong arm and a wooden spoon, cream them together until the mixture is visibly lighter in color, smooth, and fluffy. This step incorporates air, which is key for texture.
Next, mix in your vanilla extract, followed by the egg. Mix until the egg is just combined. The mixture might look a little split or curdled at this point—that’s completely fine, so don’t panic! It will all come together when you add the flour.
In a separate, medium-sized bowl, sift your dry ingredients: the plain flour, baking powder, bicarbonate of soda, and that secret-weapon cornflour. Sifting prevents lumps and ensures everything is evenly distributed. Add the dry ingredients to your wet mixture and mix on the lowest speed or by hand with a spatula until a thick dough forms. Crucially, do not overmix! Stop as soon as you no longer see dry streaks of flour. Overmixing develops gluten and will make your cookies tough.
Now for the best part. Fold in 160g of your white chocolate chips. Your dough should be thick, easy to handle, and not at all sticky.
2. The All-Important Chill
This step is non-negotiable for achieving that classic NYC thickness. Divide your dough into 8 large, equal-sized balls. Each one will be around 100-110g. Place them on a plate or a small tray lined with parchment paper.
Sprinkle the remaining 40g of white chocolate chips onto a small plate. Take each dough ball and gently press the top into the chips. This not only looks beautiful but adds an extra chocolatey hit to every bite.
Place the entire plate of cookie dough balls into the freezer for at least one hour. This solidifies the fat, which prevents the cookies from spreading into thin, sad pancakes in the oven.
3. Baking to Gooey Perfection
About 15 minutes before your dough is done chilling, preheat your oven to 200°C (180°C Fan) and line two large baking trays with parchment paper.
Once the hour is up, take the rock-solid dough balls from the freezer and place them directly onto your prepared trays. Make sure to leave plenty of room between them—I recommend only four cookies per tray—as they will spread a little.
Bake for 8-10 minutes. The timing is critical here. You’re looking for the edges to be a very light golden brown. The centers should still look pale and slightly underdone. This is the key to a gooey middle!
As soon as you pull them from the oven, you can perform an optional but highly recommended trick for perfectly circular cookies. Take a large round cookie cutter or the rim of a glass that’s bigger than the cookie and place it over the hot cookie. Gently “scoot” it around the cookie, nudging the edges into a perfect circle.
Now, the final test of your patience: let the cookies cool completely on the baking trays for at least 30 minutes. The residual heat from the tray will finish setting the centers. Moving them too soon will cause them to fall apart. Once cooled, they are ready to devour!
Sofie’s Pro-Tips for Cookie Success
- Weigh Your Ingredients: For baking, accuracy is everything. Using a digital kitchen scale to weigh your ingredients, especially the flour, will give you consistent, perfect results every single time.
- Don’t Overcrowd the Pan: Giving each cookie enough space to breathe is essential for even baking and preventing them from merging into one giant cookie-blob.
- Bake from Frozen: If you make a batch of dough to freeze for later, there’s no need to thaw. You can bake them straight from the freezer; just add 1-2 minutes to the total baking time.
- Trust the Process: It might feel wrong to pull the cookies from the oven when the centers look gooey, but trust me! They will set up perfectly as they cool on the hot tray.
More Cookie Adventures to Try
If you’ve fallen in love with these NYC cookies, you’re in the right place! My baking adventures have led to some incredible variations. Why not try one of these next?
- For a truly decadent treat, check out my Stuffed Red Velvet Cookies Recipe.
- Love unique flavors? These Pistachio NYC Cookies are a must-try.
- Get creative with candy fillings with my Creme Egg Stuffed Cookies.
- For the ultimate flavor combination, you can’t go wrong with this Peanut Butter Nutella Cookie Recipe.
- Can’t get enough white chocolate? These White Chocolate Stuffed Cookies take things to a whole new level.
Frequently Asked Questions
Why do I have to freeze the cookie dough?
Chilling or freezing the dough is the most important secret to thick, bakery-style NYC cookies. It solidifies the fat (margarine), which means the cookies spread much more slowly in the oven. This slow spread results in a thicker, gooier center and perfectly crisp edges. It also allows the flour to hydrate and the flavors to deepen, resulting in a much richer-tasting cookie.
Can I use butter instead of margarine?
Yes, you can substitute an equal amount of unsalted butter for margarine. The flavor will be slightly richer and creamier. If you use butter, the chilling step is even more critical, as butter has a lower melting point than many margarines. For the best texture, I recommend using a block-style margarine or butter, not a soft, tub-style spread.
How do I get my cookies perfectly round?
The best trick for perfectly round cookies is called “cookie scooting”. As soon as the cookies come out of the oven, while they are still hot and pliable on the parchment paper, take a large round cookie cutter (or the rim of a glass that’s wider than the cookie) and place it over the cookie. Gently swirl the cutter around the cookie. The edges will nudge into a perfect circle. Let them cool completely on the tray to set this shape.
How do I know when the cookies are perfectly baked?
For the perfect gooey center, you want to slightly underbake your cookies. The ideal visual cue is when the edges are a light, golden brown and have just started to set. The center of the cookie should still look pale and a little bit puffy or underdone. They will continue to bake from the residual heat of the tray as they cool, which creates that incredible soft texture.
Storing Your Cookies
These cookies are fantastic fresh but also keep incredibly well. Store them in an airtight container at room temperature, and they will stay soft and delicious for 5-7 days.
To Freeze: You can freeze the baked cookies or the unbaked dough balls. For baked cookies, let them cool completely, then place them in a freezer-safe bag or container. For unbaked dough, freeze the balls on a tray until solid, then transfer them to a freezer bag. They will last for up to 3 months.


