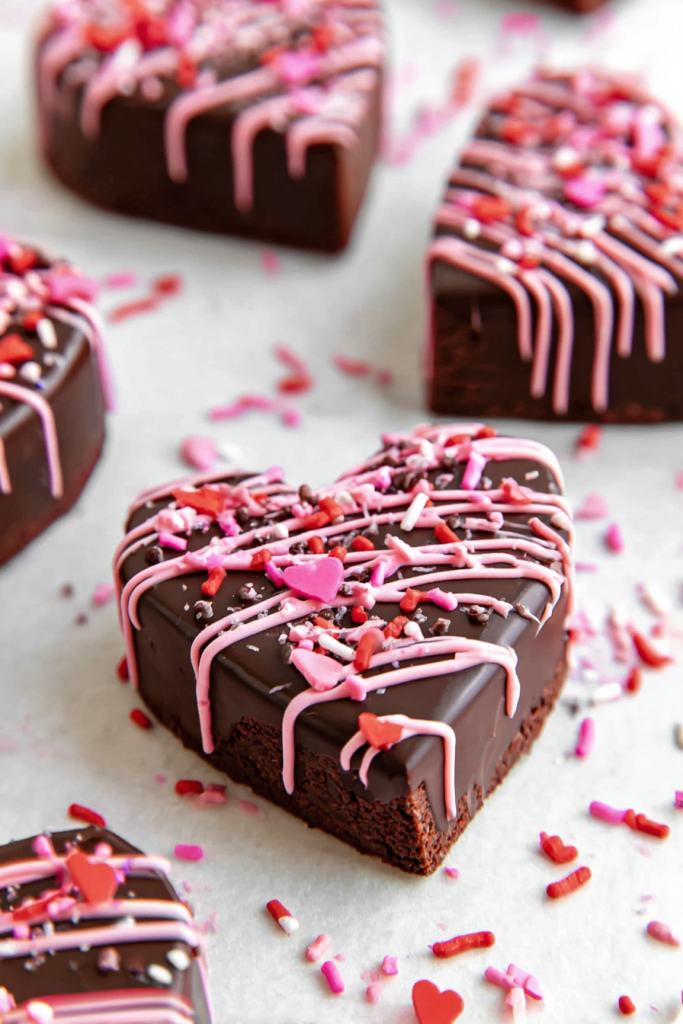
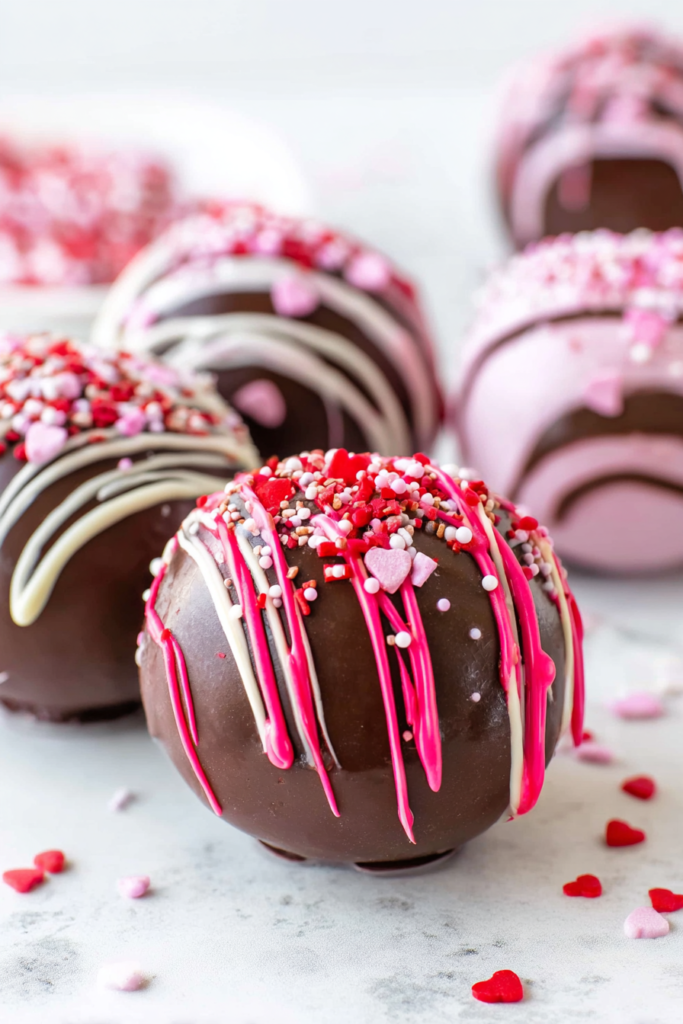
Valentine hot cocoa bombs are the ultimate heart-shaped chocolate treat that transforms into rich, creamy hot chocolate when hot milk is poured over them, creating a magical moment perfect for celebrating love and friendship. These stunning valentines day hot chocolate bombs combine dark chocolate shells, sweet cocoa mix, and fluffy mini marshmallows for an interactive dessert experience that delights both kids and adults. The heart shape makes them instantly recognizable as Valentine treats, while the decorative drizzles and festive sprinkles create bakery-quality presentation.
Whether you’re preparing romantic surprises for Valentine’s Day, creating fun activities for family gatherings, or making impressive homemade gifts, these hot cocoa bombs deliver show-stopping results that taste as incredible as they look. The process is surprisingly straightforward once you understand the technique, and the finished bombs can be made days ahead for stress-free entertaining.
Why You’ll Love This Valentine Hot Cocoa Bombs Recipe
These heart-shaped hot chocolate bombs create an unforgettable experience that combines visual drama with delicious taste. Watching the chocolate heart dissolve in hot milk as marshmallows float to the surface never gets old, making every cup feel special and celebratory. The interactive nature makes them perfect for Valentine’s Day breakfast surprises, romantic evening treats, or fun activities to make with kids.
The silicone heart mold creates beautiful, professional-looking shells without requiring candy-making expertise or expensive equipment. While the process requires patience and attention to detail, the steps are straightforward and produce consistent results. Each bomb yields one generous serving of hot chocolate, making the recipe perfect for intimate gatherings or small batches of gifts.
These cocoa bombs also make exceptional homemade gifts that feel luxurious and thoughtful. Package them individually in clear cellophane bags tied with ribbon, or arrange them in decorative boxes for impressive Valentine presents. They stay fresh at room temperature for several weeks, allowing you to make them well ahead of your celebration.
Ingredients for Valentine Hot Cocoa Bombs
Chocolate Shells
- 2 packages Ghirardelli dark melting wafers (10 oz each) – Creates rich, smooth shells that melt beautifully
- White or colored melting wafers – For decorative drizzles (pink works beautifully for Valentine’s)
Filling
- 6 tablespoons hot cocoa mix – One tablespoon per bomb
- 1 cup mini marshmallows – About 10-12 per bomb
For Serving
- 6 cups hot milk – One cup per bomb
Decoration
- Valentine’s sprinkles – Hearts, pink and red jimmies, or festive designs (optional)
Special Equipment
- 6-hole heart-shaped silicone mold (avoid molds with lips on the edge)
- Small skillet, saucepan, or microwave-safe plate for sealing
- Cookie sheet or jelly roll pan
- Spoon or small offset spatula
Ingredient Notes
Melting Wafers: Ghirardelli dark melting wafers create rich chocolate flavor and melt smoothly according to package directions. You can substitute milk chocolate wafers for sweeter bombs. White chocolate works but is more challenging with heart molds due to temperature sensitivity.
Hot Cocoa Mix: Use your favorite brand—regular, gourmet, or even sugar-free varieties all work perfectly. Each bomb needs exactly 1 tablespoon of mix.
Marshmallows: Mini marshmallows (10-12 per bomb) provide the classic hot chocolate experience. Dehydrated marshmallow bits extend shelf life if making bombs far in advance.
Milk Options: Whole milk creates the creamiest hot chocolate, but 2%, almond milk, oat milk, or any dairy-free alternative works beautifully.
Decoration Chocolate: Wilton Bright Pink Candy Melts create stunning Valentine contrast against dark chocolate, while white chocolate drizzles offer elegant simplicity.
Step-by-Step Instructions
Step 1 – Melt the Chocolate
In a microwave-safe bowl, melt chocolate wafers according to package directions and stir until smooth. Typically this means 30-second intervals, stirring between each, until completely melted and glossy.
Step 2 – Prepare Your Workspace
Place the silicone heart mold on a cookie sheet, jelly roll pan, or something stable that can be placed in the freezer. Have your spoon or small spatula ready for coating the molds.
Step 3 – Create the Deep Shells
Put about 1-2 tablespoons of melted chocolate into each well of the silicone mold. Using the back of a spoon, push the chocolate up the sides until the entire mold is covered with a layer of chocolate. Start with the top of the heart, pushing a large amount of chocolate into the top curved parts, then work down to the point at the bottom. Pay special attention to the sides making sure the chocolate completely covers the mold. You can tilt the mold slightly as you’re using the back of the spoon to coat the mold—it helps with visibility.
Step 4 – First Freeze
Transfer the baking sheet to the freezer for about 10 minutes. This initial freeze sets the chocolate shell structure.
Step 5 – Reinforce the Edges
Remove the tray from the freezer and make sure there is chocolate going all the way up the side of the mold. If the chocolate layer seems thin at the edge, add a little more chocolate to thicken the edge using a spoon, small spatula, or food-safe paint brush. Don’t worry about how the shell looks from the inside—it won’t be visible when the bomb is complete. Return to the freezer for 5 minutes.
Step 6 – Unmold the Deep Shells
Remove the mold from the freezer and flip the mold over with the rounded side facing up. Gently press the center of each well and peel the silicone mold back from the edge of the chocolate sphere to remove the hardened chocolate. If you press too hard on the center of the mold, it can cause the shell to crack on the edges.
Step 7 – Create the Lids
With the second mold, put about 1 tablespoon of chocolate in the silicone mold so that it covers only the bottom surface. Don’t push any chocolate up the sides. You should have enough chocolate to create a heart that is ¼ inch thick. This will act as a “lid” and eventually the bottom when your heart hot cocoa bomb is assembled. Transfer this mold to the freezer for 10 minutes. Remove in the same manner as the first part of the shell.
Step 8 – Prepare for Assembly
Transfer all parts of the heart cocoa bomb shell to a clean surface. The shells tend to pick up any pieces of chocolate that may have hardened during the unmolding process. You don’t want those in your finished shell. Prepare everything you’d like to add to the inside of your cocoa bomb (mix, marshmallows, and anything else you’d like to add). You will have to work quickly and it’s important to have everything ready.
Step 9 – Seal and Fill
Heat a small skillet, saucepan, or plate until it is warm. Place the deeper heart shell, rounded side up, on the hot surface just until the edge begins to melt and creates an even edge for sealing the bomb. Place this half of the heart cocoa bomb on a cookie sheet and quickly fill with 1 tablespoon of hot chocolate mix and 10-12 mini marshmallows.
Step 10 – Attach the Lid
Place the shallow heart-shaped chocolate gently on the filled shell, making a “lid.” Hold it in place for a few seconds so that the melted chocolate edges will meet and act as “glue” to hold the two halves together. Using a spoon, add some melted chocolate from the skillet or saucepan to fill in the gaps and smooth it to create a seal. Once the chocolate has hardened, flip the bomb over so that the “lid” is now on the bottom.
Step 11 – Decorate
Decorate by drizzling melted chocolate that matches the shell or contrasting melted chocolate to make a pretty design. Add holiday sprinkles for a finishing touch. Work quickly while the drizzled chocolate is still wet so sprinkles adhere properly.
Step 12 – Serve
Place one cocoa bomb in a large mug. Heat milk until very hot (not boiling). Pour 1 cup of hot milk over the bomb and watch it dissolve. Stir gently and enjoy your delicious Valentine hot chocolate.
Pro Tips for Success
Choose the Right Mold: Use a heart-shaped silicone mold without a lip on the edge. Molds with lips make unmolding extremely difficult and can cause cracking.
Work in Batches: If you have only one 6-hole mold, make all the deep shells first, then use the same mold to create the lids. This is more efficient than trying to juggle multiple molds.
Don’t Skip Edge Reinforcement: Thin edges crack easily during unmolding and assembly. Taking time to reinforce them prevents frustration and waste.
Temperature Control: Keep your work area cool. Chocolate is heat-sensitive and will start softening if your kitchen is warm. Work near your freezer for convenience.
Seal Quickly: Once you melt the shell edge on the hot surface, you have only seconds to fill and seal before it hardens again. Have everything measured and ready.
Sprinkle Note: Sprinkles completely dissolve in hot liquid, so they’re purely decorative on the finished bomb rather than adding texture to the drink.
Flavor Variations
Peppermint Hot Cocoa Bombs: Add crushed peppermint candies or candy cane pieces to the filling along with the marshmallows for a refreshing mint-chocolate combination.
Salted Caramel Bombs: Include caramel bits in the filling and drizzle with salted caramel sauce before decorating for indulgent richness.
Triple Chocolate Bombs: Use milk chocolate shells, add mini chocolate chips to the filling, and drizzle with white chocolate for ultimate chocolate lovers.
Cinnamon Spice Bombs: Mix ¼ teaspoon cinnamon into each tablespoon of cocoa mix and add a pinch of cayenne for Mexican hot chocolate style.
S’mores Bombs: Add mini chocolate chips and crushed graham crackers to the marshmallow filling, then drizzle with milk chocolate.
Serving Suggestions
Present hot cocoa bombs on individual dessert plates alongside mugs of steaming milk for a dramatic tableside pour. The visual effect of watching the chocolate heart dissolve creates memorable moments for romantic dinners or special breakfasts. Serve with our Valentine brownies or red velvet cookies for an impressive Valentine dessert spread.
For gifts, wrap each bomb individually in clear cellophane tied with red or pink ribbon. Include a small tag with instructions: “Place in mug, pour 1 cup hot milk over bomb, stir and enjoy!” Package several bombs in a decorative box with festive tissue paper for impressive homemade Valentine gifts.
Create a hot cocoa bar at parties with multiple bomb flavors, various toppings (whipped cream, chocolate shavings, crushed cookies), and different milk options for a fun interactive dessert station.
Storage and Freezing Instructions
Room Temperature: Store finished cocoa bombs in an airtight container at room temperature for up to 3 weeks. Keep them in a cool, dry place away from direct sunlight and heat sources. Layer parchment paper between bombs to prevent sticking.
Refrigerator: While not necessary, refrigeration extends shelf life to 4-6 weeks. Bring bombs to room temperature before serving for best dissolution in hot milk.
Gift Storage: If making bombs for gifts, store them at room temperature in individual bags or containers until ready to package and deliver.
Avoid Freezing: Do not freeze completed cocoa bombs, as condensation during thawing can cause chocolate bloom (white spots) and affect texture.
Nutrition Facts (Per Serving)
| Nutrient | Amount |
|---|---|
| Calories | 285 |
| Protein | 6g |
| Carbohydrates | 38g |
| Fat | 12g |
| Fiber | 2g |
| Sodium | 95mg |
Based on 6 servings with whole milk. Nutritional values are approximate.
FAQ About Valentine Hot Cocoa Bombs
Why won’t my chocolate shells release from the mold?
Shells that won’t release usually haven’t been frozen long enough or the chocolate layer is too thin. Make sure you freeze for the full 10 minutes initially and 5 minutes after reinforcing edges. The chocolate needs to be completely hardened and slightly contracted from the cold to release easily. Press gently in the center and peel the mold back slowly rather than trying to pop them out forcefully.
Can I use regular chocolate chips instead of melting wafers?
Regular chocolate chips contain stabilizers that prevent them from melting as smoothly as melting wafers. While you can use them, you’ll need to add 1 tablespoon of coconut oil or shortening per cup of chips to achieve proper consistency for coating molds. Melting wafers are specifically formulated for candy-making and produce much better results with smoother texture and glossier finish.
How do I prevent my cocoa bombs from cracking?
Cracking usually happens from chocolate that’s too thin (especially at edges), removing bombs from molds too roughly, or temperature shock. Reinforce thin edges before the second freeze, unmold very gently by pressing the center while peeling the mold back, and avoid moving bombs between extreme temperatures too quickly. Also ensure your chocolate is completely melted and smooth before coating molds.
What’s the best way to package hot cocoa bombs as gifts?
Wrap each bomb individually in clear cellophane bags secured with festive ribbon or twist ties. Place wrapped bombs in decorative boxes lined with tissue paper or shredded paper “grass” to prevent movement during transport. Include a small instruction card explaining how to use the bomb. For extra protection, cushion bombs with crinkle paper or bubble wrap to prevent breakage during shipping or handling.
Final Thoughts
Valentine hot cocoa bombs transform ordinary hot chocolate into an extraordinary experience that creates lasting memories and spreads joy with every pour. While the process requires patience and careful attention to detail, the stunning results are absolutely worth the effort. These heart-shaped treats combine impressive visual appeal with delicious taste, making them perfect for romantic celebrations, family fun, or thoughtful homemade gifts that show how much you care. Whether you’re making them for the first time or perfecting your technique, these cocoa bombs deliver pure Valentine magic in every cup.
Meta Title: Valentine Hot Cocoa Bombs Recipe – Easy Heart-Shaped
Meta Description: Make stunning Valentine hot cocoa bombs with heart-shaped chocolate shells! Step-by-step guide for perfect hot chocolate bombs every time.
Permalink Slug: valentine-hot-cocoa-bombs
Category: Drinks
Subcategory: Hot Chocolate


