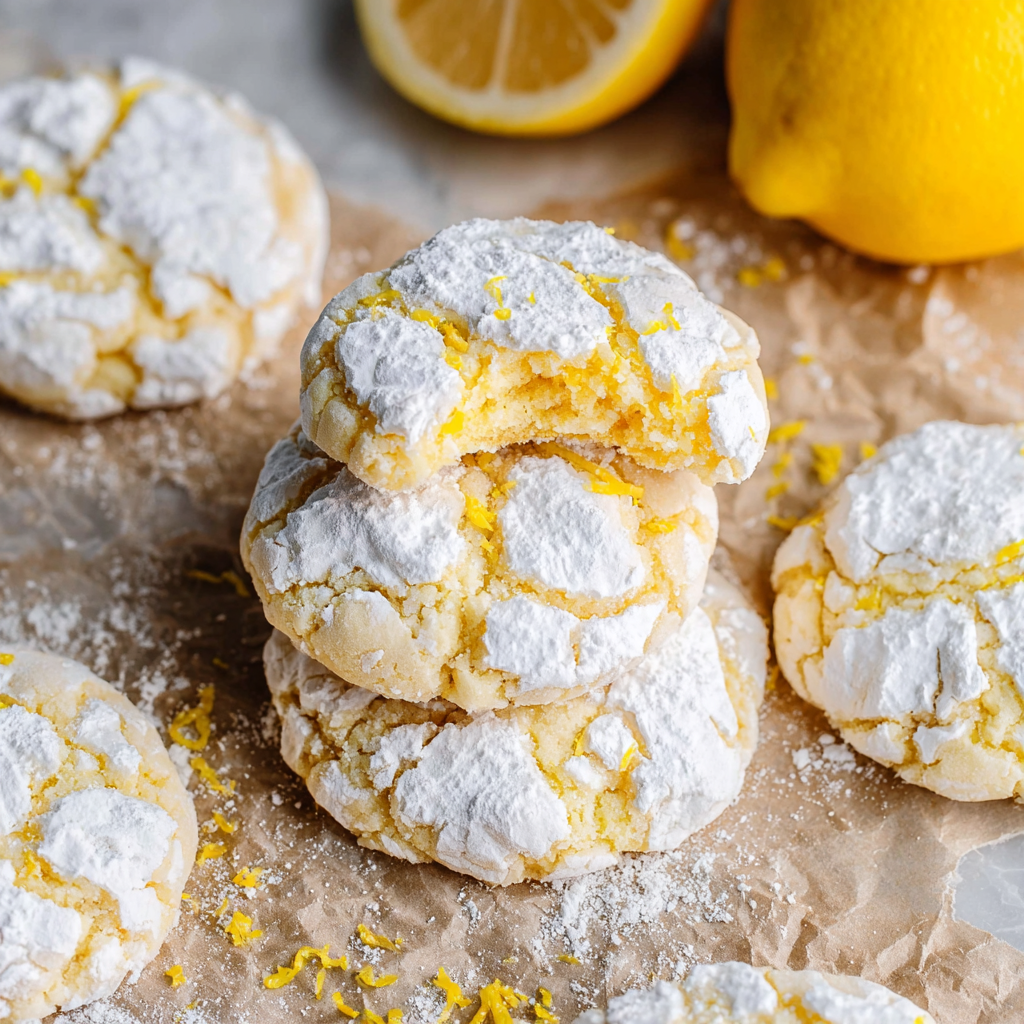
These 3-Ingredient Lemon Crinkle Cookies are the ultimate no-fuss dessert—bright, tangy, and impossibly soft cookies made with just lemon cake mix, whipped topping, and powdered sugar. Perfect for last-minute gatherings, bake sales, or when you need a sweet treat without all the measuring and mixing. These cookies look bakery-beautiful with their signature crinkled, powdered sugar coating, but they’re so easy that even beginners can master them.
I grew up between two worlds—Moroccan warmth and American comfort—shaped by the scent of cinnamon and orange blossom water drifting from my dad’s kitchen and the buttery aroma of classic chocolate chip cookies cooling in my mom’s oven. That blend of cultures is where my love for baking first took root. Sometimes, though, you need something quick and simple that still feels special. These lemon crinkle cookies became my go-to when I want homemade cookies without the commitment. After making them countless times for potlucks and impromptu gatherings, I’ve learned that the secret is in the coating technique—really rolling those dough balls generously in powdered sugar creates those gorgeous crackled tops. The bright lemon flavor is refreshing and perfect for spring and summer, though I make them year-round because they’re just that easy and delicious.
Key Ingredients
Servings: 25 cookies
- 1 box (15.25 oz / 432g) lemon cake mix
- 1 container (8 oz / 227g) frozen whipped topping (like Cool Whip), thawed
- ½ cup (60g) powdered sugar (for coating)
Substitution Tips: No lemon cake mix? Try this with any flavor—chocolate, vanilla, strawberry, or funfetti for variety. Don’t have frozen whipped topping? You can substitute with 1 cup of freshly whipped heavy cream (whipped to stiff peaks), though the texture will be slightly different. For a more natural option, look for organic or homemade whipped cream alternatives.
Step-by-Step Instructions
Preparation:
- Preheat your oven to 350°F (175°C). Line two large baking sheets with parchment paper or silicone baking mats.
Making the Cookie Dough:
- Thaw the whipped topping: Make sure your frozen whipped topping is completely thawed and at room temperature. Cold whipped topping won’t mix as smoothly into the cake mix.
- Combine ingredients: In a large mixing bowl, add the entire box of lemon cake mix and the full container of whipped topping.
- Mix thoroughly: Using a sturdy spoon or spatula, mix the two ingredients together until completely combined. The mixture will be thick and batter-like at first, then become more cohesive as you continue mixing. This should take about 2-3 minutes of stirring—don’t worry if it seems sticky, that’s normal!
Forming and Coating the Cookies:
- Prepare powdered sugar: Place the powdered sugar in a small, shallow bowl for easy coating.
- Portion the dough: Using a medium cookie scoop (about 1½ tablespoons) or a spoon, scoop out portions of dough and quickly roll them into balls with your hands. The dough will be sticky—dust your hands lightly with powdered sugar if needed.
- Coat generously: Drop each dough ball into the bowl of powdered sugar. Use a fork to gently roll the ball around until it’s completely and generously coated on all sides. Don’t skimp on the coating—a thick layer creates those beautiful cracks!
- Place on baking sheet: Transfer the coated dough balls to your prepared baking sheets, spacing them about 2 inches apart. They will spread slightly as they bake.
- Repeat: Continue portioning, rolling, and coating until all the dough is used. You should get approximately 25 cookies.
Baking:
- Bake: Place the baking sheets in the preheated oven and bake for 12 minutes. The cookies are done when the edges are set and the tops have formed those signature cracks. They’ll look slightly underdone in the center—this is perfect! They continue to set as they cool.
- Cool: Remove from the oven and let the cookies cool on the baking sheet for 5 minutes, then transfer to a wire rack. You can enjoy them warm and soft, or let them cool completely for a slightly firmer texture.
- Serve: Enjoy these bright, tangy lemon cookies with a glass of cold milk, iced tea, or lemonade!

Serving Suggestions
- Spring Gatherings: Serve on a platter with fresh strawberries and white chocolate stuffed cookies for a beautiful spring dessert spread
- Lemonade Stand: Perfect alongside homemade lemonade for summer gatherings or kids’ lemonade stands
- Coffee Break: Pair with iced coffee or tea for a refreshing afternoon pick-me-up
- Dessert Platter: Arrange with peanut butter Nutella cookies and stuffed red velvet cookies for variety at potlucks
- Gift Boxes: Stack in clear bags tied with yellow ribbon for thoughtful, homemade gifts—perfect for teachers, neighbors, or thank-you gestures
Storage & Make-Ahead Tips
Room Temperature: Store cookies in an airtight container at room temperature for up to 2 days. They’ll stay soft and delicious.
Refrigeration: Refrigerate in an airtight container for up to 2 weeks. The cookies will firm up slightly when cold but soften at room temperature.
Freezing: Freeze baked cookies in a freezer-safe container or bag for up to 2 months. Separate layers with parchment paper to prevent sticking. Thaw at room temperature for 30 minutes before serving.
Make-Ahead Dough: You can portion and coat the dough balls, then freeze them on a baking sheet until solid. Transfer to a freezer bag and bake directly from frozen, adding 1-2 extra minutes to the baking time.
Pro Tip: These cookies are best enjoyed within the first 2 days for optimal texture—the powdered sugar coating can start to absorb moisture over time.
Tips & Tricks
Generous Powdered Sugar Coating is Key: Don’t be shy with the powdered sugar! A thick, generous coating is what creates those beautiful crackled tops that make crinkle cookies so visually appealing. If the coating seems too thin, roll the dough balls through the sugar a second time.
The Dough Will Be Sticky: This batter-like consistency is completely normal and expected. Resist the urge to add extra flour or cake mix. The sticky dough is what gives these cookies their incredibly soft, cloud-like texture.
Don’t Overbake: These cookies should look slightly underdone in the center when you remove them from the oven. They’ll continue to set as they cool, and overbaking will make them dry instead of soft and tender.
Common Mistakes to Avoid
Using Cold Whipped Topping: If the whipped topping is still partially frozen or very cold, it won’t incorporate smoothly into the cake mix. Always let it thaw completely to room temperature first.
Skimping on the Coating: A light dusting of powdered sugar won’t create those signature cracks. You need a thick, generous coating that almost looks like too much—trust the process!
Overcrowding the Baking Sheet: If cookies are placed too close together, they’ll bake into each other as they spread. Leave a full 2 inches between each cookie for the best results.
Adding Extra Ingredients: The beauty of this recipe is its simplicity. Don’t add eggs, butter, flour, or other ingredients—they’ll throw off the perfect balance and texture that makes these cookies work.
Chef’s Advice
Flavor Variations:
- Chocolate Crinkle: Use chocolate cake mix for classic chocolate crinkle cookies
- Strawberry: Try strawberry cake mix for pink cookies perfect for Valentine’s Day or baby showers
- Funfetti: Use funfetti or confetti cake mix for colorful celebration cookies
- Orange Creamsicle: Use orange cake mix and add ½ teaspoon vanilla extract to the dough
Ingredient Substitutions:
- Homemade whipped cream: Whip 1 cup heavy cream with 2 tablespoons powdered sugar until stiff peaks form, then fold into cake mix
- Greek yogurt: For a protein boost, replace whipped topping with ¾ cup thick Greek yogurt (cookies will be slightly denser)
- Dairy-free: Use dairy-free whipped topping like So Delicious CocoWhip
Presentation Ideas:
- Dust with additional powdered sugar just before serving for extra visual appeal
- Drizzle cooled cookies with a simple lemon glaze (powdered sugar + lemon juice)
- Add lemon zest to the dough for more intense lemon flavor
- Sandwich two cookies with lemon curd or cream cheese frosting for lemon sandwich cookies
- Serve on a tiered stand dusted with fresh lemon slices and mint leaves
- Package in mason jars layered with colorful tissue paper for gifts
History and Cultural Significance
Crinkle cookies, also known as earthquake cookies, have uncertain origins but became popular in American home baking during the mid-20th century, around the same time boxed cake mixes revolutionized home baking. The original crinkle cookies were chocolate and required multiple ingredients, but home bakers eventually discovered that cake mix shortcuts could produce similar results with a fraction of the effort. This represents the American ingenuity of convenience baking—taking professional bakery techniques and making them accessible to busy home cooks. The three-ingredient trend has exploded in recent years on social media, where home bakers share simplified recipes that deliver impressive results without extensive ingredient lists or complicated techniques. These lemon crinkle cookies embody the modern approach to baking: quick, accessible, visually stunning, and absolutely delicious. They prove that you don’t need a culinary degree or hours of time to create something beautiful and homemade.
Final Thoughts
These 3-Ingredient Lemon Crinkle Cookies are proof that simple can be spectacular. With just three pantry-friendly ingredients and less than 25 minutes from start to finish, you can create cookies that look and taste like they came from a bakery. The bright lemon flavor is refreshing and crowd-pleasing, making these cookies perfect for spring and summer gatherings—though honestly, they’re delicious any time of year. Whether you’re an experienced baker looking for a quick treat or a complete beginner taking your first steps into baking, this recipe sets you up for success. There’s no creaming butter, no chilling dough, no complicated techniques—just mix, roll, coat, and bake. The result is soft, tender cookies with that beautiful crackled appearance that makes everyone think you spent hours in the kitchen. Keep the ingredients on hand and you’ll always be ready for last-minute guests, bake sale contributions, or those moments when you just need a sweet treat without all the fuss. These cookies have become a staple in my recipe collection, and I have a feeling they’ll become one of yours too. Happy baking!
Nutrition Information
| Serving Size | Calories | Protein | Carbs | Fat | Fiber | Sugar |
|---|---|---|---|---|---|---|
| 1 cookie | 10 | 0g | 2g | 0g | 0g | 2g |
Disclaimer: Nutrition information is estimated using standard online calculation tools and may vary based on ingredients and preparation methods. For accurate dietary advice, consult a qualified nutrition professional.


