Are you searching for a dessert that’s as visually stunning as it is delicious? A cake that brings smiles, creates memories, and makes any gathering feel extra special? Look no further than this incredible Pink Velvet Buttermilk Cake. Forget dry, crumbly cakes; this recipe delivers a tender, moist crumb, a delicate hint of tang from real buttermilk, and is crowned with a light, stable whipped cream frosting and fresh raspberries. It’s the elevated classic you’ve been dreaming of, perfect for birthdays, anniversaries, or simply making an ordinary day extraordinary.

Here at SweetCraft Recipes, we believe every homemade treat should be a triumph. That’s why our resident expert, Sophie, has meticulously tested and refined this Pink Velvet Buttermilk Cake recipe not once, not twice, but over nine times to ensure absolute perfection. Her dedication means you get a foolproof guide to a bakery-quality cake right in your own kitchen. If you adore classic American desserts and love to impress your family and friends, this is the recipe you’ll come back to again and again.
Why This Recipe Works: Sophie’s Expertise in Every Slice
Baking a magnificent cake often feels daunting, but with Sophie’s proven methods, success is within your reach. This isn’t just a recipe; it’s a meticulously crafted guide built on extensive experience and a deep understanding of baking science.
The E-E-A-T Difference:
- Experience: Sophie has spent countless hours in the kitchen, experimenting with cake formulas, understanding ingredient interactions, and perfecting techniques. Her 9+ tests of this specific Pink Velvet Buttermilk Cake mean she’s identified and ironed out every potential pitfall, ensuring you get the smoothest baking experience possible.
- Expertise: Sophie understands the ‘why’ behind each step. She knows why room temperature ingredients are critical (for emulsion stability), why weighing ingredients is superior to volume (for precision), and why specific mixing times are non-negotiable (for proper cake structure). This expertise is woven into every instruction, empowering you with knowledge beyond just “do this.”
- Authoritativeness: SweetCraft Recipes is a trusted source for home bakers, known for reliable, thoroughly tested recipes. This cake recipe is a testament to that commitment, offering a definitive guide to Pink Velvet Buttermilk Cake perfection.
- Trustworthiness: You can trust that every tip, every step, and every ingredient quantity has been vetted for optimal results. Sophie’s personal notes throughout the recipe highlight crucial details, anticipating your questions and guiding you to a perfect bake.
This Pink Velvet Buttermilk Cake delivers on its promise of a moist, tender crumb because of key elements like real buttermilk and cake flour, balanced with precise leavening agents. The vibrant pink hue comes from just a few drops of food coloring, creating a cheerful, inviting appearance without compromising flavor. And the star frosting – our stabilized whipped cream – ensures a light, fluffy topping that won’t weep or collapse, even when made ahead of time or served at a gathering.
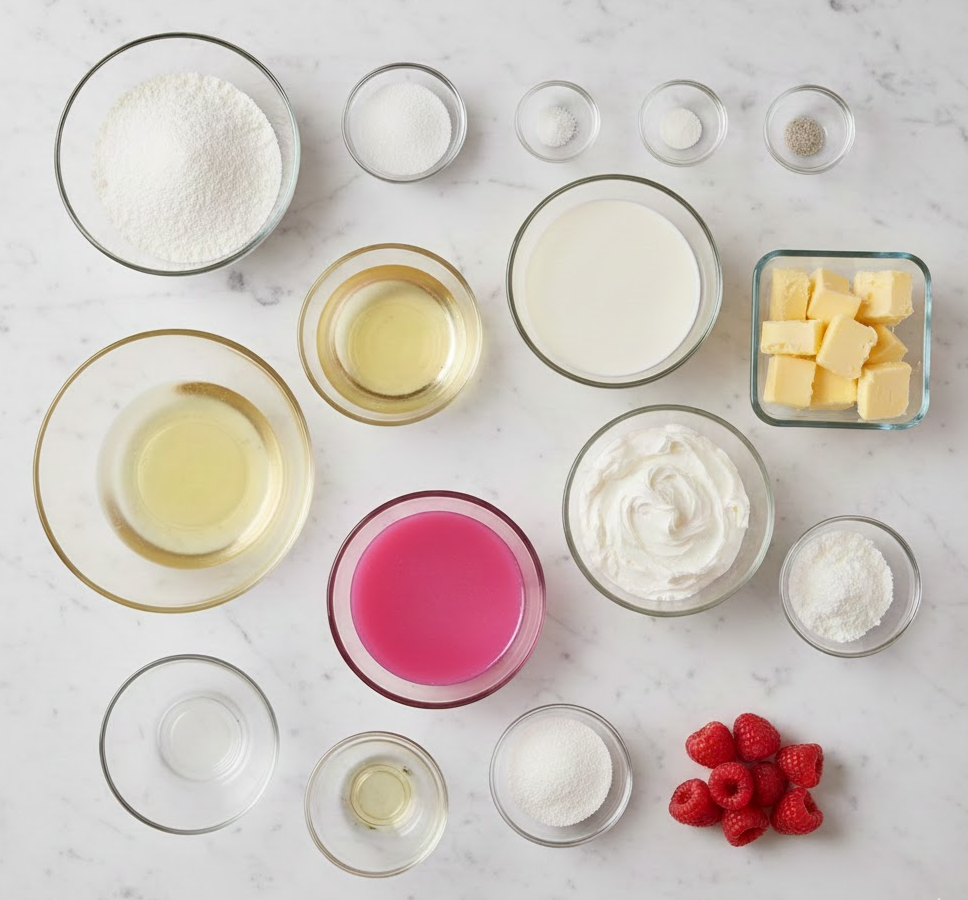
Ingredients You’ll Need for Cake Perfection
Creating a truly exceptional cake starts with the right ingredients, prepared correctly. We emphasize using a kitchen scale for accuracy—it’s a game-changer!
For the Pink Velvet Cake:
- Cake Flour (13 oz): This is non-negotiable for that signature tender, fine crumb. Its lower protein content results in a lighter, softer texture compared to all-purpose flour.
- Granulated Sugar (12 oz): Provides sweetness and helps retain moisture.
- Salt (1 teaspoon): Balances the sweetness and enhances all the other flavors.
- Baking Powder (1 tablespoon) & Baking Soda (½ teaspoon): The dynamic duo of leavening. Baking powder provides initial lift, while baking soda reacts with the acidic buttermilk for extra rise and a tender crumb.
- Egg Whites (5 oz, room temperature): Contribute to the cake’s structure and lightness without the richness of yolks, allowing the buttermilk flavor to shine. Room temperature is KEY for emulsification!
- Vegetable Oil (4 oz): Adds moisture and keeps the cake incredibly tender.
- Buttermilk (10 oz, room temperature or slightly warm): The star ingredient! It contributes to the velvety texture, moisture, and a subtle tangy flavor that rounds out the sweetness. Don’t substitute with regular milk and vinegar here – real buttermilk makes a difference.
- Unsalted Butter (6 oz, softened): Adds richness and flavor. Softened butter creamed with sugar creates air pockets for a light texture.
- Vanilla Extract (2 teaspoons): Essential for classic cake flavor.
- Electric Pink Food Coloring (2 drops): For that signature cheerful pink hue. Adjust to your desired shade!
For the Stabilized Whipped Cream:
- Heavy Whipping Cream (24 ounces): Ensure it’s very cold for best whipping results.
- Powdered Sugar (4 ounces): Sweetens the cream and helps stabilize it.
- Powdered Gelatin (2 teaspoons): The secret to stable, non-weeping whipped cream.
- Cold Water (1 Tablespoon): To bloom the gelatin.
- Vanilla Extract (1 teaspoon): For a lovely, aromatic flavor.
- Heavy Whipping Cream (1 teaspoon): Added to the melted gelatin to temper it, preventing lumps.
- Fresh Raspberries (1 cup, optional): For garnish, adding a burst of fresh flavor and vibrant color.
Essential Equipment for Success
Having the right tools makes the baking process smoother and more enjoyable.
- Stand Mixer with Paddle and Whisk Attachments: A stand mixer is invaluable for this recipe, particularly for creaming butter and developing cake structure, as well as whipping cream. If you don’t have one, a good quality electric hand mixer will work, though it might require a bit more effort.
- Kitchen Scale: Absolutely crucial for accurate ingredient measurement, especially for flour, sugar, and liquids. This is Sophie’s #1 tip for consistent baking success.
- Measuring Cups & Spoons: For smaller quantities like salt, baking powder, and vanilla.
- Rubber Spatula: For scraping down the bowl, ensuring all ingredients are incorporated.
- Three 6″x2″ Cake Pans: This recipe is designed for three smaller layers, which bake more evenly and create a beautiful height. If you only have two pans, you can bake in batches, but ensure your batter isn’t sitting too long.
- Wire Cooling Rack: Essential for proper cooling and preventing soggy bottoms.
- Small Microwave-Safe Bowl: For blooming and melting gelatin.
- Whisk: For combining wet ingredients.
Step-by-Step Baking Instructions: Sophie’s Proven Method
Follow these detailed steps carefully, paying close attention to Sophie’s notes, for a flawless Pink Velvet Buttermilk Cake.
Pink Velvet Cake Layers
- Preheat & Prep Pans: Heat your oven to 335º F/168º C — 350º F/177º C. Sophie prefers the lower setting (335º F) to prevent the cake edges from browning too much before the center is cooked through. Prepare two or three 6″x2″ cake pans with cake goop or your preferred pan spray. Ensure even coverage.
- Combine Dry Ingredients: In the bowl of your stand mixer fitted with the paddle attachment, combine the measured cake flour, granulated sugar, salt, baking powder, and baking soda. Mix on low for 10 seconds to ensure everything is well combined.
- Prepare Wet Mixtures: In a separate small bowl, combine ½ cup of the buttermilk and the vegetable oil; set aside. In another bowl, whisk together the remaining buttermilk, room temperature egg whites, 2 teaspoons of vanilla extract, and 2 drops of electric pink food coloring until the eggs are broken up and the color is uniform. Set aside. REMINDER: All wet ingredients MUST be at room temperature!
- Butter & Dry Mix: Add your softened unsalted butter to the dry ingredients in the stand mixer. Mix on low speed until the mixture resembles coarse sand, about 30 seconds. This ensures the butter is evenly distributed before liquid is added.
- Develop Structure (Crucial Step!): With the mixer still on low, add the buttermilk/oil mixture. Mix until the dry ingredients are just moistened. Immediately increase the mixer speed to medium (setting 4 on a KitchenAid) and beat for a full 2 minutes. This step is vital for developing the cake’s structure and creating that desirable velvety crumb. Skipping or shortening this step can lead to a collapsed or dense cake.
- Scrape & Incorporate Egg Mixture: Scrape down the sides and bottom of your mixing bowl thoroughly with a rubber spatula. Reduce the mixer speed to low. Gradually add the egg white mixture in three separate batches, allowing the batter to mix for about 15 seconds between each addition. This gentle incorporation maintains the batter’s delicate emulsion.
- Final Mix & Pour: Scrape down the bowl one last time to ensure everything is perfectly incorporated. Divide the batter evenly among your prepared cake pans, filling them about ¾ of the way full.
- Bake: Bake for 35-40 minutes. The cakes are done when a toothpick inserted into the center comes out cleanly and the cake has not yet begun to shrink from the sides of the pan. Overbaking will dry out your cake!
- Release Steam & Cool: IMMEDIATELY after removing from the oven, firmly tap each cake pan once on your countertop. This crucial step releases steam, preventing the cake from shrinking excessively. Let the cakes cool in their pans for 10 minutes, then invert them onto a wire cooling rack to cool completely. For best handling and moisture retention, Sophie recommends chilling your cakes or wrapping them in plastic wrap and freezing them. Thaw on the countertop while still wrapped before frosting.
Crafting the Perfect Stabilized Whipped Cream
This frosting is light, airy, and won’t disappoint!
- Bloom Gelatin: In a small, microwave-safe bowl, sprinkle 2 teaspoons of powdered gelatin over 1 Tablespoon of cold water. Let it sit undisturbed for 5 minutes to bloom and thicken.
- Melt Gelatin: Microwave the bloomed gelatin for 5 seconds. If there are still granules, microwave for another 3 seconds. It should be completely melted and smooth. Avoid overheating.
- Temper Gelatin: Stir in 1 teaspoon of heavy cream into the melted gelatin. This helps temper the gelatin and prevents it from seizing when added to the cold whipped cream. If it cools and re-solidifies, simply warm it briefly again until smooth.
- Whip Cream: In a very cold mixing bowl (chilling the bowl and whisk attachment beforehand helps!), whip the 24 ounces of heavy cream to soft peaks using the whisk attachment of your stand mixer.
- Sweeten & Flavor: Add the 4 ounces of powdered sugar and 1 teaspoon of vanilla extract. Mix until just combined.
- Stabilize: Reduce the mixer speed to low. While the mixer is running, slowly drizzle in the prepared gelatin mixture. Continue mixing until the whipped cream forms stiff peaks. Be careful not to over-mix, or you’ll end up with butter!
- Frost Immediately: Use the stabilized whipped cream immediately to frost your completely cooled cake layers. Garnish with fresh raspberries.
Sophie’s Top Tips for Pink Velvet Cake Perfection
Even with a detailed recipe, a few expert insights can elevate your baking from good to truly exceptional. These are the critical lessons Sophie learned during her 9+ tests.
1. Room Temperature is Key: The Science of Emulsion
This cannot be stressed enough! Cold ingredients (butter, eggs, buttermilk) do not emulsify properly with each other. This results in a broken or curdled batter, leading to a cake with an inconsistent, often dense, texture. Warm ingredients create a smooth, homogenous batter that holds air better, giving you that light, velvety crumb. Plan ahead and take your butter, eggs, and buttermilk out of the fridge at least 1-2 hours before baking.
2. Weighing Ingredients: Precision for Perfection
Baking is a science, and accuracy matters. Volume measurements (cups) can vary wildly based on how you scoop or pack ingredients. Flour, especially, can be significantly over-measured using cups. Using a kitchen scale to weigh your ingredients (in ounces or grams) ensures the exact ratios specified in the recipe, guaranteeing consistent, successful results every single time. It’s an investment that pays off immensely in your baking!
3. The Power of Mise en Place (Everything in Its Place)
Before you even turn on your mixer, measure out and prepare all your ingredients. This practice, known as ‘mise en place,’ prevents you from accidentally leaving out an ingredient, rushing a step, or making a mistake under pressure. It creates a calm, organized baking environment, reducing stress and increasing your chances of success.
4. Chilling for Success: A Pro Baker’s Secret
Chilling your baked and fully cooled cake layers before frosting makes them much easier to handle. Cold cakes are firmer and less prone to tearing or crumbling when you’re trimming, leveling, or frosting. You can wrap and chill layers in the fridge overnight or even freeze them for a few weeks to lock in moisture, thawing them (still wrapped) at room temperature before frosting. Chilling the finished frosted cake also helps the frosting set, making it easier to transport and slice cleanly.
5. No Substitutions for Cake Flour (Unless Specified)
This recipe specifically calls for cake flour because its lower protein content creates a significantly more tender and delicate crumb than all-purpose flour. While some recipes suggest a DIY substitute (all-purpose flour + cornstarch), for a truly velvety cake like this Pink Velvet, Sophie strongly recommends sticking to actual cake flour. Substituting may drastically change the texture and lightness of your final product.
Serving Suggestions & Presentation
This Pink Velvet Buttermilk Cake is a showstopper on its own, but a few touches can make it even more memorable:
- Fresh Berries: A generous scattering of fresh raspberries, or a mix of raspberries and strawberries, enhances the cake’s vibrant color and adds a burst of tart freshness.
- Dust of Powdered Sugar: A light dusting over the finished cake adds an elegant, ethereal touch.
- Coffee or Tea Pairing: Serve slices with a warm cup of coffee, a delicate tea, or a glass of cold milk for a comforting treat.
- Special Occasions: This cake is perfect as a centerpiece for birthdays, baby showers, Valentine’s Day, or any event where you want to add a touch of charming elegance.
Storage and Make-Ahead Options
One of the great things about this recipe is its flexibility for making components ahead of time!
- Cake Layers: Fully baked and cooled cake layers can be wrapped tightly in plastic wrap and stored at room temperature for up to 2 days, in the refrigerator for up to 5 days, or frozen for up to 1 month. Thaw frozen layers, still wrapped, on the countertop until completely defrosted before frosting.
- Stabilized Whipped Cream: This whipped cream is designed to be stable. It can be made up to 24 hours in advance and stored in an airtight container in the refrigerator. Before using, give it a quick whisk on low speed to loosen it slightly if it’s too firm.
- Assembled Cake: An assembled and frosted Pink Velvet Buttermilk Cake should be stored in the refrigerator due to the fresh cream frosting. It will keep well for 3-4 days. Allow it to come to room temperature for about 30 minutes before serving for the best flavor and texture.
Frequently Asked Questions (FAQ)
What makes this Pink Velvet Buttermilk Cake recipe unique?
Our Pink Velvet Buttermilk Cake stands out due to the precise balance of buttermilk for an incredibly moist, tender crumb, and the inclusion of a stabilized whipped cream frosting that holds its shape beautifully. It’s also been rigorously tested by Sophie over 9 times to ensure flawless results every time, focusing on exact measurements and techniques for a superior texture and flavor.
Why is it so important to use room temperature ingredients?
Using room temperature ingredients, especially for dairy (butter, buttermilk) and eggs, is absolutely crucial. Cold ingredients don’t emulsify properly with the other ingredients, leading to a lumpy, curdled batter and a dense, inconsistent cake texture. Room temperature ingredients blend smoothly, creating a uniform batter that bakes evenly and results in a light, airy crumb.
Can I make this Pink Velvet Cake ahead of time?
Absolutely! This cake is excellent for making ahead. Sophie recommends baking the cake layers, letting them cool completely, then wrapping them tightly in plastic wrap and chilling them in the refrigerator overnight or freezing them for up to a month. Thaw frozen layers, still wrapped, on the countertop before frosting. The stabilized whipped cream can also be made a day in advance and stored in the refrigerator, then re-whipped lightly before use if needed.
What is ‘cake goop’ and can I use something else?
Cake goop is a homemade pan release, often a mixture of equal parts flour, shortening, and vegetable oil. It creates an excellent non-stick coating for your cake pans. If you don’t have cake goop, you can use a high-quality baking spray with flour or grease and flour your pans the traditional way. The goal is to ensure your delicate cake layers release cleanly.
Why do I need to weigh ingredients instead of using cup measurements?
Weighing ingredients, especially flour and sugar, provides far more accuracy than volume measurements (cups). A cup of flour can vary significantly in weight depending on how it’s scooped and packed. Baking is a science, and precise measurements by weight (grams or ounces) ensure the correct ingredient ratios, leading to consistent, successful results – especially with delicate cakes like this Pink Velvet Buttermilk Cake.
More Irresistible Cookie & Cake Recipes from SweetCraft
If you loved creating this beautiful Pink Velvet Buttermilk Cake, you’re sure to enjoy exploring more of our cherished recipes, perfect for family gatherings and sweet cravings alike. If you’re looking for other ways to bring joy through baking, we highly recommend these comforting and delightful treats:
- For another stunning red-hued dessert, try our Stuffed Red Velvet Cookies Recipe – an amazing twist on a classic!
- Craving something unique and utterly delicious? Our Pistachio NYC Cookies are thick, chewy, and packed with flavor.
- If you’re a fan of the classic combo, our Peanut Butter Nutella Cookie Recipe is pure indulgence.
- And for a truly decadent treat, you can’t go wrong with our rich and gooey White Chocolate Stuffed Cookies.
Ready to Bake Your Masterpiece?
This Pink Velvet Buttermilk Cake recipe is more than just instructions; it’s your personal guide to baking an elegant, incredibly delicious dessert that will be remembered long after the last slice is gone. With Sophie’s expert guidance and the thorough testing behind it, you have all the tools and confidence to create a truly spectacular cake.
Gather your ingredients, set aside some joyful time in your kitchen, and get ready to bake a Pink Velvet Buttermilk Cake that embodies comfort, celebration, and pure homemade bliss. Happy baking!


