Hey there, fellow dessert enthusiasts and sports fans! Sophie here from SweetCraft Recipes, and if there’s one thing I know, it’s how to whip up a crowd-pleasing treat that’s as fun to make as it is to eat. Today, we’re diving headfirst into a recipe that’s guaranteed to be a total slam dunk at your next game day gathering, birthday party, or just a fun afternoon snack: Easy Slam Dunk Basketball Cookies!

After testing and perfecting this recipe no less than nine times (yes, you read that right!), I’ve got all the insider tips to ensure your cookies are picture-perfect and delicious every single time. Forget complicated baking or extensive ingredient lists; this no-bake wonder uses just three simple ingredients and comes together faster than a fast break.
These aren’t just any cookies; they’re an experience! Imagine the delight on faces young and old as they bite into a perfectly coated chocolate sandwich cookie, cleverly disguised as a miniature basketball. They’re a comfort-food favorite with a fun, festive twist, and while they’re definitely a sweet indulgence, their individual portioning makes them a smart choice for satisfying cravings without overdoing it. So, whether you’re rooting for your favorite team during March Madness, celebrating a little league win, or simply looking for a fun kitchen project with the kids, these Basketball Cookies are about to become your MVP recipe!
Why You’ll Be Cheering for These Basketball Cookies
Let’s break down why this recipe is about to steal the show in your kitchen:
- Effortlessly Easy: Seriously, if you can melt chocolate and dip a cookie, you can make these! It’s a fantastic no-bake recipe perfect for all skill levels.
- Minimal Ingredients: You only need three main items – orange candy melts, black candy melts, and chocolate sandwich cookies. That’s it!
- Game Day Perfection: They are the ultimate snack for watching basketball games, football, or any sports event. Festive and thematic, they instantly elevate any party spread.
- Kid-Friendly Fun: Involve the little ones in the dipping and decorating. It’s a wonderful activity that yields delicious results.
- Crowd-Pleaser: Everyone, from toddlers to grandparents, adores these charming, chocolate-coated treats. They disappear fast!
- No Oven Required: Keep your kitchen cool, especially during warmer months, as these beauties only need the microwave and fridge.
- Customizable: While we’re making basketballs today, the technique is versatile for other sports or themed cookies!
Essential Ingredients: Your Starting Lineup
This recipe calls for a straightforward lineup of ingredients, but understanding them ensures your cookies are a success.
- 12 oz. Wilton Orange Candy Melts: These are the star players! Candy melts are specifically designed for melting and coating, creating a smooth, glossy finish that hardens quickly. They come in a disc form and are easy to work with. I specifically recommend Wilton for their consistent quality and vibrant color. Using real chocolate can be trickier as it requires tempering, so stick to candy melts for ease.
- ¼ C. Wilton Black Candy Melts: This is for piping those iconic basketball lines. You only need a small amount, making it a great way to use up leftover candy melts from other projects.
- 1 Package of Chocolate Sandwich Cookies: The foundation of our delicious basketballs! Any brand of classic chocolate sandwich cookies with a white cream filling will work perfectly. They provide a sturdy base and a delightful chocolatey crunch beneath the candy coating.
- Small Sandwich Bag & Scissors: Your simple piping tools! A small snip in the corner of a sandwich bag works just as well as a fancy piping bag for the fine lines required.
Sophie’s Ingredient Swap & Prep Advice:
- Candy Melt Alternatives: While Wilton is my go-to for reliability, other brands of candy melts (like Ghirardelli Melting Wafers for a slightly richer flavor, though they are more prone to seizing) can work. Just ensure they are specifically for melting/coating.
- Cookie Variations: Feeling adventurous? You could try golden vanilla sandwich cookies for a lighter base, or even peanut butter-filled ones for a flavor twist. Just remember the chocolate sandwich cookie offers the most classic contrast.
- Mise en Place: Get all your ingredients and tools ready before you start. This includes unwrapping cookies, having your microwave-safe bowls, parchment paper, and cookie sheets prepared. This makes the dipping process much smoother!
Step-by-Step Instructions: Scoring Big with Every Cookie
Ready to create some edible masterpieces? Follow these detailed steps, complete with my expert tips, for perfectly coated Slam Dunk Basketball Cookies.
Step 1: Melt the Orange Candy Melts
- In a microwave-safe bowl, add the 12 oz. of orange Wilton candy melts.
- Heat in the microwave on 50% power for 30-second intervals, stirring thoroughly after each interval. Candy melts can hold their shape even when melted, so stirring is crucial. Continue until completely smooth and fluid, but not scorching hot.
- Sophie’s Tip: Overheating candy melts can cause them to seize or become grainy. Low and slow is the key here. Let the melted candy cool for 2-3 minutes before dipping. This prevents your cookies from getting too hot and potentially separating the cream filling, and also allows the coating to be thicker.
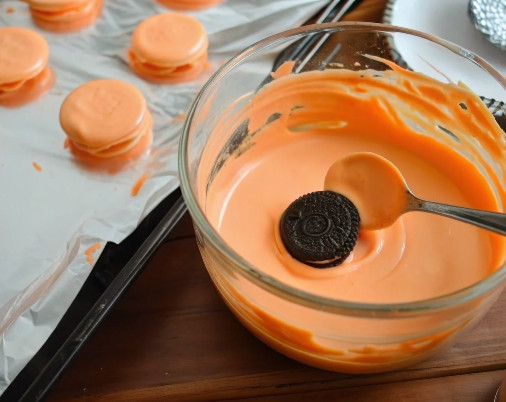
Step 2: Dip the Cookies
- Using a fork (or a candy dipping tool, if you have one), carefully submerge one chocolate sandwich cookie at a time into the melted orange candy. Ensure both sides are completely covered.
- Gently lift the cookie out with the fork, allowing any excess chocolate to drip back into the bowl. You can tap the fork lightly against the rim of the bowl.
- Lay the dipped cookie onto a cookie sheet lined with wax paper or parchment paper.
- Sophie’s Tip: Work efficiently but calmly. Don’t rush, but keep the candy melts warm enough to be fluid. If it starts to thicken, microwave for another 10-15 seconds at 50% power and stir.
Step 3: Set the Orange Coating
- Once all your cookies are dipped, transfer the cookie sheet to the refrigerator.
- Let them chill for 15-20 minutes, or until the orange candy melt coating is completely set and firm to the touch. This ensures a solid base for your basketball lines.
Step 4: Melt the Black Candy Melts
- In a separate small microwave-safe bowl, melt ¼ cup of black candy melts. Follow the same low and slow microwave method (30-second intervals at 50% power, stirring well).
- Let the melted black candy cool for 3-4 minutes. You want it warm enough to be fluid but cool enough to control when piping.
Step 5: Prepare Your Piping Bag
- Scoop the cooled, melted black candy melts into a small sandwich bag.
- Using scissors, snip a tiny corner off the bag. Start with a very small snip; you can always make it bigger, but you can’t make it smaller! This tiny hole will give you precise lines.
Step 6: Pipe the Initial Basketball Lines
- Take your chilled, orange-coated cookies out of the fridge.
- Using your makeshift piping bag, pipe a curved line across the top of each cookie, resembling the arc of a basketball’s seam.
- Then, pipe two smaller curved lines on either side, running perpendicular to the first main curve. These are the classic “C” shapes of a basketball.
- Repeat this pattern for all your cookies.
- Sophie’s Tip: Practice on a piece of parchment paper first if you’re nervous! Maintain steady pressure and a consistent speed for clean lines. Don’t worry if they aren’t perfect; homemade charm is part of the fun!
Step 7: Set the Initial Lines
- Once all cookies have their first three lines, place them back into the refrigerator for another 5-10 minutes. This quick chill will set the black lines so they don’t smudge when you add the final line.
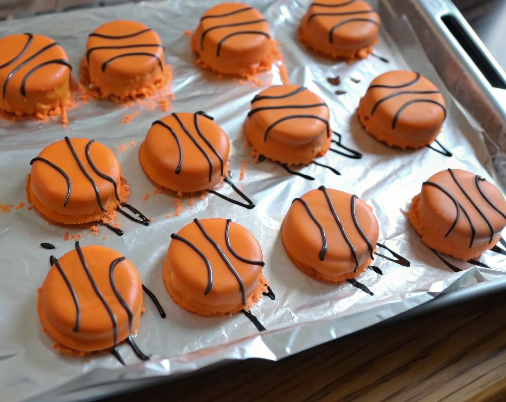
Step 8: Complete the Basketball Transformation
- Finally, pipe one straight line across the middle of each cookie, connecting the two main curved lines. This completes the iconic basketball seam pattern.
- Let the finished cookies set completely at room temperature for at least 30 minutes, or speed up the process with another 15-20 minutes in the fridge.
- Sophie’s Tip: Patience is key for setting! Don’t try to handle them too much before they’re fully firm, or you risk smudging your beautiful work.
Sophie’s Expert Tips for a Slam Dunk Every Time
Having made these numerous times, I’ve picked up a few tricks that will help you achieve professional-looking results with minimal stress.
- Temperature Control is Paramount: Candy melts are sensitive to heat. Always use low power in the microwave and stir frequently. If they get too hot, they become thick, dull, and difficult to work with. If they get too thick, you can stir in a teaspoon of paramount crystals or a tiny bit of vegetable shortening (not butter or oil, which can cause seizing!) to thin them out.
- Don’t Rush the Cooling: Cooling the melted candy for a few minutes before dipping helps it adhere better and creates a thicker, more even coat. Rushing this can lead to thin, translucent spots.
- The Fork is Your Friend: A regular dinner fork works perfectly for dipping. Use the tines to gently lower and lift the cookie, letting excess drip through. For extra smoothness, you can even scrape the bottom of the dipped cookie very gently against the edge of the bowl before placing it on parchment paper.
- Small Snip for Precision: When cutting the corner of your sandwich bag for piping, remember: less is more. A very small snip creates a finer line, which is essential for detailed basketball seams. You can always widen it if needed.
- Steady Hand for Lines: Try resting your piping hand on the back of your other hand (which can hold the cookie steady) for greater control. This creates a more stable “tripod” and helps you pipe straighter, more consistent lines.
- Parchment Paper is a Must: Always line your cookie sheets with parchment paper or wax paper. This prevents sticking and makes for easy cleanup once the candy melts have set.
- Storage Savvy: Once completely set, store these cookies in an airtight container. They’re best enjoyed within 3-4 days to maintain their freshness and crispness. Avoid storing in a humid environment, which can make the candy melts sticky.
Variations & Customizations: Play Your Way!
While Slam Dunk Basketball Cookies are fantastic as is, here are some ideas to customize them for other occasions or preferences:
- Team Colors: Swap the orange for your favorite team’s colors! Use red for a specific team, blue, green, or even purple. Just adjust the candy melt colors.
- Other Sports Themes:
- Football: Use brown candy melts for the base and white candy melts for the laces.
- Baseball/Softball: Use white candy melts for the base and red candy melts for the stitching.
- Soccer: Use white candy melts for the base and black candy melts to pipe hexagonal patterns.
- Sprinkle Power: Before the orange candy melts fully set, sprinkle them with orange or black sprinkles for added texture and sparkle.
- Mini Cookies: Use mini chocolate sandwich cookies for smaller, bite-sized basketballs. Perfect for tiny hands or a dessert bar!
- Flavor Boost: Before dipping, spread a thin layer of peanut butter or hazelnut spread on top of the chocolate sandwich cookie for an extra layer of flavor. Just ensure it’s a very thin layer so it doesn’t interfere with the candy melt setting.
Serving Suggestions: Presenting Your Winning Team
These Basketball Cookies are a treat in themselves, but here’s how to serve them up like a true champion:
- Game Day Platter: Arrange them artfully on a large platter alongside other game-day favorites like savory dips, popcorn, and mini sliders.
- Individual Treats: For parties, place each cookie in a small cupcake liner for easy grabbing and a touch of elegance.
- Dessert Bar Star: Include them on a dessert bar with other themed treats, or as part of a larger cookie assortment.
- Gift Idea: Package a few cookies in a clear cellophane bag tied with a ribbon in team colors for a thoughtful gift for coaches, teammates, or sports-loving friends.
- With a Beverage: Serve them with a tall glass of milk, a warm mug of hot chocolate, or even a frosty soda for the ultimate comfort food experience.
Make Ahead & Storage: Plan for Victory!
One of the best aspects of these no-bake cookies is their make-ahead potential!
- Make Ahead: You can prepare your Slam Dunk Basketball Cookies up to 3-4 days in advance. This makes them ideal for busy party prep! Ensure they are fully set before storing.
- Storage: Once completely firm, store the cookies in an airtight container at room temperature for up to 3-4 days. If your home is particularly warm or humid, you can store them in the refrigerator for up to a week. If stacking, place small sheets of parchment paper between layers to prevent them from sticking together and smudging the designs.
- Freezing: I generally don’t recommend freezing candy-melt coated cookies. The candy melts can sometimes become brittle and crack, or develop condensation upon thawing, which can affect the appearance and texture.
Common Questions About These Easy Basketball Cookies (FAQs)
How do I prevent candy melts from seizing or becoming too thick?
Candy melts can seize if exposed to even a tiny amount of water or if overheated. To prevent this, use a clean, dry microwave-safe bowl. Heat in short bursts (30 seconds) and stir well between each, even if they don’t look melted, as residual heat will continue the process. If they become too thick, you can add a small amount of paramount crystals or a tiny bit of vegetable shortening (not water or milk!) to thin them out, stirring until smooth. Over-thinning will make them take longer to set, so add sparingly.
Can I make these Slam Dunk Basketball Cookies ahead of time?
Absolutely! These cookies are perfect for making in advance. You can prepare them up to 3-4 days before your event. Store them in an airtight container at room temperature if your kitchen isn’t too warm, or in the refrigerator. Just ensure they are fully set before stacking them to prevent sticking or smudging the design.
What kind of chocolate sandwich cookies work best?
Any standard chocolate sandwich cookie with white cream filling will work wonderfully! The classic brand is a popular choice, but feel free to use your favorite store brand. The important thing is a sturdy cookie that holds up well to dipping and provides a nice contrasting base for the vibrant orange and black candy melts. For a slightly different flavor, you could even try golden sandwich cookies, though the dark base offers the best visual pop.
What’s the best way to store leftover Basketball Cookies?
Once fully set, store your leftover Slam Dunk Basketball Cookies in an airtight container. They will keep fresh at room temperature for up to 3-4 days, or in the refrigerator for up to a week. If stacking, you can place small pieces of parchment paper between layers to prevent any sticking, especially if your home is humid. They don’t typically freeze well due to the candy melt coating, which can sometimes become brittle.
The Story Behind the Slam Dunk: My Journey to This Recipe
There’s something incredibly satisfying about creating a treat that brings so much joy with so little effort. The inspiration for these Slam Dunk Basketball Cookies came from a desire to celebrate big moments – whether it’s a crucial game, a school victory, or just making a regular Tuesday feel special. As a recipe developer, I’m always looking for ways to simplify deliciousness, especially for busy home cooks like you!
I remember the first time I made a batch for a neighborhood watch party during the NBA playoffs. I wanted something festive and fun, but I didn’t have hours to spend baking. I grabbed some chocolate sandwich cookies and, with a spark of creativity, decided to transform them into mini basketballs. It took a few tries (hence the “9+ times tested” badge!), experimenting with candy melt temperatures, dipping techniques, and piping bag sizes, to get that perfect, glossy finish and crisp design.
Each time I refined the process, I focused on making it as foolproof as possible, envisioning parents and kids creating these together, or a hostess effortlessly assembling a show-stopping platter. The biggest “aha!” moment was perfecting the cooling steps between dipping and piping – it’s a small detail that makes a monumental difference in the final look.
These cookies became an instant hit, eliciting “oohs” and “aahs” from everyone who saw them. They’re more than just a dessert; they’re a conversation starter, a mood lifter, and a testament to how a little creativity in the kitchen can go a long way. This recipe isn’t just about candy melts and cookies; it’s about creating memories, celebrating victories big and small, and sharing a bit of sweet joy with loved ones.
If You Love Fun, Stuffed Cookies, You’ll Adore These!
Here at SweetCraft Recipes, we’re all about taking classic treats and giving them an exciting, often stuffed, twist! If you enjoyed the ease and fun of these Slam Dunk Basketball Cookies, I bet you’ll fall head over heels for some of my other popular cookie creations:
- For a truly indulgent experience, you absolutely have to try my Stuffed Red Velvet Cookies Recipe. They’re rich, decadent, and utterly irresistible.
- Craving something unique and utterly delicious? My Pistachio NYC Cookies Recipe brings that famous bakery experience right to your kitchen.
- And for a truly seasonal delight, especially around Easter, don’t miss the chance to whip up these amazing Creme Egg Stuffed Cookies Recipe – they’re always a hit!
- If you’re a fan of the classic combo, then my Peanut Butter Nutella Cookie Recipe is a dream come true, with a gooey, flavorful center.
- And for those who adore white chocolate, my White Chocolate Stuffed Cookies are pure bliss, bursting with creamy goodness.
These recipes, much like our Basketball Cookies, are designed to be fun, achievable, and utterly delicious. Dive into these other incredible cookie adventures and expand your baking repertoire!
Ready to Score Big?
There you have it – the ultimate guide to creating Easy Slam Dunk Basketball Cookies that are guaranteed to win over any crowd. This recipe is a testament to the fact that delicious, memorable treats don’t have to be complicated. With just a few ingredients, a little patience, and my tried-and-true tips, you’ll be creating professional-looking, fun cookies in no time.
So, gather your ingredients, get ready to dip and pipe, and prepare for a dessert victory! Whether it’s for a birthday bash, a championship game, or just a sweet treat for your family, these cookies are a surefire hit.
Don’t forget to share your creations with me in the comments below! I love seeing your kitchen triumphs. Happy dipping, and may all your cookies be a slam dunk!


