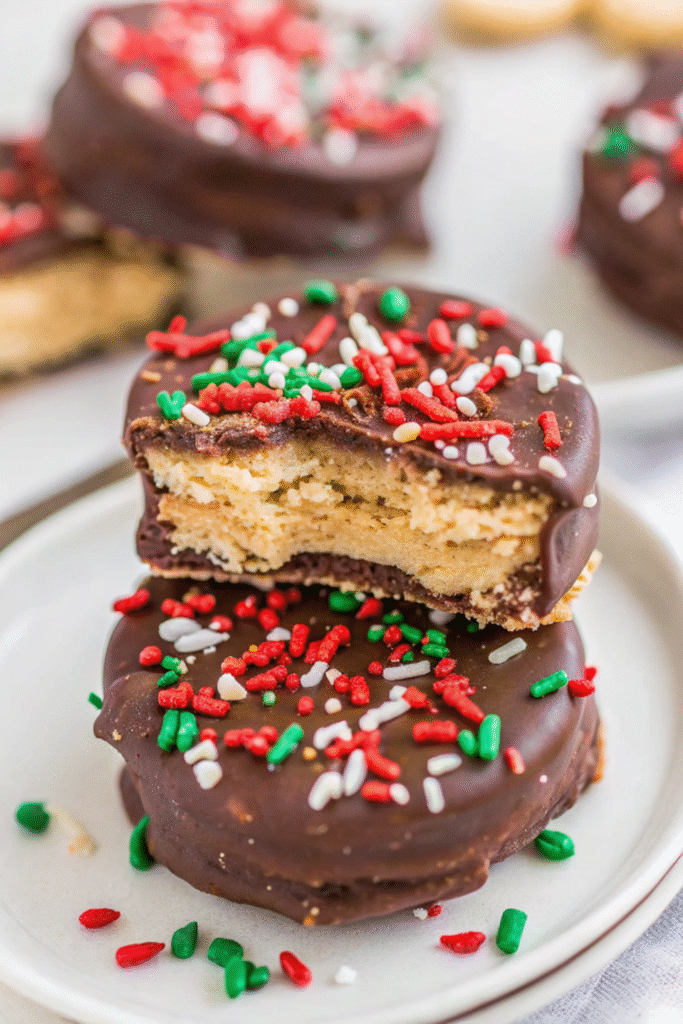
Are you ready to dive headfirst into a world of nostalgic flavors and effortless delight? Get ready to meet your new favorite no-bake treat: Chocolate Peanut Butter Stacks! This isn’t just a recipe; it’s a passport to pure comfort, a symphony of salty, sweet, creamy, and crunchy all wrapped up in a decadent chocolate coating. Imagine that satisfying snap of chocolate giving way to a buttery cracker sandwiching a luscious peanut butter and marshmallow creme filling. Pure bliss, right?
As Sophie, the recipe developer and chief taste-tester behind Sweet Craft Recipes, I can tell you these Chocolate Peanut Butter Stacks are more than just a quick dessert – they’re a revelation. I’ve personally tested this recipe nine times (and counting!), perfecting every nuance to ensure you get a fool-proof, utterly delicious result every single time. It’s a testament to simple ingredients coming together to create something truly magical.
In a world full of complicated baking projects, these stacks are your culinary escape. They require no oven, minimal effort, and just three star ingredients (plus an optional, but highly recommended, sprinkle of joy!). Whether you’re a busy parent looking for a lightning-fast treat, a home cook yearning for that classic American comfort food, or simply a peanut butter and chocolate devotee, these stacks are calling your name.
Perfect for family gatherings, holiday parties, or just a Tuesday night indulgence, they’re designed to bring smiles and satisfy even the most intense sweet cravings. Let’s get stacking!
Why You’ll Absolutely Love These Chocolate Peanut Butter Stacks
These aren’t just any no-bake treat; they’re the no-bake treat that consistently earns rave reviews. Here’s why Sophie and countless others adore them:
- No-Bake Bliss: Ditch the oven and the stress! This recipe is entirely no-bake, making it perfect for hot days, busy schedules, or anyone who prefers to skip the baking process. It’s quick, cool, and incredibly convenient.
- Ridiculously Easy: With only three main ingredients, the process is straightforward enough for even novice cooks. No fancy techniques, no intimidating steps – just simple assembly for maximum deliciousness. Sophie’s careful testing ensures every step is foolproof.
- A Taste of Nostalgia: These stacks evoke childhood memories of simple, sweet treats. The combination of salty crackers, creamy peanut butter, and sweet chocolate is a timeless classic that brings back warm, fuzzy feelings with every bite.
- Ultimate Salty-Sweet Balance: The buttery, slightly salty Ritz crackers are the secret weapon here, cutting through the sweetness of the peanut butter, marshmallow creme, and chocolate. It’s a flavor harmony that keeps you coming back for more.
- Crowd-Pleasing Perfection: Need a dessert that disappears fast at parties? These are it. They’re unique enough to be memorable but universally loved. They’re perfectly sized, making them ideal for potlucks, cookie platters, or anytime you’re feeding a hungry crowd.
- Quick & Adaptable: From start to finish, you’ll have these ready to chill in under 30 minutes. Plus, they’re incredibly versatile – easily customizable for different seasons or dietary preferences (with a few thoughtful swaps!).
- Texture Heaven: Experience the satisfying crunch of the cracker, the smooth creaminess of the filling, and the satisfying snap of the chocolate coating. It’s a textural journey in every single bite!
The Simple Ingredients You’ll Need
One of the beautiful things about Chocolate Peanut Butter Stacks is their reliance on just a few easily accessible ingredients. Don’t let the simplicity fool you; the magic happens when these humble components come together.
- Ritz Crackers (or similar buttery golden round crackers): The unsung hero of this recipe! Ritz crackers provide that signature buttery, slightly salty flavor and crisp texture that elevates these stacks from good to utterly addictive. Their round shape is also perfect for creating uniform sandwiches.
- Sophie’s Insight: While Ritz are my absolute favorite for that authentic flavor, any similar buttery, slightly salty cracker will work. Just ensure they’re sturdy enough to hold the filling and withstand dipping. Avoid very thin or overly brittle crackers.
- Creamy Peanut Butter: The heart of our delicious filling. Opt for a smooth, creamy peanut butter that’s not too oily or too dry. Classic brands work wonderfully here. Avoid natural peanut butter that separates easily, as its consistency can make the filling harder to spread evenly and might result in an oilier texture.
- Sophie’s Insight: If you’re using a brand that’s a bit stiff, you can warm it gently in the microwave for 15-20 seconds to make it more pliable and easier to mix with the marshmallow creme.
- Marshmallow Creme (Marshmallow Fluff): This is the other half of our dreamy filling. Marshmallow creme adds an incredible lightness, sweetness, and that distinct sticky, gooey texture that makes the peanut butter mixture so delightful and spreadable. It helps bind the peanut butter without adding extra liquid.
- Sophie’s Insight: Don’t confuse marshmallow creme with mini marshmallows! Marshmallow creme is specifically designed to be light and airy, perfect for mixing into a fluffy spread. There’s no good direct substitute for its unique texture in this recipe, so make sure you have a jar on hand.
- Chocolate, coarsely chopped and melted for dipping: This is where the indulgence truly shines. You’ll need about a pound of good quality chocolate. You can use semi-sweet, milk, or even dark chocolate, depending on your preference. High-quality chocolate melting wafers, chocolate bark, or even a good baking chocolate bar will give you the smoothest melt and best finish.
- Sophie’s Insight: For ease and a professional-looking finish, I highly recommend using chocolate melting wafers (like Ghirardelli or Guittard) or even almond bark or candy melts. These are formulated to melt smoothly and harden quickly without requiring tempering, giving you a beautiful, glossy coating. If using chocolate chips or bars, you might need to add a teaspoon of coconut oil or vegetable shortening per cup of chocolate to thin it slightly for easier dipping and a smoother set.
- Holiday Sprinkles, optional but recommended: A fun way to add color, texture, and festive cheer! These are especially great for different holidays or themed events.
How to Make Chocolate Peanut Butter Stacks: Sophie’s Step-by-Step Guide
Ready to create some magic? This process is so simple, you’ll wonder why you haven’t been making these all your life!
- Prep Your Workspace: First things first, line a large baking sheet (or two, if you’re making a big batch) with parchment paper or wax paper. This prevents sticking and makes for easy cleanup. Trust me, melted chocolate can be messy, and parchment paper is your best friend.
- Lay Out Your Crackers: Carefully arrange 24 of your Ritz crackers in a single layer on the prepared baking sheet. Leave a little space between each one. These will be the bottom halves of your sandwiches. Set the remaining 24 crackers aside for the tops.
- Whip Up the Filling: In a medium-sized mixing bowl, combine the creamy peanut butter and the marshmallow creme. Now, get ready to stir! You’ll want to mix this thoroughly until it’s completely smooth, uniform in color, and has a light, fluffy consistency. Sophie’s pro tip: A sturdy spatula or a hand mixer on low speed works best for this.
- Spread the Love: Take your perfectly mixed peanut butter-marshmallow filling and spread an even, thin layer onto each of the 24 crackers on your baking sheet. Don’t overdo it with the filling – a thin layer is all you need for that ideal balance of flavors and textures.
- Assemble the Stacks: Gently place one of the reserved plain crackers on top of each spread cracker, pressing down just enough to create a sandwich. You now have 24 delightful cracker sandwiches, ready for their chocolate bath!
- Melt the Chocolate: In a medium microwave-safe bowl, add your coarsely chopped chocolate. Heat the chocolate on high power in short bursts – 15 to 30 seconds at a time. After each burst, remove the bowl and stir thoroughly. Chocolate retains its shape even when melted, so stirring is crucial to prevent burning. Continue this process until the chocolate is completely melted and can be stirred smooth and glossy. Be patient and stir, stir, stir!
- Dip and Drip: This is the fun part! Using one or two forks (the tines help drain excess chocolate), carefully pick up one cracker stack and submerge it completely in the melted chocolate. Lift the stack, gently tap the fork against the side of the bowl to allow any excess chocolate to drip off. You want a nice, even coating, not a heavy blob.
- Return to Baking Sheet & Decorate: Carefully place the chocolate-dipped stack back onto your parchment-lined baking sheet. If you’re using sprinkles (and I strongly recommend you do!), now is the time to add them, while the chocolate is still wet. Repeat with the remaining stacks.
- Chill Out: Once all your stacks are dipped and sprinkled, transfer the baking sheet to the refrigerator or freezer. The chilling time allows the chocolate to harden completely, giving it that satisfying snap. In the fridge, this usually takes 15-30 minutes. If you’re in a hurry, 10-15 minutes in the freezer will do the trick!
- Serve and Enjoy: Once the chocolate is firm, your Chocolate Peanut Butter Stacks are ready to be devoured!
Sophie’s Top Tips for Success
Having made these numerous times, I’ve gathered some insights that will guarantee your Chocolate Peanut Butter Stacks turn out perfectly every single time.
- Quality of Chocolate Matters: As mentioned, using chocolate melting wafers or good quality chocolate bark will yield the best results for dipping. They melt smoothly and set firmly, giving your stacks a beautiful, professional-looking coating. If using standard chocolate chips, add a tiny bit of coconut oil or vegetable shortening (about 1 teaspoon per cup) to achieve a smoother, thinner consistency for dipping. This prevents a thick, clumpy coating.
- Don’t Overheat Your Chocolate: Patience is key when melting chocolate. Heating it too quickly or for too long can cause it to seize (become thick and grainy) or burn, making it unusable for dipping. Low and slow, with plenty of stirring, is the way to go. If your chocolate does seize, sometimes adding a teaspoon of vegetable oil or shortening and stirring vigorously can rescue it, but it’s best to avoid it altogether.
- Even Spreading is Key: A thin, even layer of the peanut butter-marshmallow filling ensures that each bite has the perfect balance of flavors and textures. Too much filling can make the stacks overly sweet or difficult to dip cleanly.
- Room Temperature Ingredients (Mostly): While the peanut butter is fine at room temperature, ensure your marshmallow creme isn’t super cold, as it can be harder to mix. The warmth of your kitchen will help both ingredients combine smoothly.
- The Power of Parchment Paper: Don’t skip lining your baking sheet! This ensures your chocolate-dipped stacks don’t stick and makes for super easy cleanup. Wax paper also works well.
- A Fork is Your Friend: When dipping, using two forks can give you more control, especially for lifting the stack out of the chocolate bath. Gently tapping the fork against the bowl helps shed excess chocolate, preventing puddles around the base of your stacks.
- Chill Thoroughly: Resist the urge to dive in before the chocolate is fully set! Chilling is essential for that satisfying chocolate snap and for the stacks to hold their shape. A quick stint in the freezer works wonders if you’re in a rush.
- Have Fun with Sprinkles: If you’re using sprinkles, have them ready to go before you start dipping. You need to add them immediately after dipping each stack, while the chocolate is still wet, so they adhere properly.
Variations & Customizations
One of the joys of a simple recipe like Chocolate Peanut Butter Stacks is how easily it adapts to your whims and desires. Here are some ideas to spark your creativity:
- Chocolate Choices: Experiment with different types of chocolate for dipping. A rich dark chocolate will offer a more intense, less sweet contrast, while white chocolate can create a beautiful visual and a creamy flavor. You could even do a swirl of two different chocolates!
- Nutty Additions: Before topping with the second cracker, sprinkle a few finely chopped peanuts or pecans onto the peanut butter filling for an extra crunch and nutty flavor boost.
- A Pinch of Salt: For a truly gourmet touch, sprinkle a tiny pinch of flaky sea salt (like Maldon) on top of the wet chocolate after dipping. The salt will enhance both the chocolate and the peanut butter flavors.
- Holiday Themes: Change up your sprinkles! Red and green for Christmas, pastels for Easter, orange and black for Halloween, or patriotic colors for the Fourth of July. These stacks are incredibly versatile for any holiday dessert table.
- Mini Stacks: Use mini Ritz crackers for adorable, bite-sized versions perfect for a sophisticated party platter.
- Spice It Up: A tiny pinch of cinnamon or a dash of vanilla extract stirred into the peanut butter-marshmallow filling can add an extra layer of flavor complexity.
- Stuffed Cookie Inspiration: Think of these as a deconstructed, no-bake version of some of our favorite stuffed cookies. You could even swap the cracker for a thin, neutral cookie for a truly cookie-like experience.
Serving Suggestions
Chocolate Peanut Butter Stacks are incredibly versatile. Here are some ideas on how to serve them:
- Dessert Platter Star: Arrange them beautifully on a platter with other small sweets. Their striking appearance and familiar flavors make them a standout.
- Afternoon Treat: Pair them with a cold glass of milk, a warm cup of coffee, or a cozy mug of hot chocolate for a delightful afternoon pick-me-up.
- Party Food: These are perfectly portioned for parties, picnics, and potlucks. They’re easy to grab and enjoy while mingling.
- Lunchbox Surprise: Pop one or two into a lunchbox for a special treat that will bring a smile.
- Gifts from the Kitchen: Package them in pretty cellophane bags with a ribbon for a thoughtful homemade gift during the holidays or for a hostess.
- Elevate Your Ice Cream: Crumble a chilled stack over a scoop of vanilla or chocolate ice cream for an instant sundae upgrade!
Storage Instructions
One of the many benefits of these no-bake treats is their excellent shelf life and ease of storage.
Once the chocolate has fully set, transfer your Chocolate Peanut Butter Stacks to an airtight container. Arrange them in a single layer, or place parchment paper between layers to prevent them from sticking together.
- Refrigerator: They will keep beautifully in the refrigerator for up to 7 days. The chill helps maintain the chocolate’s crisp snap and keeps the filling firm.
- Freezer: For longer storage, you can freeze them for up to 1-2 months. This is perfect for making a big batch ahead of time. Thaw them in the refrigerator for a few hours or at room temperature for about 15-20 minutes before serving.
Common Questions About Chocolate Peanut Butter Stacks (FAQs)
Can I make Chocolate Peanut Butter Stacks ahead of time?
Absolutely! These Chocolate Peanut Butter Stacks are fantastic for making in advance. They hold up beautifully in the refrigerator for up to a week when stored in an airtight container. In fact, many find the flavors meld even better after a day or two, and the chocolate coating becomes perfectly firm. This makes them an ideal dessert for parties, potlucks, or holiday gatherings where you want to minimize last-minute stress. Sophie often prepares a double batch on a Sunday to enjoy throughout the week!
What kind of chocolate works best for dipping?
For the best results, Sophie recommends using a good quality chocolate melting wafer or chocolate bark for dipping. These are specifically formulated to melt smoothly and harden with a nice snap, without needing tempering. Semi-sweet or milk chocolate chips can also work, but sometimes require a touch of coconut oil or shortening (about 1 teaspoon per cup of chocolate) to achieve a thinner, more dippable consistency and a smoother finish. Avoid using regular chocolate bars that contain high amounts of sugar, as they can seize more easily when melted and may not give you that desired firm, shiny coating.
Can I use different crackers or cookies?
While Ritz crackers offer that unique salty-sweet balance that makes these stacks so addictive, you can certainly experiment! Other buttery, round crackers would be a good substitute. For a different flavor profile, you could try graham crackers (though they are larger and might require cutting) or even thin shortbread cookies for a sweeter base. The key is to pick a cracker or cookie that isn’t too thick, has a relatively flat surface, and provides a good textural contrast to the creamy filling and chocolate coating. Just be aware that swapping the cracker may alter the signature salty-sweet dynamic of the original recipe.
How do I store Chocolate Peanut Butter Stacks?
Once the chocolate has fully set, transfer your Chocolate Peanut Butter Stacks to an airtight container. Store them in a single layer, or separate layers with parchment paper, to prevent them from sticking together. They will keep well in the refrigerator for up to 7 days. For longer storage, you can freeze them for up to 1-2 months. Thaw in the refrigerator or at room temperature for a few minutes before serving. Freezing them also means you always have a secret stash of comfort food ready for unexpected cravings!
Can I make these without marshmallow creme?
While marshmallow creme is a key ingredient for the specific light, fluffy, and sticky texture of the filling, you could try a different binder if you absolutely must. A classic peanut butter cookie dough filling (peanut butter, powdered sugar, a touch of butter) could work, but it will be denser and less airy. Another option might be a thick, creamy peanut butter frosting. However, these substitutions will significantly change the texture and flavor profile, moving away from the classic Chocolate Peanut Butter Stack experience.
The Story Behind the Stack: Sophie’s Sweet Craft Journey
Every recipe has a story, and the Chocolate Peanut Butter Stacks are particularly close to my heart. Growing up, there was always something incredibly comforting about a simple, homemade treat. My grandmother, who inspired much of my love for baking (and no-baking!), often whipped up quick desserts that felt utterly luxurious despite their simplicity. These stacks remind me so much of that era – a time when deliciousness didn’t require an hour in the kitchen or a list of obscure ingredients.
I remember first encountering a version of these years ago, a whisper of a recipe passed between friends. But it wasn’t quite right. The filling was too heavy, the chocolate too thin, or the balance just a little off. So, I embarked on a mission, testing this recipe over nine times (yes, you read that right, nine! My family were very happy taste-testers) to get it just right.
My goal was to achieve that perfect crispy cracker base, a filling that was creamy and perfectly sweet without being cloying, and a chocolate shell that had a satisfying snap. I tried different ratios of peanut butter to marshmallow creme, experimented with various types of chocolate, and even played around with chilling times. It was during these trials that I discovered the magic of melting wafers for the chocolate coating – a game-changer for that glossy finish and quick set.
These Chocolate Peanut Butter Stacks have since become a staple in my home, a guaranteed crowd-pleaser for any gathering, and my go-to when I need a quick pick-me-up. They’re a little piece of edible nostalgia, perfected with love and lots of careful testing, ready to bring that same joy to your kitchen.
More Sweet Craft Recipes You’ll Love
If you’re anything like me, a true cookie enthusiast, you know there’s always room for one more delicious treat! Here at Sweet Craft Recipes, we’re passionate about creating irresistible desserts that bring joy and comfort to your table. If you’ve loved the simplicity and flavor of these Chocolate Peanut Butter Stacks, I know you’ll be eager to explore more of our decadent cookie creations. Each one has been meticulously tested and adored by my family, ensuring a fantastic experience for you too.
Why not dive into the rich, velvety world of our Stuffed Red Velvet Cookies Recipe? They offer an elevated take on a classic, with a delightful surprise inside. For something truly unique, reminiscent of a bustling city bakery, you absolutely must try our famous Pistachio NYC Cookies Recipe. They’re thick, chewy, and bursting with flavor.
If you’re looking for a fun, seasonal treat that truly embodies the spirit of indulgence, our Creme Egg Stuffed Cookies Recipe are an absolute must-make when Creme Eggs are in season. For the ultimate pairing of two beloved flavors, you can’t go wrong with our Peanut Butter Nutella Cookie Recipe – a match made in heaven! And if you appreciate a classic cookie with a creamy, melty core, our White Chocolate Stuffed Cookies are pure bliss. Each of these recipes offers its own unique charm and is guaranteed to become a new favorite in your baking repertoire. Happy baking (and no-baking)!
Final Thoughts: Your New Go-To Dessert
There you have it: the easiest, most satisfying, and utterly delicious no-bake dessert you’ll ever make. These Chocolate Peanut Butter Stacks are more than just a recipe; they’re a testament to how simple ingredients, combined with a little love and a lot of testing (thanks, Sophie!), can create something truly extraordinary.
Whether you’re making them for a holiday party, a casual family treat, or simply to satisfy a craving, I promise they will disappear faster than you can say “peanut butter.” So go ahead, gather your ingredients, follow my foolproof steps, and prepare to fall in love with your new favorite comfort food. Don’t forget to share your creations with us at Sweet Craft Recipes – we love seeing what you make! Happy stacking!


