There’s something undeniably magical about Funfetti cake. It’s more than just a dessert; it’s a burst of joy, a slice of pure celebration, and a nostalgic trip back to simpler, happier times. For me, Sophie from SweetCraft Recipes, the sight of those colorful sprinkles suspended in a fluffy vanilla cake always brings a smile. And while a box mix might be tempting, nothing compares to the rich flavor and tender crumb of a cake made from scratch. This isn’t just any Funfetti cake recipe; this is my ultimate homemade Funfetti cake, perfected after more than nine rigorous tests to ensure every bite is sheer bliss.
Forget the dry, artificial taste of store bought versions. My recipe focuses on simple, quality ingredients that transform into a moist, vibrant, and utterly delightful cake that will make any occasion feel extra special. Whether it’s a birthday, a holiday gathering, or just a Tuesday that calls for a little extra happiness, this cake is your go to. It’s a comfort food favorite elevated to new heights, delivering a homemade goodness that nourishes the soul. Let’s dive into making a cake that tastes as good as it looks, and trust me, it looks pretty fantastic!
Why You’ll Love This Homemade Funfetti Cake
Why bother with homemade when there are so many mixes out there? Because the difference is truly night and day, and once you taste this, you’ll never go back!
- Unrivaled Taste & Texture: This cake boasts an incredibly moist, fluffy, and tender crumb, thanks to a careful balance of butter, oil, and buttermilk. It melts in your mouth with every bite.
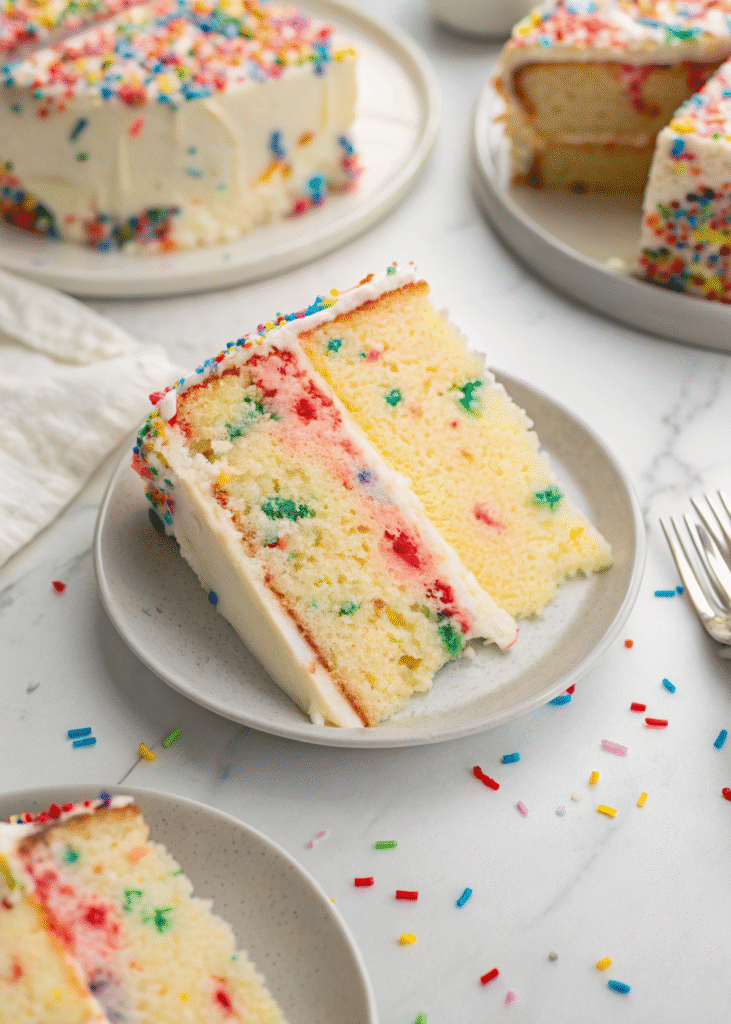
- Vibrant & Festive: The sprinkles are not just an afterthought; they’re perfectly distributed, creating a beautiful mosaic of color that screams celebration without bleeding into the batter.
- Easy to Follow, Expertly Guided: I’ve broken down every step into simple, actionable instructions. With Sophie’s expert tips woven throughout, even novice bakers can achieve bakery quality results.
- Better than Boxed Mix: By making it from scratch, you control the ingredients, avoiding artificial flavors and preservatives. It’s a healthier twist in the sense that it’s made with wholesome ingredients and a lot of love, making it a true comfort food.
- Perfect for Any Occasion: Birthdays, anniversaries, graduations, or just a weekend treat – this Funfetti cake is versatile and always a crowd-pleaser for family gatherings, easily serving up to 10 happy guests.
Sophie’s Secret to the Best Funfetti Cake: Expert Tips for Success
After testing this recipe nine times (and counting!), I’ve gathered some essential insights that make all the difference. These aren’t just steps; they’re little secrets that ensure your Funfetti cake turns out perfectly every single time.
- Room Temperature is Key: This is non negotiable for cake baking! Make sure your butter, eggs, and buttermilk are all at room temperature. Cold ingredients don’t emulsify properly, leading to a lumpy batter and a denser cake. Take them out of the fridge at least an hour before you plan to bake.
- Cake Flour for the Win: While you can substitute all purpose flour, cake flour is what gives this Funfetti cake its signature light, airy, and super tender crumb. It has a lower protein content, which means less gluten development and a softer texture.
- Creaming is Crucial: Don’t rush the creaming of the butter, oil, and sugar. This step incorporates air into the mixture, which is vital for a fluffy cake. Beat it until it’s visibly light, fluffy, and pale yellow about 4-5 minutes total.
- Don’t Overmix the Batter: Once you add the dry ingredients and buttermilk, mix just until combined. Overmixing develops gluten, which makes your cake tough and dense. A few small lumps are perfectly fine and even desirable for a tender crumb.
- Fold in Sprinkles Gently and Last: To prevent your beautiful sprinkles from bleeding their color into the batter, fold them in quickly and gently at the very end of the mixing process, right before dividing the batter into pans. Jimmie style sprinkles tend to hold their color better than nonpareils.
- Proper Cooling is Patience: It’s tempting to frost a warm cake, but resist! Frosting a warm cake will cause the frosting to melt and slide right off. Allow your cake layers to cool completely on a wire rack – this can take 1-2 hours. You can even pop them in the fridge for 20 minutes once cool to the touch to firm them up further.
- Whip Your Frosting for Fluffiness: Don’t just combine the frosting ingredients; beat them on medium high speed for at least 3 minutes after adding the milk. This incorporates air, making the buttercream light, fluffy, and easy to spread, not dense and greasy.
By following these simple yet powerful tips from my kitchen, you’re not just baking a cake; you’re crafting a masterpiece!
Key Ingredients for Your Funfetti Masterpiece
Crafting the perfect Funfetti cake begins with understanding the role each ingredient plays. Here’s a closer look at the stars of this recipe:
- Unsalted Butter & Vegetable Oil: This dynamic duo provides the best of both worlds. Butter brings incredible flavor, while vegetable oil ensures a consistently moist crumb that stays tender for days. Using unsalted butter allows you to control the salt content precisely.
- Granulated Sugar: Beyond sweetness, sugar helps tenderize the cake and contributes to its golden crust.
- Large Eggs: Eggs are essential for structure, richness, and binding the ingredients together. Using them at room temperature is crucial for proper emulsification.
- Vanilla & Almond Extracts: These extracts are the flavor powerhouses. Vanilla provides that classic, comforting warmth, while a hint of almond extract elevates the overall flavor profile, adding a subtle, sophisticated depth that makes the cake truly special.
- Cake Flour: As mentioned, cake flour is paramount for achieving that incredibly light and tender texture. Its low protein content prevents excessive gluten development, resulting in a delicate crumb that practically melts in your mouth.
- Salt & Baking Powder: Salt balances the sweetness and enhances all the other flavors. Baking powder is our leavening agent, creating the lift and fluffiness we crave in a perfect cake.
- Buttermilk: This ingredient is a secret weapon for moist cakes. Its acidity reacts with the baking powder, promoting extra lift, and its slight tang adds a wonderful depth of flavor while contributing to a supremely tender crumb. If you don’t have buttermilk, you can make a substitute by adding 1 tablespoon of lemon juice or white vinegar to a measuring cup, then filling the rest with whole milk to 1 1/3 cups, letting it sit for 5-10 minutes until it slightly curdles.
- Sprinkles: The “fun” in Funfetti! Choose high quality Jimmie style sprinkles. These cylindrical sprinkles hold their shape and color better during baking compared to nonpareils, which tend to dissolve and bleed more easily.
- For the Frosting: Unsalted butter, powdered sugar, vanilla extract, a pinch of salt, and whole milk create a classic, fluffy vanilla buttercream that’s the perfect sweet crown for your cake. The milk helps achieve the desired consistency, while whipping for several minutes incorporates air for a light, ethereal texture.
Step-by-Step Guide to Baking Your Funfetti Cake
Baking this homemade Funfetti cake is a delightful process. Follow these detailed steps, keeping Sophie’s tips in mind, and you’ll be enjoying a slice of pure joy in no time!
1. Prepare Your Workspace & Pans:
Before you even think about mixing, preheat your oven to 350°F (175°C). This ensures a consistently hot oven from the moment your cake goes in, promoting even baking. Take two 8 inch round cake pans. Line the bottoms with parchment paper – this is a lifesaver for easy release! Then, grease the sides thoroughly with cooking spray or butter and flour. Set them aside, ready for your beautiful batter.
2. Cream Butter, Oil, and Sugar:
In the bowl of your stand mixer (fitted with the whisk attachment, if you have one, or use a hand mixer), combine the softened unsalted butter and vegetable oil on low speed until just combined. Gradually increase the speed to medium high and beat for about 2 minutes until smooth. Now, slowly add the granulated sugar, continuing to beat on medium high speed. This creaming process is essential; beat until the mixture is light, fluffy, and has a very pale yellow hue, which usually takes another 2 minutes. This incorporates air, making your cake airy and tender.
3. Incorporate Eggs and Extracts:
Stop the mixer and use a silicone spatula to scrape down the sides and bottom of the bowl. This ensures all ingredients are evenly incorporated. Add the large room temperature eggs, vanilla extract, and almond extract. Beat again on medium high speed for about 2 minutes until the mixture is light, fluffy, and well emulsified. It should look like a pale yellow cloud!
4. Alternate Dry and Wet Ingredients:
In a separate medium sized mixing bowl, whisk together the cake flour, salt, and baking powder. This ensures the leavening agents are evenly distributed. Now, with your stand mixer on its lowest speed, begin to alternate adding the dry ingredients and the buttermilk to the wet mixture. Start with about half of the dry ingredients, mix briefly, then add all the buttermilk, mix, and finish with the remaining dry ingredients. Mix just until combined. It’s perfectly okay if you see a few small lumps; overmixing at this stage will develop gluten and lead to a tough cake. The goal is tenderness!
5. Fold in the Sprinkles:
This is where the “Funfetti” magic truly comes alive! Gently fold in your 1/2 cup of sprinkles using a spatula. Do this quickly and minimally to avoid overmixing the batter and, more importantly, to prevent the sprinkles from bleeding their vibrant colors into your lovely vanilla batter.
6. Bake to Golden Perfection:
Divide the cake batter evenly between your two prepared 8 inch round pans. Use your spatula to gently spread the batter into an even layer. Transfer the pans to your preheated oven. Bake for 30 to 40 minutes. You’ll know the cakes are done when they have risen beautifully, the tops spring back gently when lightly touched, and a butter knife or wooden skewer inserted into the center comes out clean.
7. Cool and Release:
Once baked, remove the cakes from the oven and place them on a wire cooling rack. Let them cool in their pans for about 10-15 minutes. This slight cooling helps them firm up before handling. To remove, run a butter knife around the edges of the pan to loosen, then carefully flip the cakes onto a cutting board. Peel away the parchment paper from the bottoms, then re invert them right side up onto the cooling rack. Allow them to cool completely here – this is crucial for flawless frosting!
8. Prepare the Fluffy Buttercream Frosting:
While your cakes are cooling, it’s frosting time! In a clean stand mixer bowl, beat the softened unsalted butter and powdered sugar together on medium speed until fluffy, about 2 minutes. Add the vanilla extract, salt, and 1 tablespoon of whole milk at a time. Beat for a full 3 minutes on medium high speed, or until the frosting is incredibly light, airy, and fluffy. If it seems too stiff, add another tablespoon of milk, but be cautious not to make it too runny. You want a beautifully spreadable consistency.
9. Assemble Your Funfetti Masterpiece:
Once the cakes are completely cool, it’s time for the grand finale. Place one cake layer on your cake stand or serving plate. Spoon about 1/3 of the prepared frosting onto the top and spread it evenly all the way to the edge. Carefully place the second cake layer on top. Now, use the remaining frosting to generously frost the top and sides of the entire cake, creating a smooth, festive finish. Stand back, admire your work, and then… enjoy every single celebratory bite!

Funfetti Cake Troubleshooting & FAQs
Even experienced bakers run into questions! Here are answers to some common dilemmas you might encounter while making your Funfetti cake, ensuring your baking journey is smooth.
Why is my cake dry?
A dry cake is often the result of overmixing the batter (developing too much gluten) or overbaking. Make sure to mix the dry ingredients only until just combined and check for doneness at the earliest recommended time. Also, ensure your measuring cups are accurate, especially for flour.
Why did my sprinkles bleed into the batter?
This usually happens due to low quality sprinkles, prolonged mixing, or using nonpareil sprinkles, which are more prone to bleeding. Use Jimmie-style sprinkles and fold them in very gently and quickly at the very last moment before baking.
My frosting is too runny/stiff, what should I do?
If your frosting is too runny, you can add more powdered sugar, a tablespoon at a time, beating well after each addition until it reaches the desired consistency. If it’s too stiff, add whole milk (or cream), a teaspoon at a time, until it loosens up.
Can I make this into cupcakes instead of a layer cake?
Absolutely! This recipe works beautifully for cupcakes. Line a muffin tin with paper liners and fill each about two thirds full. Bake for approximately 18-22 minutes, or until a toothpick inserted comes out clean. The yield will be about 24-30 cupcakes.
How long does homemade Funfetti cake last, and how should I store it?
Store your frosted Funfetti cake at room temperature in an airtight container for 3-4 days. If refrigerated, it can last up to a week, but for optimal freshness and texture, room temperature is often preferred. You can also freeze unfrosted cake layers, wrapped tightly in plastic wrap and then foil, for up to 2-3 months. Thaw at room temperature before frosting.
Can I make this cake ahead of time?
Yes! You can bake the cake layers a day or two in advance. Once completely cooled, wrap them tightly in plastic wrap and store at room temperature. The frosting can also be made a day ahead and stored in an airtight container in the refrigerator; just bring it to room temperature and re whip briefly until light and fluffy before frosting your cake. This is a great tip for stress. free party prep!
Variations & Customizations
While this classic Funfetti cake is perfect as is, it’s also a fantastic canvas for your creativity!
- Sprinkle Swap: Experiment with different sprinkle colors to match a specific theme or holiday. Think pastel for Easter, red and green for Christmas, or even team colors for a sports party.
- Flavor Boost: Add a teaspoon of lemon zest to the batter for a bright, citrusy twist, or swap the almond extract for a little coconut extract for a tropical flair.
- Alternative Frostings: While vanilla buttercream is iconic, consider a cream cheese frosting for a tangy contrast, or even a white chocolate ganache for extra decadence.
- Shape Shifter: Transform this recipe into a sheet cake (bake in a 9×13 inch pan for about 35-45 minutes) or the aforementioned cupcakes. Adjust baking times accordingly.
Pairings & Serving Suggestions
This Homemade Funfetti Cake is a celebration in itself, but it pairs wonderfully with a few simple additions. Serve slices with a tall glass of cold milk, a warm cup of coffee, or a comforting herbal tea. A scoop of vanilla bean ice cream alongside a slice adds an extra layer of indulgence, perfect for any family gathering.
More Sweet Treats from SweetCraft Recipes
If you’ve loved crafting this joyous Funfetti cake from Sophie’s kitchen, then you’re in for a treat! My passion for creating comforting, easy-to-follow recipes extends to a whole world of delightful cookies that are perfect for any occasion, just like this cake. If you’re looking for more ways to bring homemade magic to your table, explore some of my other popular cookie recipes:
- For a truly decadent experience, dive into my rich and velvety Stuffed Red Velvet Cookies Recipe.
- Craving a taste of the Big Apple? My Pistachio NYC Cookies Recipe delivers that iconic chewy crisp texture.
- Get ready for a sweet surprise with my unique and irresistible Creme Egg Stuffed Cookies Recipe – a seasonal favorite!
- If you’re a fan of classic flavor combinations, you absolutely must try my gooey Peanut Butter Nutella Cookie Recipe.
- And for a truly comforting and luxurious bite, my White Chocolate Stuffed Cookies are pure bliss.
Each recipe is crafted with the same care and expertise you found here, designed to bring joy and deliciousness to your home.
There’s truly nothing quite like the feeling of pulling a homemade Funfetti cake from the oven, its sweet aroma filling your kitchen, and then seeing the smiles it brings to loved ones’ faces. This isn’t just a recipe; it’s an invitation to create lasting memories, to embrace the joy of baking, and to share a little piece of happiness. With Sophie’s proven method and expert tips, you’re now equipped to bake the ultimate Homemade Funfetti Cake a true celebration in every fluffy, sprinkle filled bite. Go on, give it a try, and let the good times roll! Happy baking from SweetCraft Recipes!


