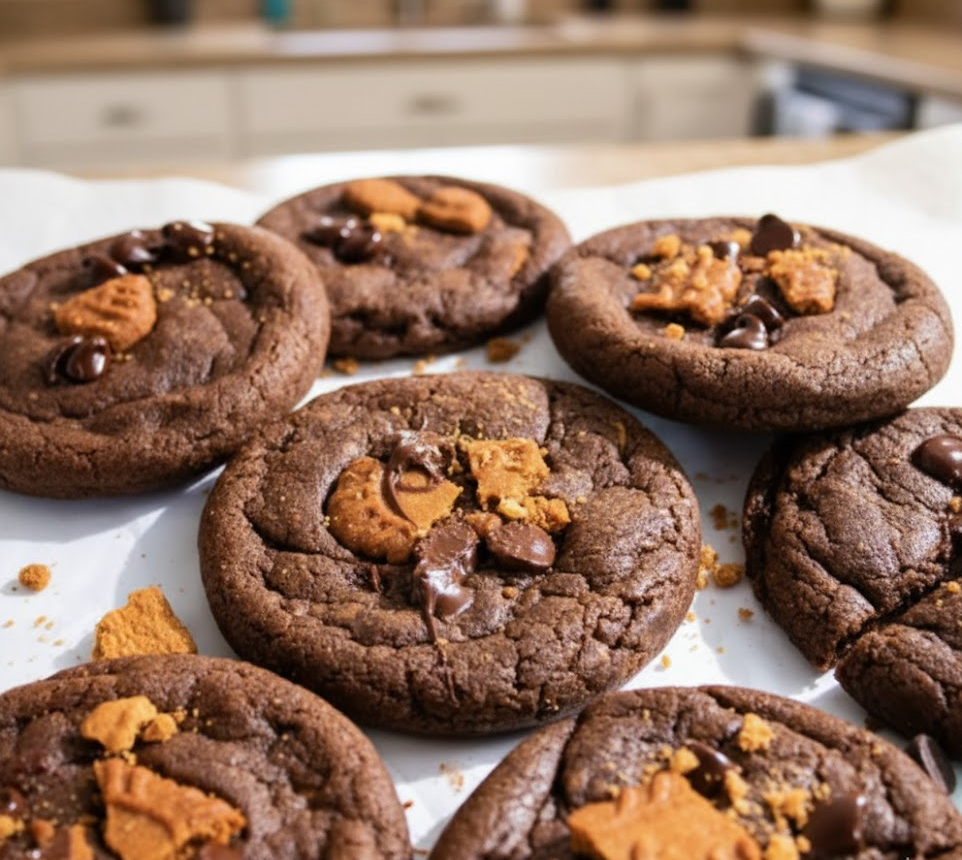
There are cookies, and then there are these cookies. Imagine a rich, deeply chocolatey cookie, perfectly soft and chewy, with crisp edges. Now, imagine breaking it open to reveal a molten, gooey river of warm Biscoff spread. That, my friends, is the magic of these Chocolate Biscoff Cookies.
This isn’t just another cookie recipe. This is the result of a flavor obsession and more than nine dedicated testing sessions in my kitchen. I wanted to create a cookie that delivered on every promise: intense chocolate flavor, the unmistakable spiced-caramel notes of Biscoff, and a ridiculously satisfying gooey center. After tweaking ratios, testing rest times, and perfecting the stuffing technique, I finally landed on this flawless recipe.
Whether you’re a die-hard Biscoff fan or just looking for your next go-to comfort bake for a family gathering, you’ve come to the right place.
Why You’ll Be Obsessed With This Recipe
This recipe has quickly become a favorite in my household, and I know it will in yours too. Here’s why:
- The Gooey Biscoff Center: The frozen Biscoff scoop is the secret weapon. It creates a lava-cake-like center that is absolutely irresistible when served warm.
- Rich Chocolate Flavor: We use just the right amount of cocoa powder to create a decadent, brownie-like cookie dough that perfectly complements the spiced Biscoff.
- Perfect Texture: Thanks to a few key techniques (which I’ll walk you through), these cookies have it all: slightly crisp edges, a soft and chewy body, and that incredible molten middle.
- Bakery-Style Looks: With chunks of Biscoff cookies and extra chocolate chips pressed on top, these look like they came straight from a high-end bakery.
- Surprisingly Easy: Despite the impressive result, the steps are simple and straightforward enough for bakers of all levels.
My Journey to the Perfect Stuffed Cookie
Creating a stuffed cookie isn’t as simple as just wrapping dough around a filling. My first few attempts were… messy. Deliciously messy, but the Biscoff spread would leak out, creating a sticky, caramelized puddle on the baking sheet. I was determined to crack the code.
After nine rounds of testing, I pinpointed the non-negotiable factors for success:
- Freezing the Filling: This was the biggest game-changer. Scooping the Biscoff spread and freezing it solid gives the cookie dough a head start in the oven. The dough bakes and sets around the filling before the Biscoff has a chance to fully melt and escape.
- Dough Hydration: Letting the dough rest for just 30 minutes at room temperature makes a world of difference. It allows the flour to fully absorb the liquids, resulting in a less sticky dough that’s easier to handle and a cookie with a deeper flavor and chewier texture.
- The Right Ratios: I tinkered with the flour-to-fat ratio and the amount of leavening. Too much spread resulted in a blowout. Too little was disappointing. The 50g dough ball to one frozen teaspoon of Biscoff is the golden ratio.
My passion for stuffed cookies runs deep. If you love this concept, you should definitely check out my famous Stuffed Red Velvet Cookies, which are a true showstopper, or for a different flavor profile, these Pistachio NYC Cookies are a must-try.
Ingredient Spotlight: What Makes These Cookies Special
Using the right ingredients is key. Here’s a breakdown of the star players in this recipe and why they matter.
- Biscoff Spread & Cookies: The heart of our recipe! Lotus Biscoff Spread gives us that iconic deep caramel and spiced flavor. We use it for the molten filling and use the crushed cookies for extra texture and flavor on top.
- Unsweetened Cocoa Powder: Use a quality cocoa powder here. It’s responsible for the deep, rich chocolate base. I prefer Dutch-processed for a smoother, less acidic flavor.
- Light Brown Sugar & Cane Sugar: Using a combination of sugars is crucial for texture. The light brown sugar provides moisture and a chewy texture due to its molasses content, while the cane sugar helps the cookies spread and develop those crispy edges.
- Butter: The foundation of any great cookie. Use unsalted, softened butter. “Softened” means it’s at a cool room temperature—you should be able to press a finger into it and leave an indent, but it shouldn’t be greasy or melty.
- All-Purpose Flour: Standard all-purpose flour provides the perfect structure. Be sure to measure it correctly—either with a kitchen scale (for best results) or by spooning it into your measuring cup and leveling it off.
Step-by-Step Guide to Perfect Chocolate Biscoff Cookies
Let’s bake! I’ll break down each step with my personal tips to ensure your cookies turn out perfectly every single time.
Step 1: Freeze the Biscoff Filling
This is your most important prep step! Line a small plate or tray with parchment paper. Use a teaspoon to scoop 9 small balls of Biscoff spread onto the parchment. Pop them in the freezer for at least 30 minutes, or until rock solid.
- Pro Tip: You can do this step hours or even days in advance. I often keep a small stash of frozen Biscoff scoops in my freezer for cookie emergencies.
Step 2: Cream the Butter and Sugars
In a large bowl, use a hand mixer or stand mixer to beat the softened butter, light brown sugar, and cane sugar together. Mix on medium speed for about 2-3 minutes. The mixture should become pale, light, and fluffy. This process incorporates air, which is essential for a good cookie texture.
Step 3: Combine the Wet and Dry Ingredients
Add the room temperature milk and vanilla extract to the creamed butter and sugar, mixing until it’s smooth. In a separate, medium-sized bowl, whisk together the all-purpose flour, cocoa powder, baking soda, baking powder, and salt. Whisking pre-mixes everything and gets rid of lumps.
Add the dry ingredients to the wet ingredients and mix on low speed until just combined. Stop as soon as you no longer see streaks of flour. Overmixing develops gluten and can lead to tough cookies.
Step 4: Rest The Dough
Cover the bowl with plastic wrap and let the dough rest at room temperature for 30 minutes. This short rest makes the dough less sticky and significantly improves the final flavor and texture.
Step 5: Assemble the Cookies
Preheat your oven to 350°F (175°C). Use a medium cookie scoop (about 2 tablespoons) to portion the dough. Flatten the dough ball into a disc in the palm of your hand.
Place one of your frozen Biscoff scoops in the center. Carefully fold the edges of the dough up and around the Biscoff, pinching the seams to seal it completely. Roll it gently into a smooth ball. This careful sealing is your insurance against leaks!
Step 6: Bake to Perfection
Place the dough balls on a parchment-lined baking sheet, leaving at least 3 inches of space between them. Press a few extra chocolate chips and Biscoff cookie chunks onto the tops.
Bake for 10-12 minutes. The edges will look set and dry, but the centers will appear puffy and slightly soft. This is exactly what you want! Do not overbake.
Step 7: The ‘Cookie Scoot’
For perfectly round, professional-looking cookies, perform the “cookie scoot” as soon as they come out of the oven. Take a round cookie cutter or the rim of a glass that’s slightly larger than the cookie and place it over the hot cookie. Gently swirl it around the edges, nudging the cookie into a perfect circle.
Let them cool on the baking sheet for 5-10 minutes—they will finish setting up here. Then, transfer to a wire rack. Enjoy them warm for that epic, gooey Biscoff pull!
More Stuffed Cookie Inspiration
If you’re now as obsessed with stuffed cookies as I am, you’ll love exploring other flavor combinations. The technique is the same, but the possibilities are endless. Try my gooey Peanut Butter Nutella Cookies for a classic pairing, or these luxurious White Chocolate Stuffed Cookies for a truly decadent treat. And for a seasonal favorite, the Creme Egg Stuffed Cookies are always a huge hit!

Storage and Make-Ahead Tips
- To Store: Keep the cooled cookies in an airtight container at room temperature for up to 5 days. You can zap one in the microwave for 10-15 seconds to re-melt the center.
- To Make Ahead: The cookie dough can be made and refrigerated (wrapped tightly) for up to 3 days before baking.
- To Freeze: You can freeze the fully assembled, unbaked cookie dough balls. Place them on a baking sheet in the freezer until solid, then transfer to a freezer-safe bag for up to 3 months. Bake directly from frozen, adding 2-3 minutes to the bake time.
Frequently Asked Questions (FAQ)
Do I have to freeze the Biscoff spread?
Yes, this is the most critical step in the recipe! Freezing the spread solid prevents it from melting too quickly and leaking out of the cookie during baking. This guarantees a gooey, molten center is waiting inside the cookie, not on your baking sheet.
Can I use a different filling?
Of course! This chocolate cookie dough is a fantastic base for other fillings. Try a scoop of Nutella, a chunk of caramel, or a ball of peanut butter. Just be sure to freeze the filling solid before you wrap the dough around it.
My cookies spread too much. What did I do wrong?
Over-spreading is usually caused by butter that is too soft or melted. Make sure your butter is at a cool room temperature. Another culprit can be inaccurate flour measurement. Using a kitchen scale is the best way to ensure you have the right amount.
I can’t wait for you to try these Chocolate Biscoff Cookies. They are a true labor of love from my kitchen to yours. That moment when you break one open and see the melted Biscoff center is pure joy. If you make them, please leave a comment and a rating below—I love hearing from you


