Last December, my kitchen counter looked like Santa’s workshop exploded—white chocolate everywhere, sprinkles in places I’m still finding them, and my kids arguing over who got to place the Reese’s cups on top. But you know what? Those chaotic afternoons testing this Christmas Oreo Ornament Cookies recipe became our favorite holiday tradition. After making these festive treats over 9 times (yes, really!), I’ve perfected every detail so your first batch turns out Instagram-worthy without the mess I created.
These no-bake Christmas cookies combine everyone’s favorite store-bought treats into adorable edible ornaments that’ll steal the show at any holiday gathering. The best part? No mixer, no oven, and done in under an hour. My 7-year-old can make these with minimal supervision, which tells you everything about how beginner-friendly they are.
Why These Christmas Oreo Ornaments Are Taking Over Holiday Cookie Trays
I’ll be honest—I was skeptical when I first saw these on Pinterest. Could something this simple really taste good AND look professional? After my first test batch disappeared within minutes at our neighborhood cookie swap, I had my answer.
The genius lies in the combination: the crunchy Oreo base, creamy white chocolate coating, and that surprise peanut butter cup on top creates a texture and flavor experience that’s unexpectedly sophisticated. Plus, they photograph beautifully, which is why these cookies are currently trending all over social media this holiday season.
Traditional Christmas cookies require planning, precision, and patience—three things in short supply during the holiday rush. These Oreo ornament cookies deliver all the festive appeal with a fraction of the effort. They’re perfect for last-minute cookie exchanges, school parties, or when relatives announce they’re coming over in two hours (we’ve all been there).
The Secret to Picture-Perfect Oreo Ornament Cookies
After testing this recipe 9+ times, I’ve learned that success comes down to three critical factors: chocolate consistency, timing, and temperature control.
Getting Your White Chocolate Just Right
The chocolate coating makes or breaks these cookies. Too thick and it looks globby; too thin and the Oreos show through. Here’s what I learned through multiple failed batches:
Always add 2-3 teaspoons of coconut oil or vegetable oil to your melting chocolate. This creates a smooth, flowing consistency that coats evenly without being too heavy. I ruined my first two batches by skipping this step—the chocolate was so thick it pulled the Oreo apart when I tried dipping.
Melt your chocolate in 20-second intervals, stirring thoroughly between each round. I got impatient once and microwaved for a full minute—ended up with seized, grainy chocolate that was completely unusable. Patience pays off here.
The ideal consistency should flow like heavy cream. When you lift your spoon, the chocolate should fall in a smooth ribbon that disappears into the bowl within 2-3 seconds. If it’s thicker than that, add another teaspoon of oil and stir well.
The Dipping Technique That Changed Everything
My early attempts looked like a toddler decorated them (no offense to toddlers—they actually did help). Then I discovered the fork method.
Place your Oreo on a fork and lower it completely into the melted chocolate. Use a spoon to help coat the top if needed. Lift it out on the fork and gently tap the fork handle against the bowl’s edge 3-4 times. This removes excess chocolate and creates that smooth, professional coating.
Here’s the trick I wish I’d known from the start: Use a toothpick to slide the cookie off the fork onto your parchment paper. This prevents that annoying chocolate puddle that forms when you try to shake it off the fork.
Essential Ingredients and Smart Substitutions
Let me walk you through each component and share what I learned about making substitutions without sacrificing quality.
Choosing Your Oreos
I exclusively use Double Stuf Oreos for these ornament cookies. The extra cream filling creates better structure and prevents the cookie from getting soggy under the chocolate coating. Regular Oreos work in a pinch, but they’re more fragile and can crack during dipping.
I tested these with stuffed cookies variations during development, but the classic Oreo truly performs best for this specific recipe. The chocolate cookie provides the perfect color contrast against the white coating.
White Chocolate Options That Actually Work
You have three main choices: white chocolate chips, candy melts, or white chocolate bars. Here’s how they compare based on my testing:
White chocolate chips (my go-to choice): Ghirardelli and Guittard brands melt beautifully with minimal oil added. They taste the most authentic and set with a nice snap. Cost-effective if you’re making multiple batches.
Candy melts: These are formulated for easy melting and come in various colors, which is fun for customization. They’re sweeter and less chocolatey but very user-friendly for beginners. They set quickly, which can be both good and challenging.
White chocolate bars: Premium quality and best flavor, but more expensive. Break into small pieces before melting. Lindt and Ghirardelli bars work wonderfully.
I’ve had followers ask about using almond bark—it works fine for coating but has an artificial taste that I find disappointing. Save your money and stick with real white chocolate.
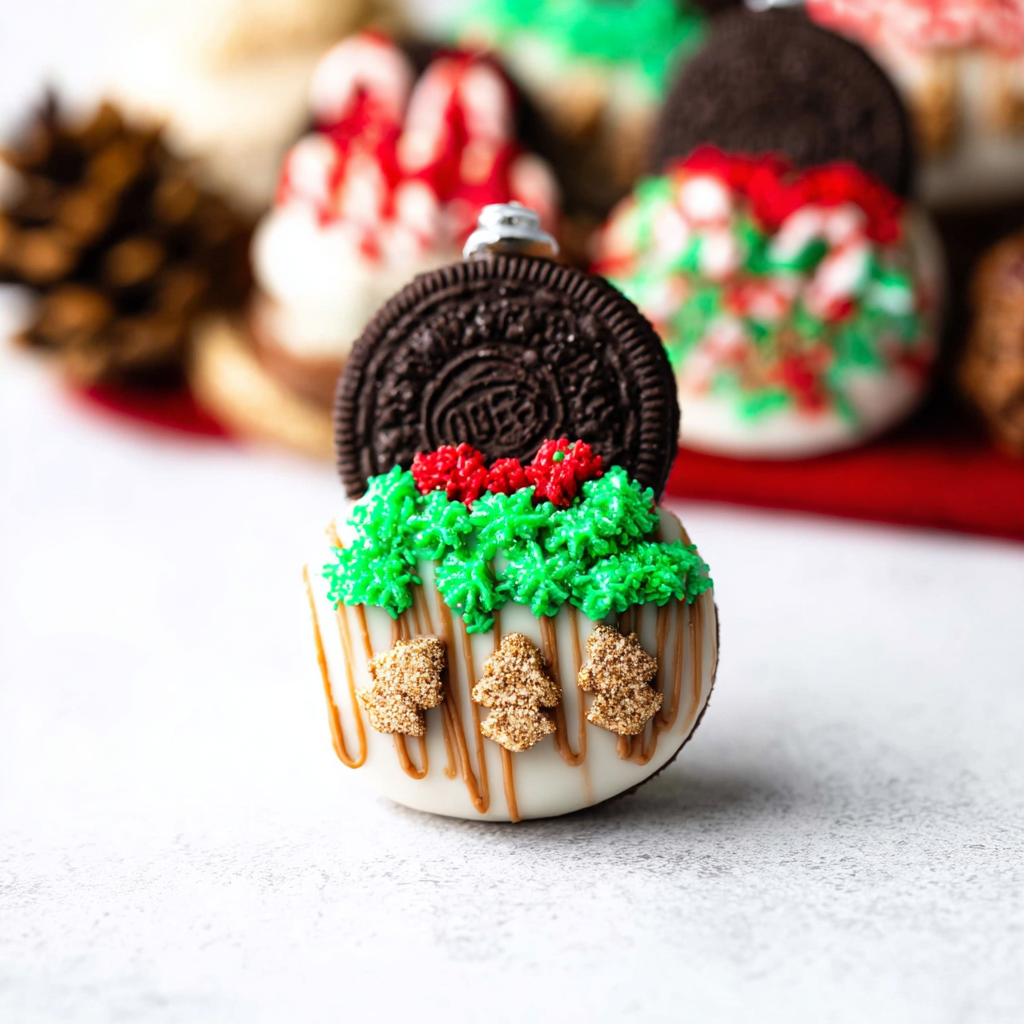
The Reese’s Cup Crown
Miniature Reese’s peanut butter cups are non-negotiable for that authentic ornament look. I tried other toppings during testing—Hershey’s Kisses, Rolos, even chocolate truffles—but nothing creates that same ornament cap effect.
Pro tip: Unwrap all your Reese’s cups before you start dipping cookies. Trying to unwrap them with chocolate-covered fingers is a messy disaster I only made once.
Decorating Supplies That Make a Difference
This is where you can get creative! I keep a well-stocked sprinkle drawer (yes, I have a dedicated sprinkle drawer now), but here are my holiday favorites:
- Red and green sugar crystals for classic Christmas vibes
- Gold dragees for elegant party cookies
- Nonpareils (those tiny ball sprinkles) for texture
- Mini M&Ms or Skittles for pops of color
- Edible glitter for that extra festive sparkle
The key is applying decorations immediately after dipping, before the chocolate begins to set. I learned this the hard way when my sprinkles just bounced off half-set chocolate.
Step-by-Step Guide to Perfect Christmas Oreo Ornaments
Let me walk you through the process exactly as I do it in my kitchen, including the little details that make everything easier.
Setting Up Your Workspace
Before you melt a single chocolate chip, get organized. Line your baking tray with parchment paper—not wax paper, which can stick. I use two large baking sheets to avoid crowding.
Lay out all your decorating supplies in small bowls within easy reach. Unwrap your Reese’s cups and have them ready. Fill a tall glass with water for cleaning your fork between cookies (trust me on this one).
Melting Chocolate Like a Pro
Place your white chocolate chips or chopped bars in a large, microwave-safe bowl. Add 2-3 teaspoons of coconut oil or any neutral oil. I prefer coconut oil because it adds a subtle flavor enhancement, but vegetable oil works perfectly fine.
Microwave on 50% power for 20 seconds. Stir thoroughly—and I mean really stir, getting into all the corners. Repeat this process 4-6 times until almost all the chips are melted with just a few small pieces remaining. The residual heat will melt these as you stir.
This gradual melting prevents overheating, which causes chocolate to seize into a grainy, unusable mess. I’ve ruined enough batches to know this lesson intimately.
The Dipping Process Perfected
Working with one cookie at a time (seriously, don’t rush this), place an Oreo on a fork and lower it completely into the melted chocolate. Use a spoon to help coat the top surface evenly.
Lift the cookie out and let excess chocolate drip back into the bowl. Gently tap the fork handle against the bowl’s edge 3-4 times to remove more excess. You want a thin, even coating, not a chocolate blob with a cookie hidden inside.
Use a toothpick to gently slide the cookie off the fork onto your prepared baking sheet. Work quickly but carefully—this is about precision, not speed.
Decorating Before the Clock Runs Out
Here’s where timing becomes critical. You have approximately 30-45 seconds before the chocolate starts setting and decorations won’t stick properly.
Immediately sprinkle your chosen decorations over the wet chocolate. Don’t be shy—you can always brush off excess once it sets. I like to use 2-3 different colors or types of sprinkles for visual interest.
Working quickly, add a small dollop of melted white chocolate to the bottom of a Reese’s cup and press it gently onto the center of the cookie. This is your ornament cap, so placement matters. If you’re off-center, you can gently adjust within the first few seconds.
The Chilling Phase That Seals the Deal
Once all your cookies are decorated, transfer the entire tray to the refrigerator. This is where patience becomes a virtue. Let them chill for at least 20-30 minutes—longer won’t hurt.
I’ve tested various setting times, and anything less than 20 minutes risks the chocolate remaining tacky. Room temperature setting takes 2-3 hours, which is fine if you’re not in a hurry, but refrigeration gives you finished cookies much faster.
Expert Tips From 9+ Batches of Testing
These insights come from actual mistakes, happy accidents, and careful observation over multiple testing sessions.
Temperature Troubleshooting
If your chocolate becomes too thick while working, microwave it for 10 seconds and stir well. I keep my bowl nearby and reheat as needed throughout the dipping process.
Conversely, if your chocolate seems too thin and runs off the cookies, it means you’ve added too much oil. The solution? Melt additional chocolate chips (without added oil) and stir them into your mixture to thicken it up.
Color Customization Options
While white chocolate is traditional and my personal favorite, I’ve successfully made these with milk chocolate and dark chocolate for variety. The milk chocolate version has a more subtle color contrast, while dark chocolate creates dramatic, sophisticated-looking cookies.
You can also tint white chocolate with oil-based food coloring (NOT water-based, which makes chocolate seize). A few drops of red or green creates pastel-colored coatings that are beautiful for themed parties.
Making These Ahead (Because Life Gets Crazy)
These Christmas Oreo ornaments are actually better when made 1-2 days in advance. The flavors meld, and the chocolate coating becomes perfectly firm without being overly hard.
Store them in an airtight container in the refrigerator for up to 10-12 days. Layer them between parchment paper sheets to prevent sticking. They also freeze beautifully for up to 2 months—just thaw in the refrigerator before serving.
Scaling Up for Large Gatherings
I regularly make triple batches for cookie exchanges and parties. The process is exactly the same, just requires more patience. Work in batches of 8 cookies at a time—this keeps your chocolate at the right temperature and prevents you from feeling rushed during decorating.
If making massive quantities, enlist help for the decorating phase. One person dips, another decorates and adds Reese’s cups. We turn it into a fun assembly line during our annual cookie-making party.
Creative Variations to Try
Once you master the basic technique, these variations add exciting twists without much additional effort.
Peppermint Bark Version
Crush 3-4 candy canes and mix the pieces into your melted white chocolate before dipping. The peppermint flavor transforms these into sophisticated peppermint bark cookies. Top with a mini York Peppermint Patty instead of a Reese’s cup for double mint impact.
Cookies and Cream Explosion
Use regular Oreos and dip them in melted cookies and cream chocolate (yes, this exists and it’s amazing). Top with crushed Oreo pieces mixed with your sprinkles for an ultra-chocolatey treat that cookie lovers go crazy for.
Salted Caramel Elegance
Drizzle caramel sauce over the white chocolate coating before it sets, then sprinkle with flaky sea salt. Replace the Reese’s cup with a Rolo candy for a sophisticated caramel-on-caramel situation that’s decidedly grown-up.
Peanut Butter Lover’s Dream
Use peanut butter cookies as your base instead of Oreos for an all-peanut-butter experience. Dip in peanut butter melting chocolate and top with a mini Reese’s cup. This variation has its own devoted following among my recipe testers.
White Chocolate Wonderland
For an all-white, winter wonderland aesthetic, start with Golden Oreos (the vanilla version), dip in white chocolate, and top with white chocolate candies or white pearl sprinkles. These look stunning on a silver platter and photograph beautifully.
Serving Suggestions That Impress
Presentation matters, especially during the holidays when we’re all trying to make things special.
Plating for Maximum Impact
Arrange these ornament cookies on a decorative platter or cake stand to make them the centerpiece of your dessert table. I like to intersperse them with fresh mint sprigs or small pine branches for a festive, natural look.
Create height variation by stacking a few cookies (the flat Oreo bottom makes this easy) or using a tiered serving stand. The visual interest draws people in.
Pairing These With Other Treats
These cookies pair beautifully with hot chocolate, coffee, or even a glass of cold milk. For adult gatherings, they’re unexpectedly delicious alongside Irish coffee or peppermint schnapps hot chocolate.
On a dessert spread, balance these rich, sweet cookies with fresh fruit, cheese plates, or lighter cookie options to give guests variety.
Gift Packaging Ideas
These make excellent homemade gifts. Package 4-6 cookies in a clear cellophane bag tied with festive ribbon. Add a handwritten recipe card and suddenly you have a thoughtful, personal gift that feels special.
I’ve also arranged them in decorative tins lined with tissue paper—they stack well and travel safely this way. For teacher gifts or neighbor thank-yous, they’re always enthusiastically received.
Troubleshooting Common Issues
Even with a simple recipe like this, things can go sideways. Here’s how to fix the most common problems.
Chocolate Won’t Stick to Oreos
This usually means your cookies are too cold or have moisture on the surface. Let refrigerated Oreos come to room temperature before dipping. If you’ve touched them with wet hands, wipe them dry with a paper towel first.
Reese’s Cups Keep Sliding Off
You’re not using enough chocolate “glue,” or the base chocolate hasn’t set enough before adding the top. Apply a generous dollop of melted chocolate to the Reese’s bottom and hold it in place for 5-10 seconds while the chocolate begins setting.
Chocolate Coating Looks Dull or Streaky
This is called blooming and happens when chocolate experiences temperature fluctuations. It doesn’t affect taste, but if appearance matters, try tempering your chocolate properly or use candy melts instead, which are more forgiving.
Cookies Are Too Fragile When Moving
You’re trying to move them before the chocolate has fully set. Be patient—wait the full 20-30 minutes in the refrigerator. Use a thin spatula to transfer set cookies if they’re sticking to parchment.
Storage and Food Safety
Proper storage ensures your cookies stay fresh and delicious throughout the holiday season.
Short-Term Storage
Keep these Christmas Oreo ornaments in an airtight container in the refrigerator for up to 10-12 days. Layer them between sheets of parchment paper to prevent them from sticking together.
Don’t store them at room temperature for extended periods—the white chocolate can become soft and the decorations may bleed or melt, especially in warm environments.
Long-Term Freezing
These freeze exceptionally well for up to 2 months. Place them in a single layer on a baking sheet and freeze until solid (about 1 hour), then transfer to a freezer-safe container with parchment paper between layers.
Thaw frozen cookies in the refrigerator overnight before serving. Never thaw at room temperature, as this can cause condensation that makes the chocolate coating sticky.
Food Safety Considerations
Since these contain no raw eggs or perishable ingredients (Reese’s cups are shelf-stable), they’re relatively safe. However, if you’re giving these as gifts or taking them to a party, include a note that they should be refrigerated for best quality.
If transporting in warm weather, use a cooler with ice packs. I learned this lesson after my cookies melted slightly during a 20-minute car ride on a sunny December afternoon.
Why This Recipe Works: The Science Behind the Magic
Understanding why these cookies work so well helped me troubleshoot issues and create better results.
The Structural Engineering of Oreos
Double Stuf Oreos provide the perfect structural base because their cream filling acts as a shock absorber. When you bite into these cookies, that creamy layer prevents the chocolate coating from shattering. Regular Oreos, with less filling, tend to crack more easily.
The cookie part itself remains crunchy even under chocolate because the cream filling creates a moisture barrier. This is why these stay fresh so long—the components don’t interact and break each other down.
White Chocolate Coating Chemistry
White chocolate is technically not “real” chocolate since it contains no cocoa solids, just cocoa butter, sugar, and milk solids. This gives it a lower melting point than dark or milk chocolate, making it perfect for coating applications.
Adding oil reduces the viscosity by disrupting the fat crystal structure, allowing the chocolate to flow smoothly and create a thin, even coating. Too much oil, however, prevents proper crystallization and you get a coating that never fully hardens—this is the science behind my earlier oil quantity recommendations.
The Temperature Sweet Spot
Melted chocolate needs to stay between 88-90°F for optimal coating consistency. Too hot and it’s too thin; too cool and it starts setting before you finish decorating. This narrow temperature window explains why you need to work quickly and why reheating periodically is necessary.
Frequently Asked Questions
Can I use milk chocolate or dark chocolate instead of white chocolate?
Absolutely! The process is identical with any chocolate type. Milk chocolate creates a sweeter, more traditional taste, while dark chocolate offers a sophisticated, less-sweet option that adults particularly enjoy. I recommend using higher-quality chocolate (60-70% cacao) for dark chocolate versions to avoid excessive bitterness.
How do I prevent the chocolate from getting too thick while working?
Keep your bowl of melted chocolate near your workspace and reheat it for 10-15 seconds every 5-6 cookies. The chocolate will naturally cool and thicken as you work, so periodic reheating maintains the right consistency. Adding an extra teaspoon of oil can also help if it gets too thick.
Can I make these without the Reese’s cups?
Yes, though they’ll lose that distinctive ornament cap appearance. Alternative toppings include Hershey’s Kisses, Rolos, malted milk balls, or even a large gumball. Some people prefer just decorating with sprinkles for a simpler look. The recipe works perfectly well either way.
Are these safe to ship as gifts?
They ship reasonably well if packed properly. Place cookies in a sturdy container with parchment between layers, then cushion the container with bubble wrap or packing peanuts. Ship with expedited delivery if possible, and warn recipients to refrigerate upon arrival. I’ve successfully shipped these across the country multiple times.
Can I make these dairy-free or vegan?
Traditional Oreos are accidentally vegan (surprisingly!), so you just need to swap the white chocolate for dairy-free white chocolate chips or vegan candy melts. Use vegan peanut butter cups (Justin’s makes good ones) or omit them entirely. The recipe works great with these substitutions.
Why did my chocolate turn grainy and seized?
Water is chocolate’s enemy. Even a drop of water can cause seizing (when chocolate turns grainy and clumpy). This happens if your bowl is damp, steam gets in, or you use water-based food coloring. Unfortunately, seized chocolate can’t be saved for coating—you’ll need to start with fresh chocolate. Make sure all your tools are completely dry.
How far in advance can I make these for a party?
These taste best within 10-12 days of making, though they’ll technically last longer. I recommend making them 2-3 days before your event for optimal freshness and flavor. The chocolate coating actually improves slightly after a day or two as the flavors meld together.
What’s the best way to clean up melted chocolate?
Let excess chocolate harden in bowls and on utensils, then pop it out in large pieces (I actually save this for melting later or eating as snacks). Wash remaining residue with very hot water and dish soap. Don’t pour melted chocolate down the drain—it will solidify and clog your pipes.
The Memories These Cookies Create
Here’s what I love most about this recipe: it’s become our family’s Christmas tradition. Every December, we clear the kitchen counter, blast holiday music, and spend an afternoon creating these together.
My kids now argue over who gets to place the Reese’s cups (we take turns). My daughter has perfected the sprinkle application technique. And my son has become the official chocolate melter, taking his job very seriously with the kitchen timer.
These cookies have appeared at every holiday gathering we’ve attended for the past three years. They’ve been teacher gifts, neighbor thank-yous, and cookie exchange favorites. Last year, someone from my kids’ school texted me in March asking if I’d make them for her birthday party—in March! That’s when I knew we’d created something special.
The beauty of these Christmas Oreo ornament cookies isn’t just how they look or taste (though both are excellent). It’s how they bring people together in the kitchen, create memories, and make the holidays feel magical without requiring advanced baking skills or hours of effort.
Make These Your New Holiday Tradition
If you’re looking for a festive cookie recipe that delivers wow-factor without stress, this is it. Whether you’re an experienced baker or someone who burns toast, these Christmas Oreo ornaments will make you look like a holiday hero.
The recipe is forgiving, customizable, and foolproof once you understand the basic techniques. The ingredients are affordable and readily available. And the results? Absolutely showstopping.
This holiday season, skip the complicated cookie recipes that require precise temperatures and specialized equipment. Make these instead. Your family will ask for them every year, guaranteed.
Ready to start your own tradition? Grab those Oreos, melt that chocolate, and create some magic. Then come back and tell me how they turned out—I love hearing about your creative variations and decorating choices!
For more holiday cookie inspiration, check out our pistachio NYC cookies or our show-stopping Creme Egg stuffed cookies that use similar dipping techniques. Happy holidays and happy baking! 🎄


